Linux Tutorial
Introduction
This page will cover some basic commands for Linux that can be used for your Linux based servers. If you followed the Website Tutorial: Using Amazon Web Services: EC2 Instance, you should have your very own Ubuntu Server that uses the Linux kernel. The basic commands from this tutorial can be used on your Ubuntu EC2 Instance Web Server and other systems that have the Linux kernel. You can also download Ubuntu from their website and install it on a hard drive or a virtual machine using VirtualBox. I will be using the Ubuntu Server on VirtualBox for these tutorials.
Installing Ubuntu Server
This section will be dedicated to showing how to install the Ubuntu Server on VirtualBox. If you have already installed your Ubuntu Server, please head on over to the Basic Commands section.
The first step is to download the Ubuntu Server and VirtualBox. Run VirtualBox and you should be greeted with the window below. Select New and give your Ubuntu Server a Name. Select Linux for Type and Ubuntu (64-bit) for Version.
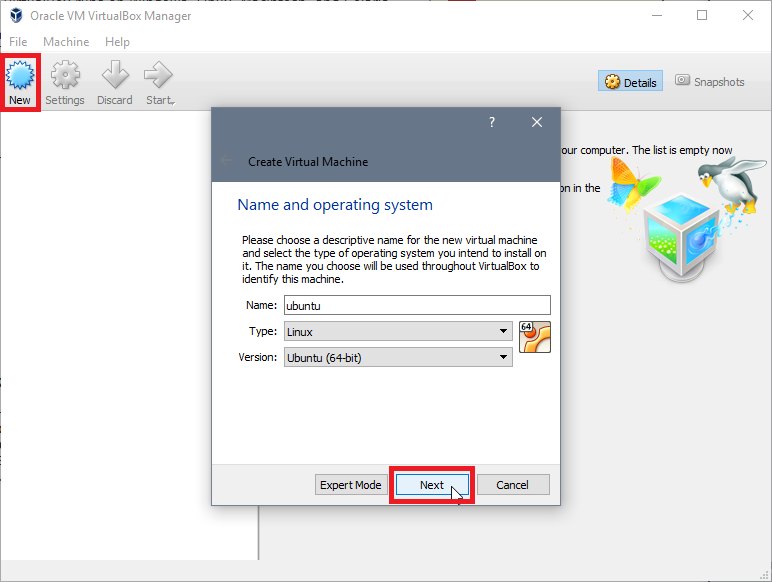
Virtual Machine Name
Select how much RAM you want to allocate to this virtual machine. I chose the default 1024 MB.
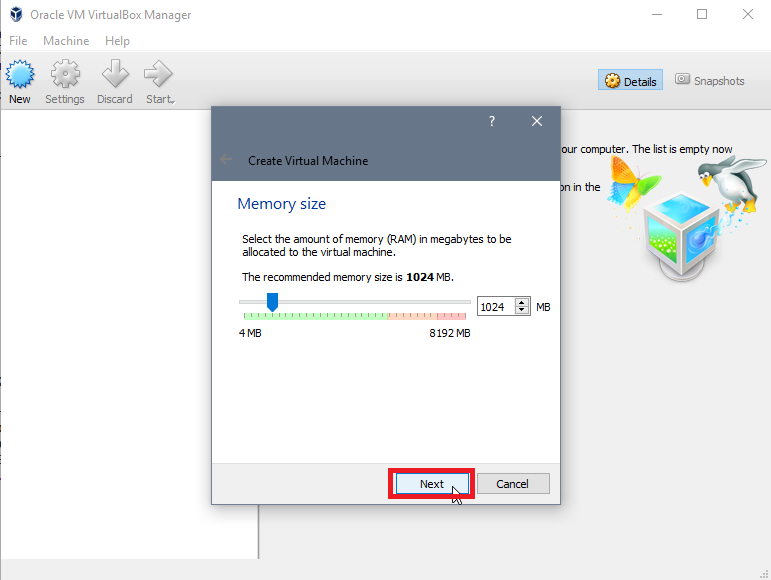
Virtual Machine RAM
Select Create a virtual hard disk now so that the virtual machine has some space to store its files.
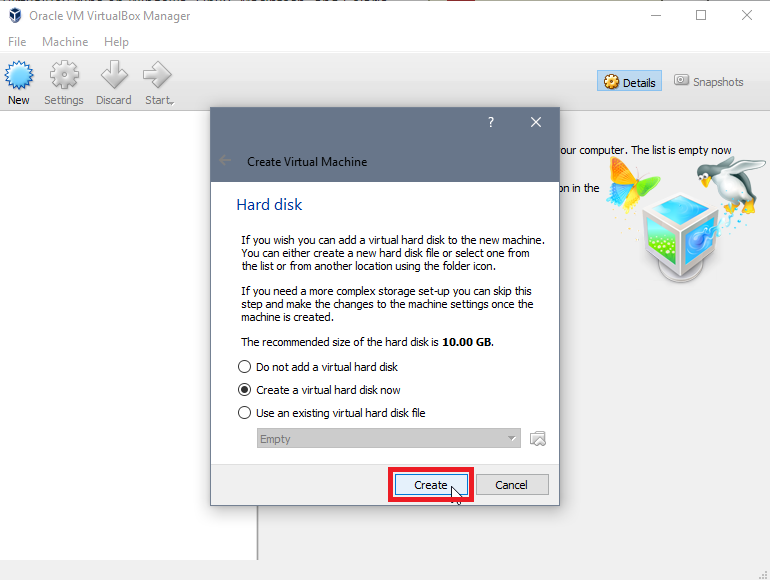
Virtual Machine Hard Disk
Select the file type for your hard disk. I kept mine as the default VDI. More information about the differences can be found here.
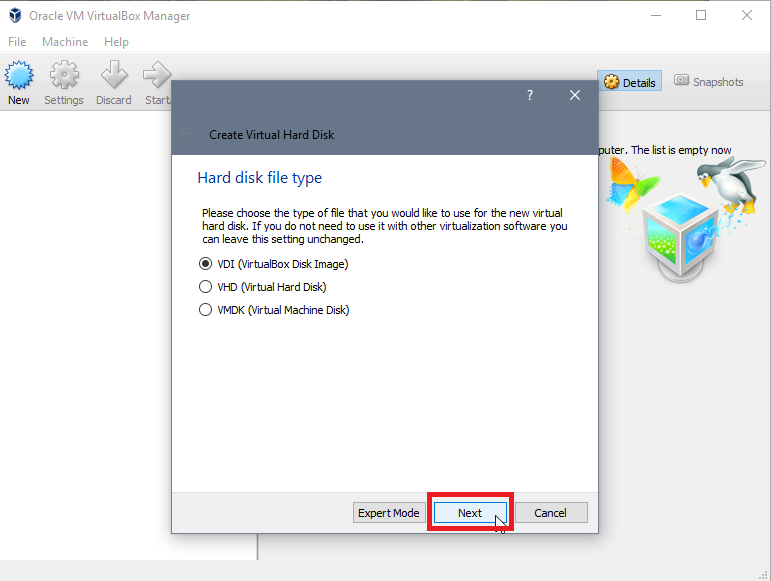
Virtual Machine Hard Disk Type
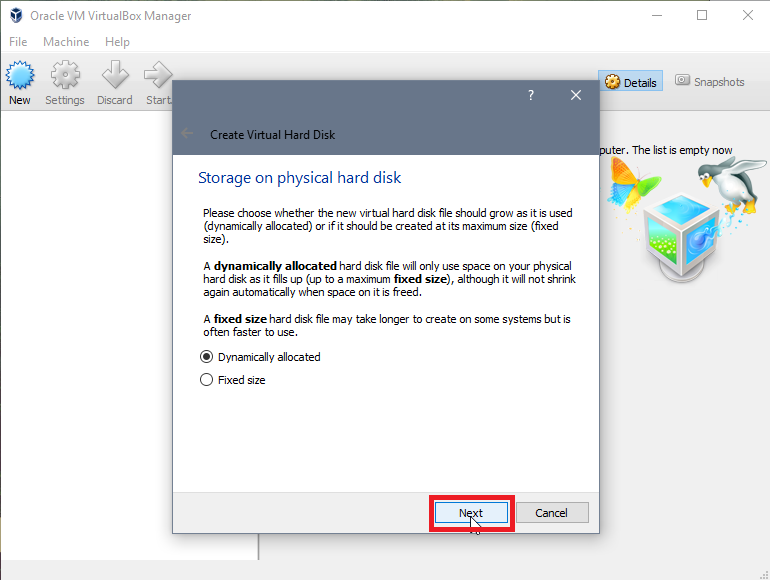
The hard disk can be dynamically allocated such that it doesn't take up space on your HDD until it needs to. This can be useful when you are running low on computer space. You can set it to a fixed size if you are not too worried about your HDD space.
Virtual Machine Hard Disk Storage
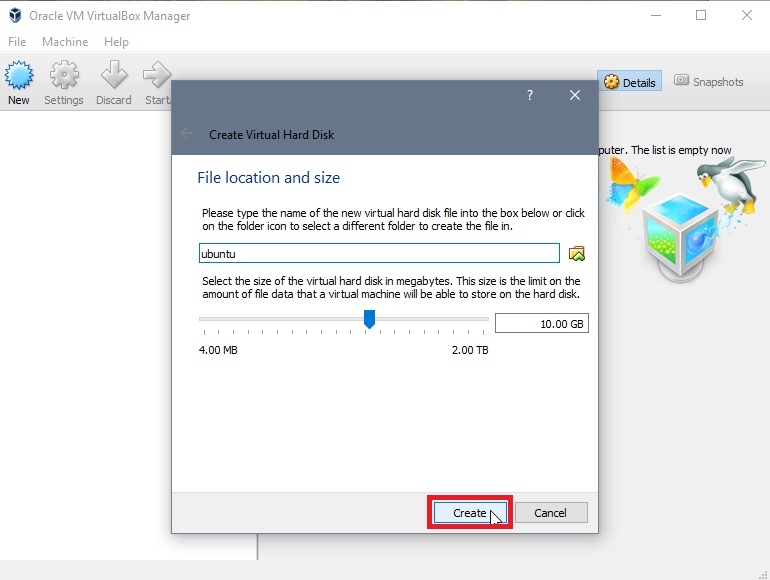
Select how much space you want the virtual machine to take up on your HDD. I chose the default 10 GB but you can adjust it to whatever you want.
Virtual Machine Hard Disk Storage Amount
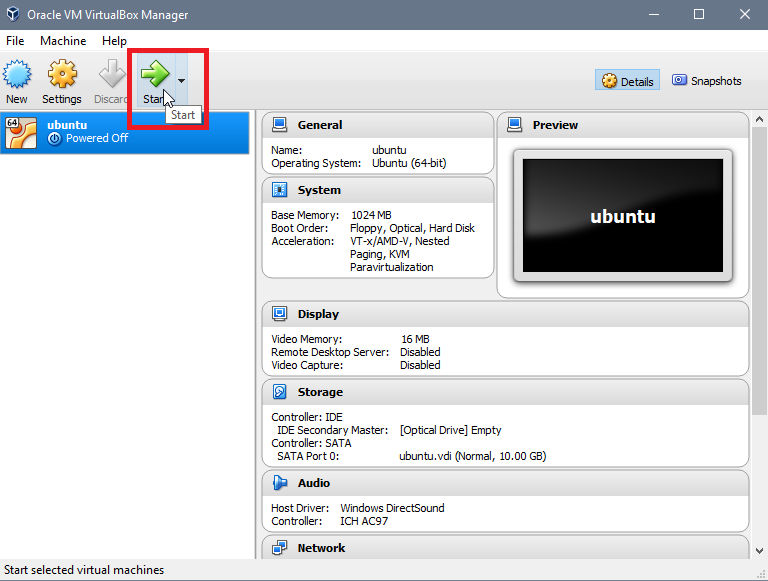
You should now be able to select Start to begin setting up your Ubuntu Server using VirtualBox.
Virtual Machine Start
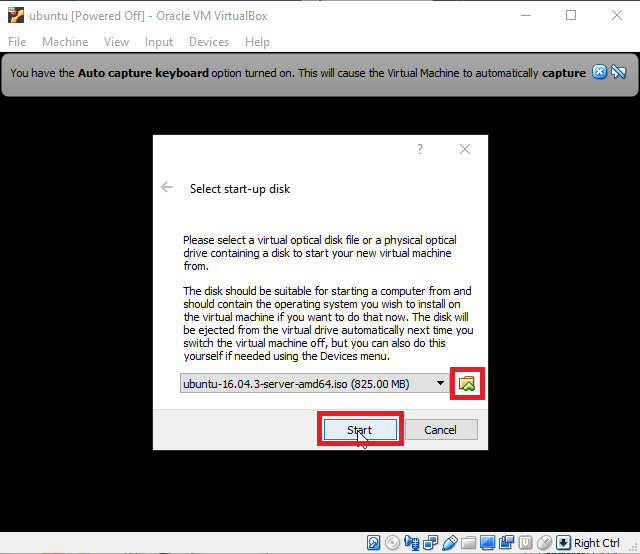
Browse for your Ubuntu Server file you downloaded earlier and select Start.
Virtual Machine Start
Select your language of preference. You will need to use the arrow keys for navigation. Using your mouse will not work.
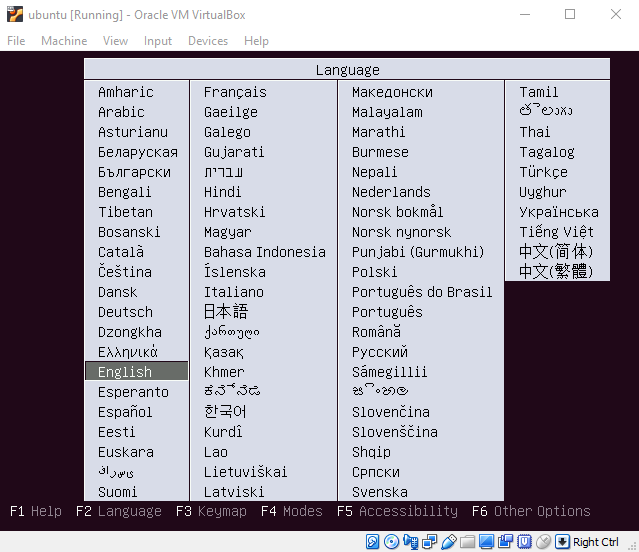
Ubuntu Language
Select the default choice of Install Ubuntu Server.
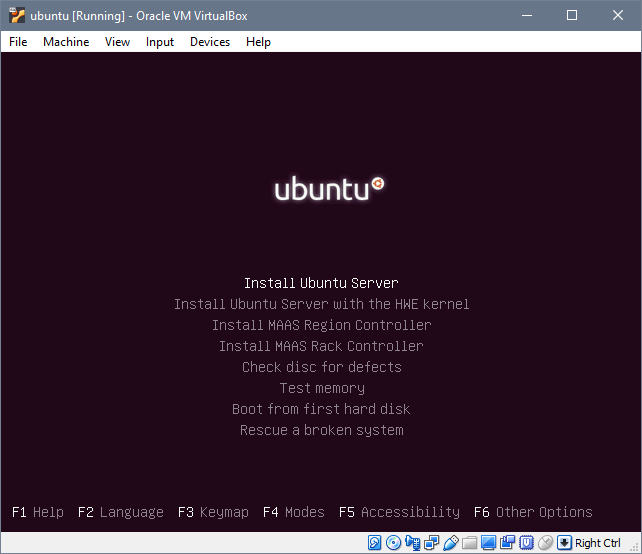
Install Ubuntu Server
Select your language of preference again.
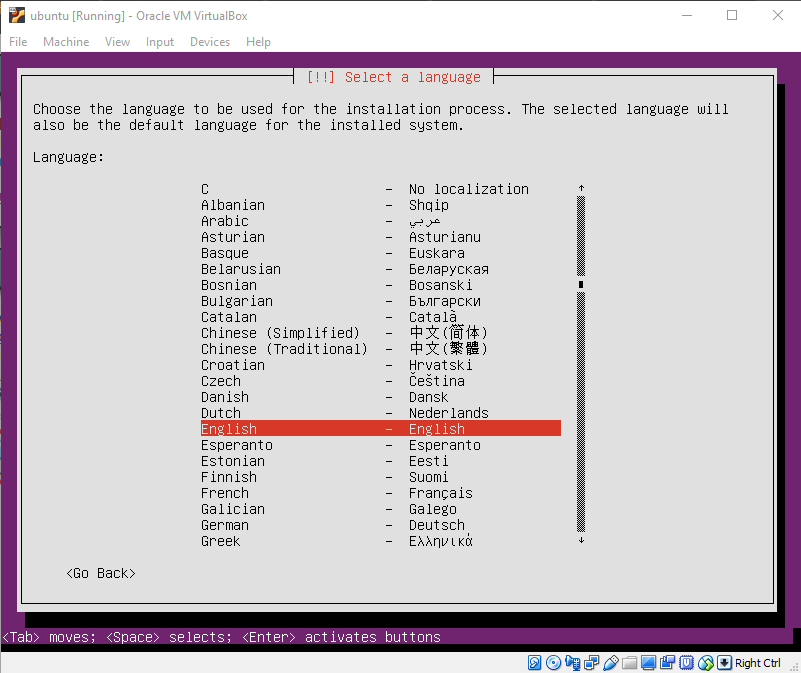
Ubuntu Language 2
Select your location in order to acquire the correct time zone.
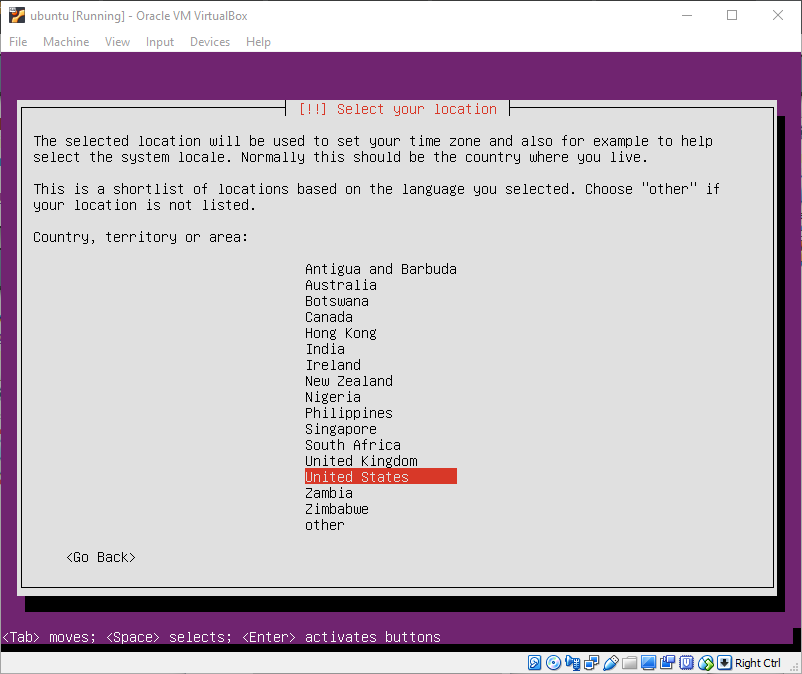
Select Your Location
You can configure your keyboard by typing in some keys or you can select a keyboard from the list available. Select No if you already know what kind of keyboard you have.
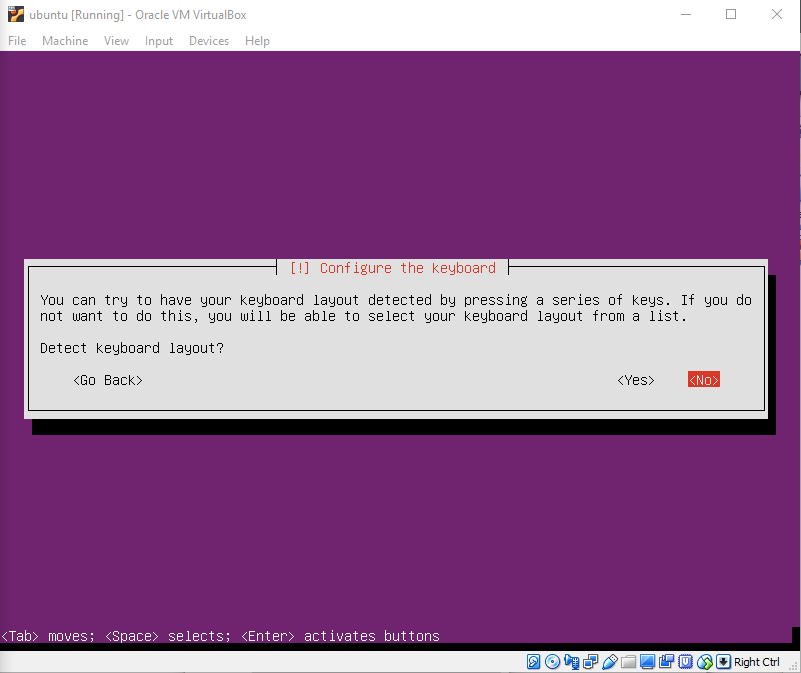
Keyboard 1
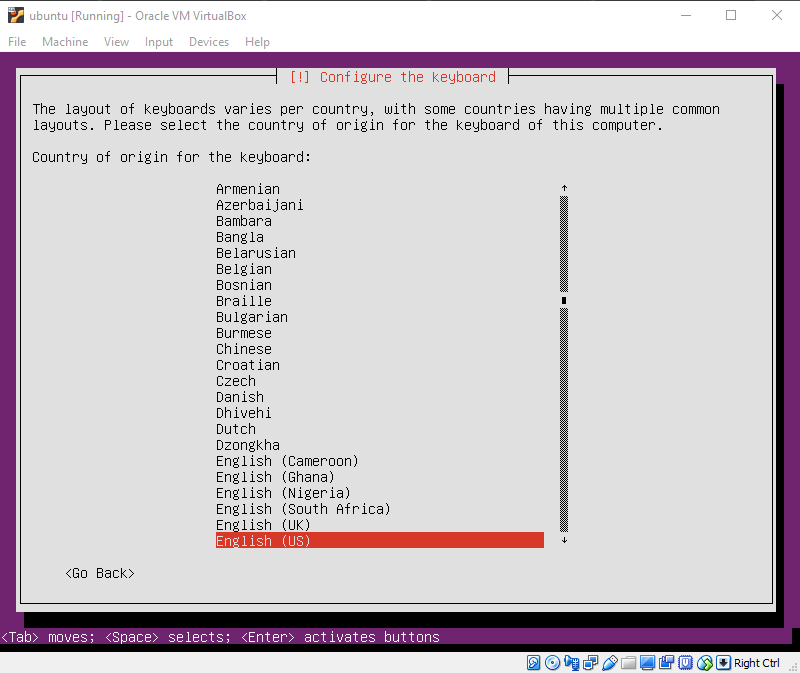
Keyboard 2
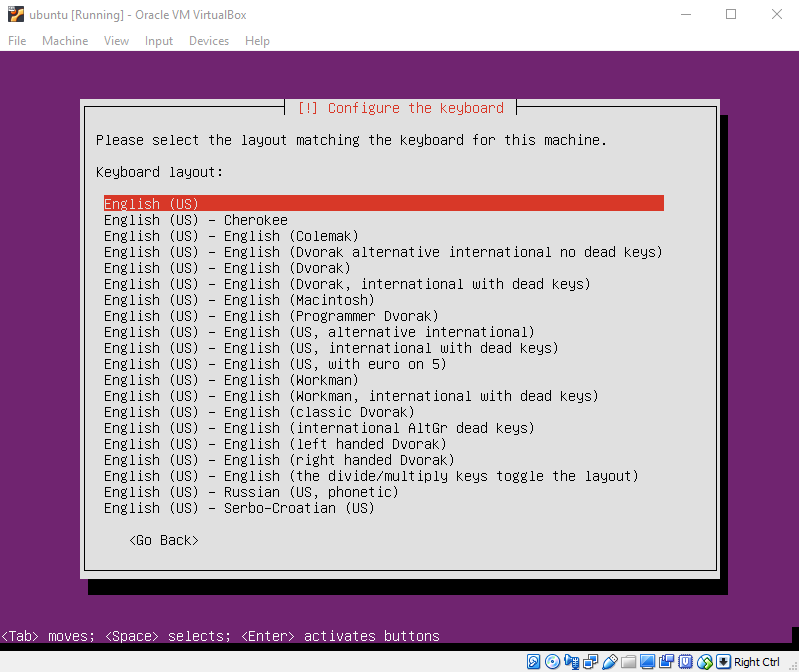
Keyboard 3
Select a hostname for your server. I named my server ubuntu.
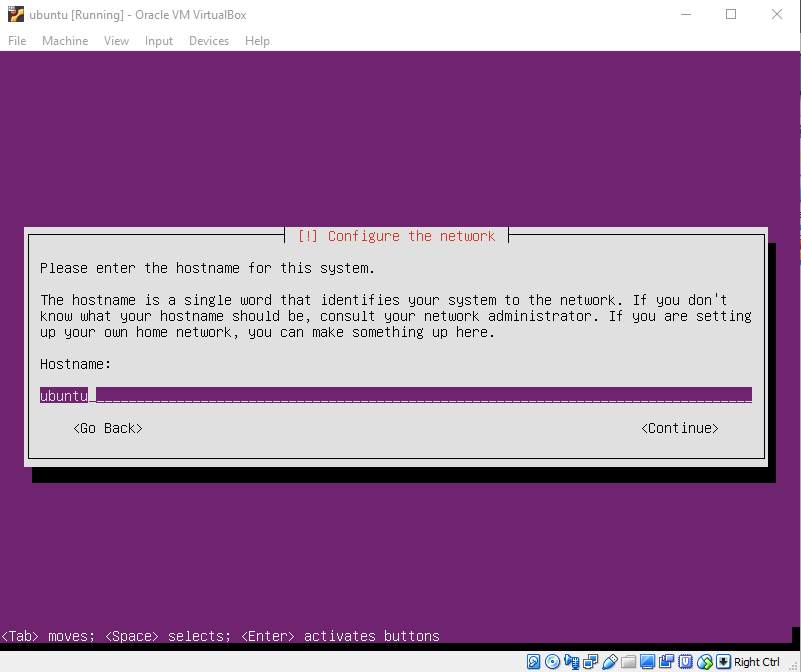
Hostname
Enter your name that will be associated with your username later on. I have entered Test User for this tutorial.
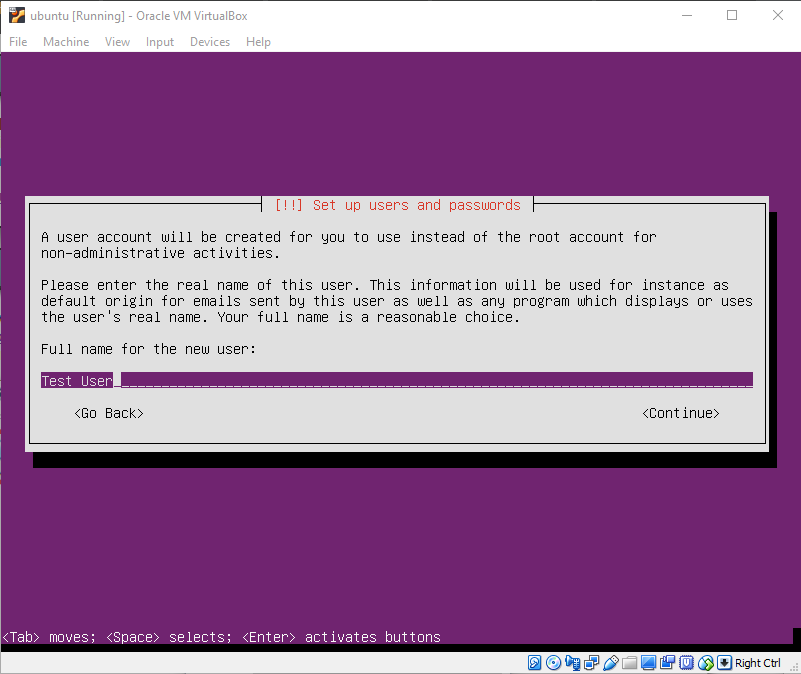
Full Name
Enter your username. I have selected test for this tutorial.
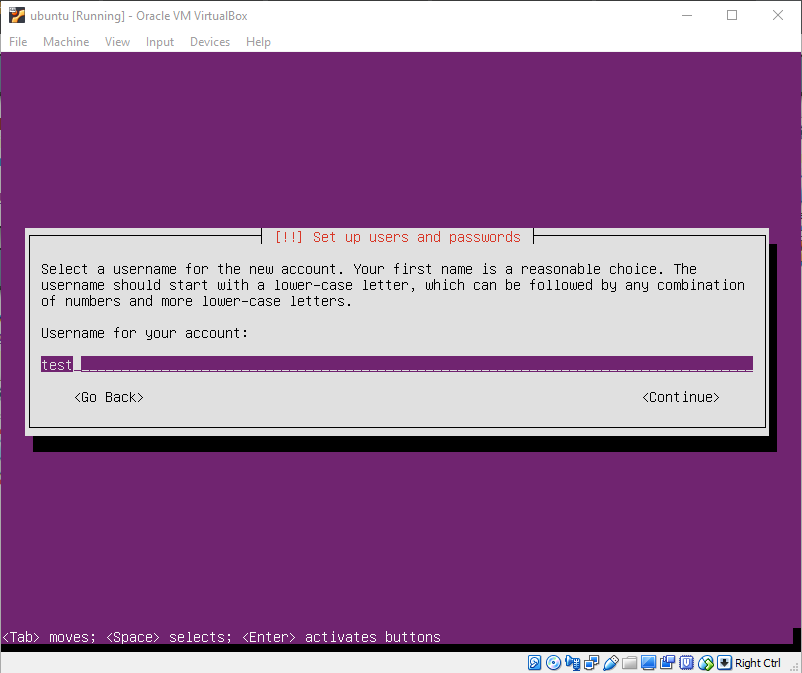
Username
Type in your password and confirm.
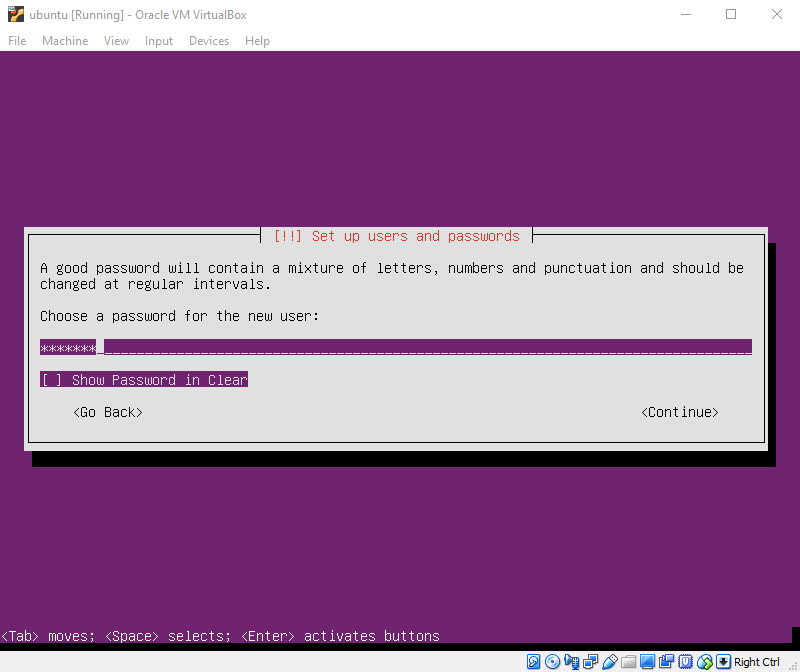
Password

Confirm Password
Select Yes to encrypt your files.
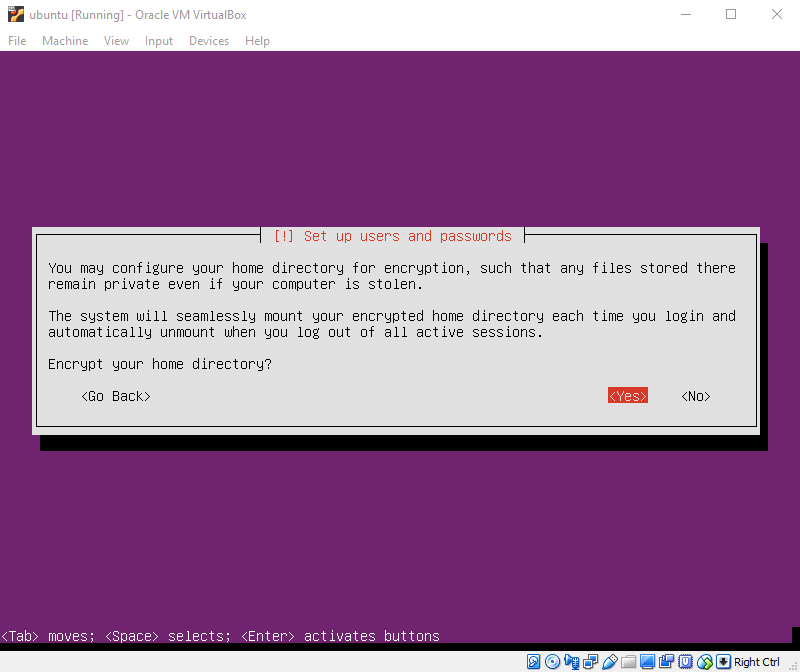
Encrypt
Confirm that your Time Zone is correct.
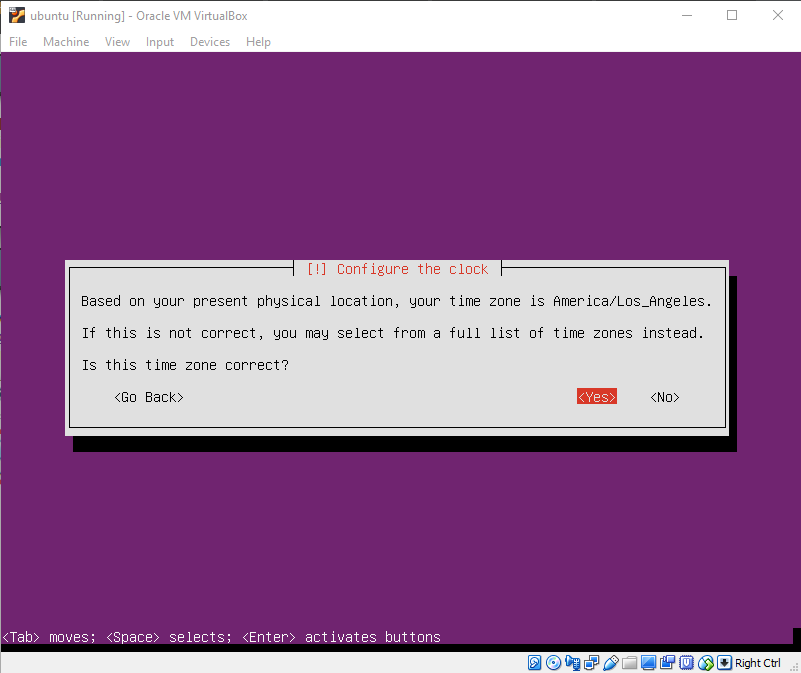
Time Zone
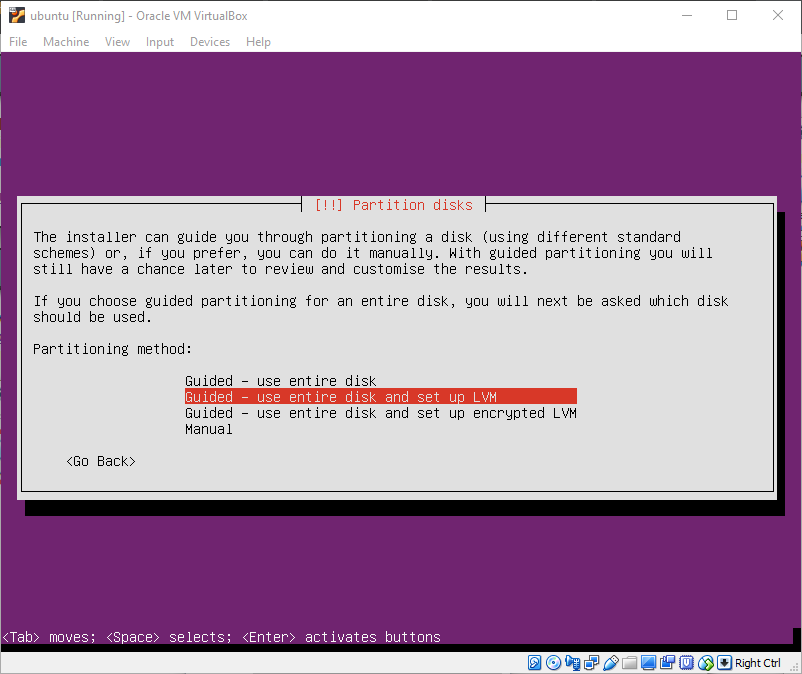
Select the default choice for the guided partition option.
Guided
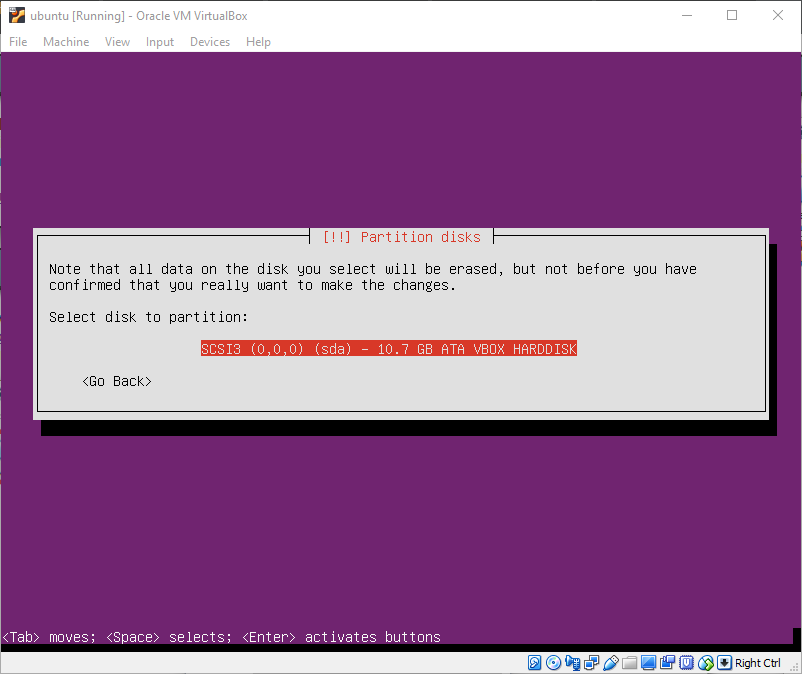
Select your VirtualBox HDD from before.
VirtualBox HDD
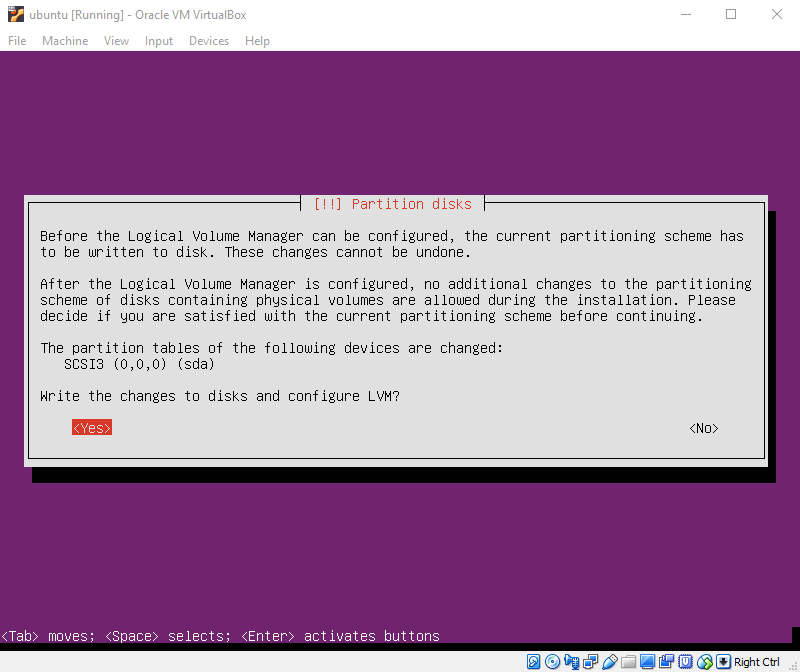
Select Yes to install the partitioning scheme.
Partitioning Scheme
Select how much space you want to allocate for the partition of this volume. The amount you selected during the VirtualBox configuration should be filled in by default.
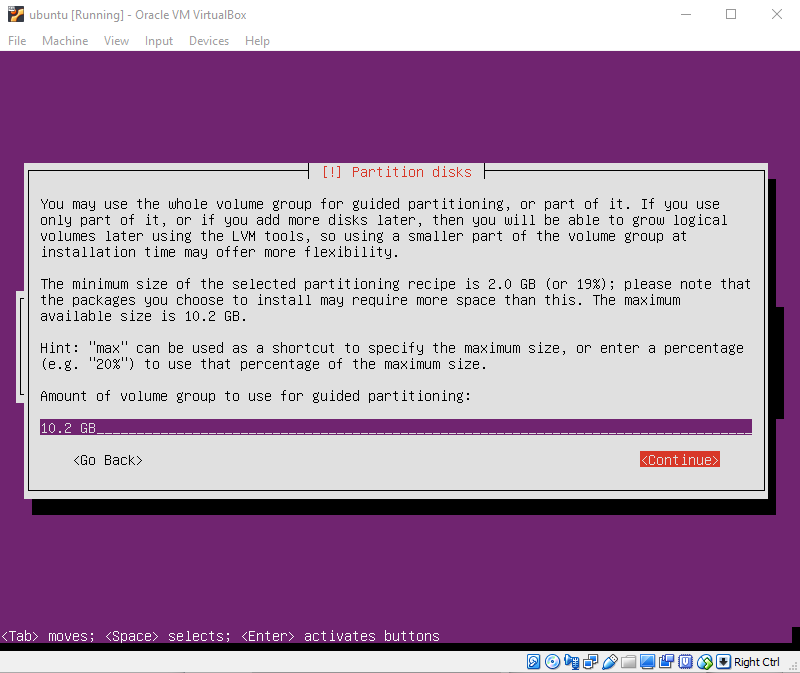
Amount of Volume
Select Yes to write partition changes.
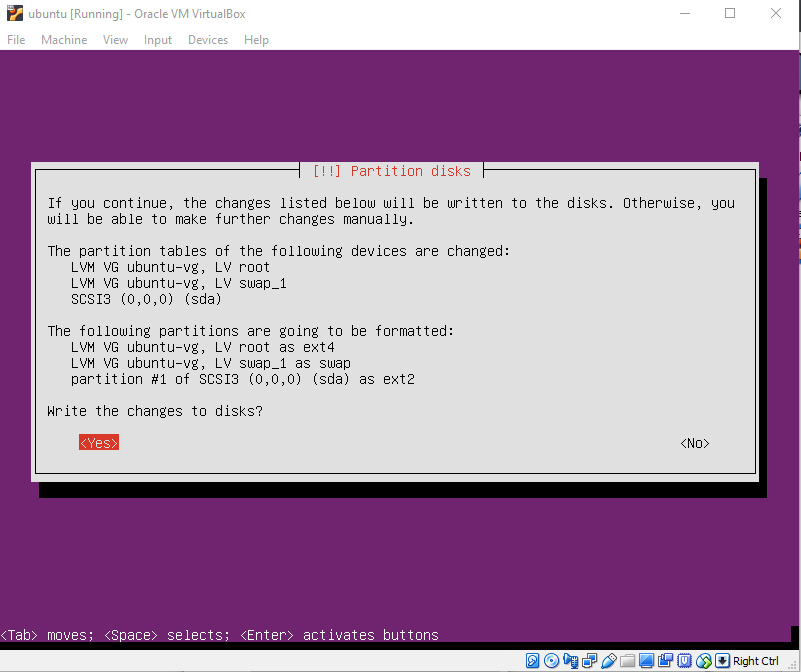
Partition Changes
You can leave the HTTP proxy information blank.
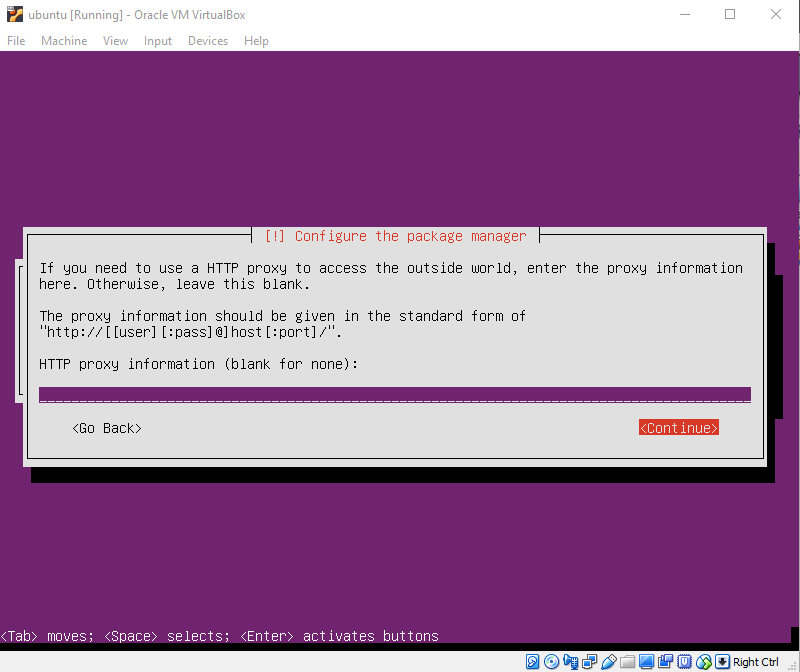
HTTP Proxy Information
Select the No automatic updates option to manually update your system.
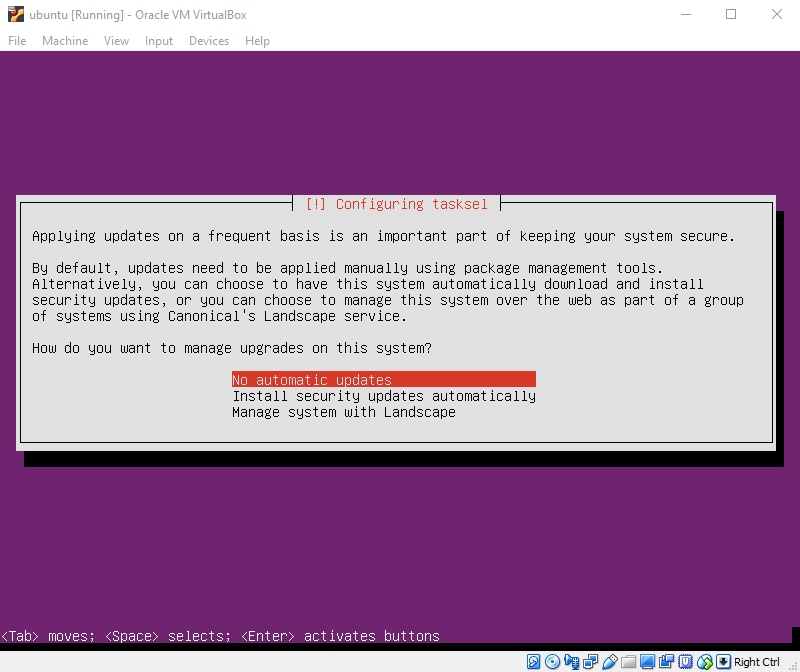
Updates
Choose which software packages you want preinstalled on the server. I am only installing the standard system utilities.
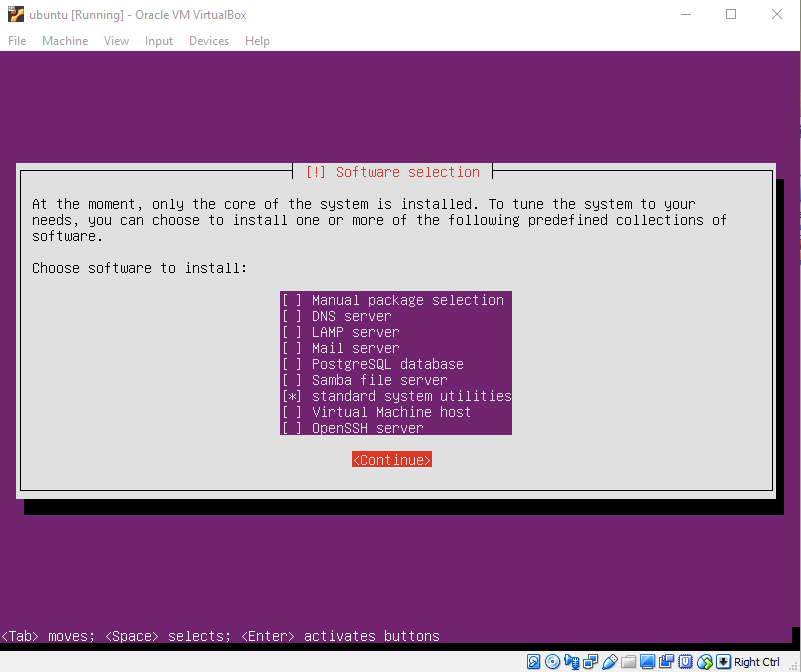
Software Selection
Install the GRUB Boot Loader.
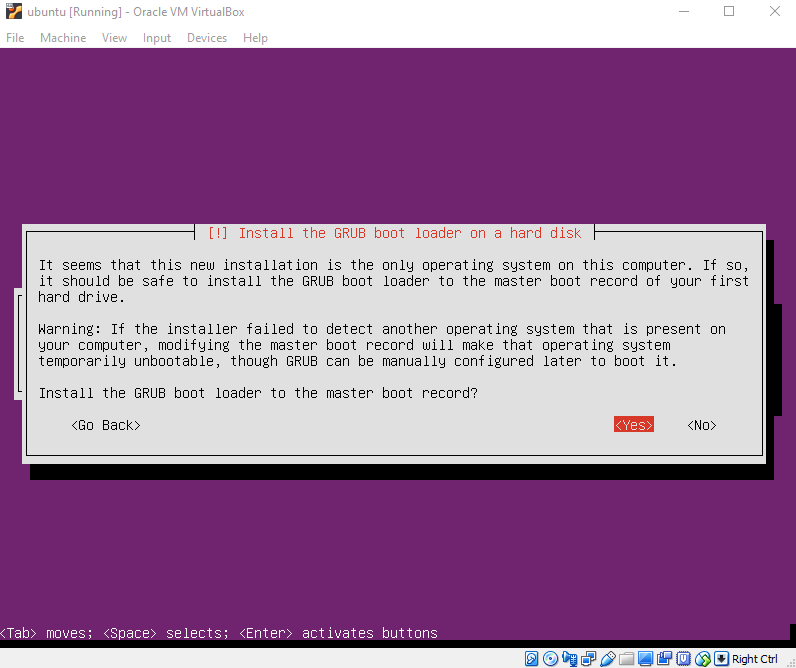
GRUB Boot Loader
Select Continue as the installation is now complete and wait for the Ubuntu Server to automatically reboot.
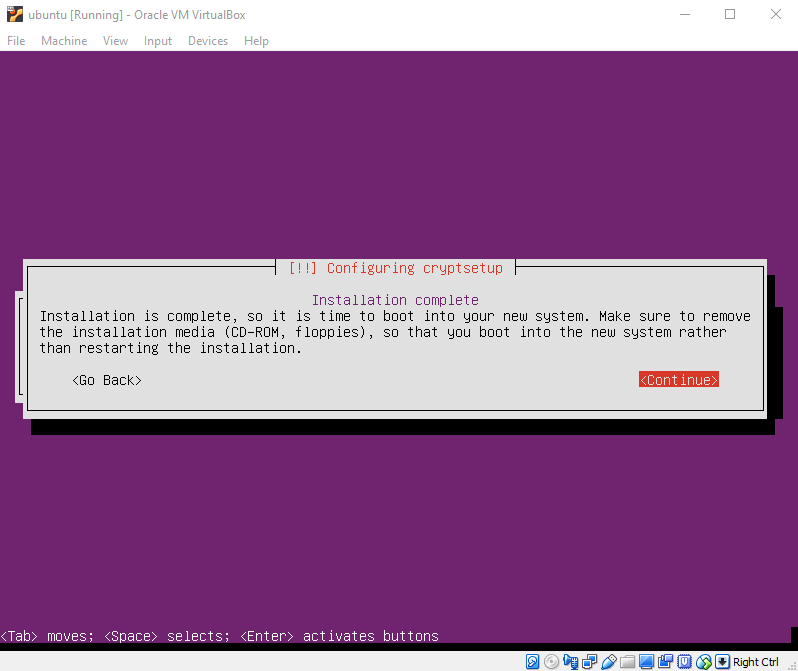
Installation Complete
You should now be able to sign in with your username and password. We have now installed the Ubuntu Server on a virtual machine using VirtualBox. You can now quit and log in to your Ubuntu Server with VirtualBox whenever you want.
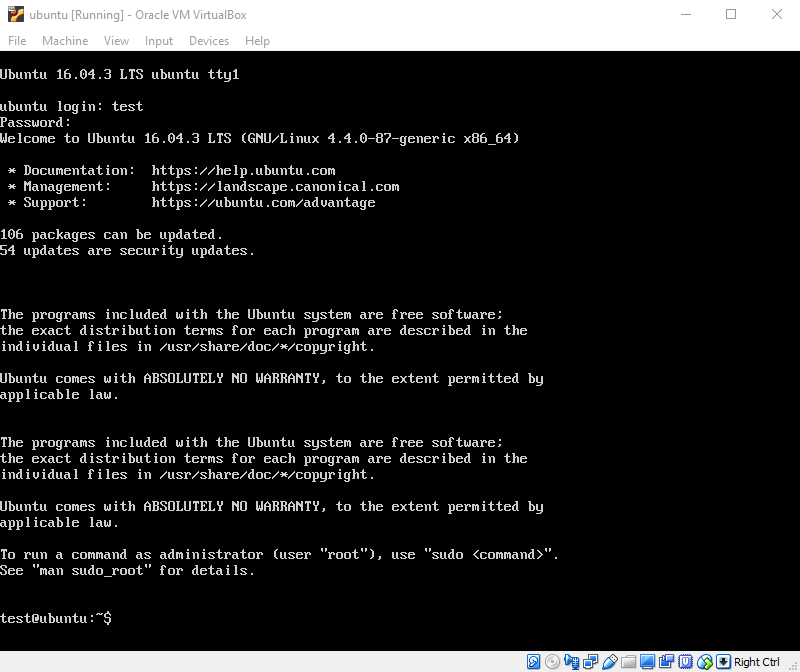
Log In
Basic Commands
This section will discuss some basic commands for systems that use the Linux kernel. Below is a list of commands that this tutorial covers.
- Clear (clear)
- Print Working Directory (pwd)
- Make Directory (mkdir)
- Change Directory (cd)
- Touch (touch)
- Move (mv)
- Copy (cp)
- Add User (adduser)
- List (ls)
- Permissions
- User Modification (usermod)
- Add Group (addgroup)
- Change Ownereship (chown)
- Change Mode (chmod)
- Visual Editor (vi)
Clear (clear)
The clear command allows you to clear the window in order to prevent cluttering of the terminal.
Input:
clear
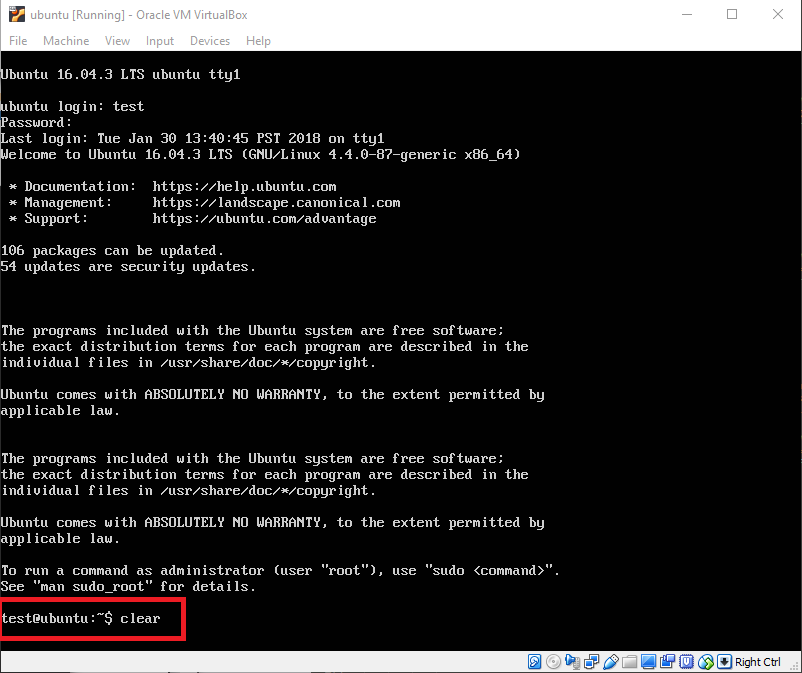
Clear
Output:
Cleared
Print Working Directory (pwd)
The print working directory pwd command states the current directory. By default you start off in your own user directory when you log in.
Input:
pwd
Output:

Show Current Directory
Make Directory (mkdir)
You can create directories by using the command mkdir DIRECTORYNAME. You can see the contents of the current directory by using the ls command. The image below shows an empty directory using the ls command before we make the directory. After the new directory testdirectory is created, it is seen using the ls command.
Input:
ls
								mkdir testdirectory
								ls
Output:

Make Directory
You can remove directories by using the command rmdir DIRECTORYNAME.
Input:
ls
								rmdir testdirectory
								ls
Output:

Remove Directory
However, you will get an error if the directory is not empty.
Input:
rmdir testdirectory
Output:

Remove Directory Not Empty
You would then need to use the remove command (rm) along with the recursive (-r) option rm -r DIRECTORYNAME to remove the directory if it is not empty.
Input:
rm -r testdirectory
Output:

Remove Directory with rm -r
Change Directory (cd)
The change directory cd DIRECTORYNAME command allows you to navigate through directories. The input below takes me to the directory testdirectory. I have also made multiple test directories within testdirectory to illustrate how one can keep navigating further into other directories.
Note: One can press tab in order to autocomplete a file or directory name.
Input:
cd testdirectory
Output:

Change Directory
Input:
cd testdirectory/testdirectory2/testdirectory3
Output:

Change Directory Multiple
You can go up one directory by using the cd .. command or multiple directories cd ../../.. and so on.
Input:
cd ..
Output:

Go Up One Directory
Input:
cd ../../..
Output:

Go Up Multiple Directories
Typing cd ../../../../../.. can be a hassle so you can also use the cd ~ command to take you to your home directory. This command can be used in whichever directory you are currently in.
Input:
cd ~
Output:

Change to Home Directory
The cd ~ command can also be useful if you are switching to directories within your home directory by changing the command to cd ~/. I have made two directories named testdirectory and anotherdirectory that are within my home directory. In the image below, I navigate to the directory testdirectory/testdirectory2/testdirectory3. I then use cd ~/anotherdirectory/anotherdirectory2 to navigate to the directory anotherdirectory/anotherdirectory2 which is within my home directory.
An error occurs if the change directory command omitted the ~ as this would mean you are looking for the directory anotherdirectory/anotherdirectory2 within the directory testdirectory/testdirectory2/testdirectory3 instead of within the home directory.
Input:
cd ~/anotherdirectory/anotherdirectory2
Output:

Change to Directories Within Home Directory

Change to Directories Within Home Directory Error
The cd / command takes you to the root directory of the server which is the directory that contains all directories. This can also be used in whichever directory you are currently in. In the second image, I switch from the directory testdirectory/testdirectory2/testdirectory3 to my home directory home/test using the cd / command.
Input:
cd /
Output:

Root Directory
Input:
cd /home/test
Output:

Change to Directories Within Root Directory
Touch (touch)
The touch FILENAME command creates an empty file in the current directory. You can also create files in other directories by stating the directory name before the file name as seen in the second image. If you want to create a certain file type, just include the file extension in the name, e.g. file1.html instead of file1.
Note: A directory and file cannot have the same name as seen in the third image.
Input:
touch file1
Output:

Create a File
Input:
touch testdirectory/file2
Output:

Create a File in Another Directory
Input:
mkdir file1
Output:

Same Name
The rm command also works with files. You can also delete files in other directories by stating the directory name before the file name as seen in the second image.
Input:
rm file1
Output:

Remove a File
Input:
rm testdirectory/file2
Output:

Remove a File in Another Directory
Move (mv)
The move mv command allows you to move a file by stating a directory name. The first image shows the file file1 moving from the home directory to the directory anotherdirectory. The second image shows the file file1 moving from the directory anotherdirectory to the home directory using the tilde ~ character.
Input:
mv file1 anotherdirectory
Output:

Move a File
Input:
mv file1 ~
Output:

Move a File to Home Directory
The move mv command also allows you to rename a file by stating a file name. The first image shows the file file1 being renamed to file10. The second image shows the file file1 moving from the home directory to the directory anotherdirectory and being renamed to file10. The third image depicts file file10 moving back to the home directory and being renamed to file1.
Input:
mv file1 file10
Output:

Rename a File
Input:
mv file1 anotherdirectory/file10
Output:

Move and Rename a File
Input:
mv file10 ~/file1
Output:
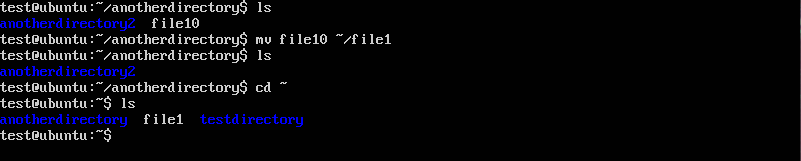
Move Home and Rename a File
Copy (cp)
The copy cp command allows you to copy files. The first command copies file1 to file10. The second command copies file10 to the directory anotherdirectory. The third command copies file10 to the directory anotherdirectory and renames it file20.
Input:
cp file1 file10
Output:

Copy a File
Input:
cp file10 anotherdirectory/
Output:

Copy a File to Directory
Input:
cp file10 anotherdirectory/file20
Output:

Copy a File to Directory and Rename It
The copy cp command can also be used to copy directories by using the recursive -r option. The first command copies the directory anotherdirectory and all of its contents to the directory testdirectory. If you only want to copy the contents but not the directory itself, you will need to add the dot . to the end of the folder you are copying as seen in the second command. You can also copy the contents to another directory that doesn't exist by using the third command.
Input:
cp -r anotherdirectory/ testdirectory/
Output:

Copy a Directory to Another Directory
Input:
cp -r anotherdirectory/. testdirectory/
Output:

Copy a Directory's Content to Another Directory
Input:
cp -r anotherdirectory/ yetanotherdirectory/
Output:

Copy a Directory's Content to Another Directory That Hasn't Been Created
Add User (adduser)
If you want to enable other people to use your server, you can add users using the adduser command. The command below adds a user with the username anotheruser. You will need to add the superuser do sudo command to the beginning of the adduser command as adding a user requires heightened permissions. You will then be asked for your password to confirm this action then you will be asked to create a password for the new user.
Input:
sudo adduser anotheruser
Output:

Add User
You can find the new user's home directory if you go the /home directory which contains all users' home directories.
Input:
cd /home
Output:

User Home Directory
You can delete a user by using the userdel command. Using userdel USERNAME deletes the user while userdel -r USERNAME deletes the user and their home directory.
Input:
sudo userdel anotheruser
								sudo userdel -r anotheruser
Output:

Delete User

Delete User and Their Home Directory
List (ls)
The ls command lists the contents of a directory. We are in the user test's home directory in the image below.
The first command (ls) lists the files, links, and directories.
The second command (ls -l) lists the files, links, and directories in the long format (-l) with more metadata shown.
The third command (ls -lh) lists the files, links, and directories in the long format (-l) with human readable (-h) file sizes.
- The first column contains the permissions with the first character signify if it's a file, link, or directory represented by a -, l, or d respectively.
- The second column is the link count.
- The third column is the owner of that file, link, or directory.
- The fourth column is the group of that file, link, or directory.
- The fifth column is the file size.
- The sixth column is the date of last modification.
- The last column is the name of the file, link, or directory.
Input:
ls
						    ls -l
							ls -lh
Output:
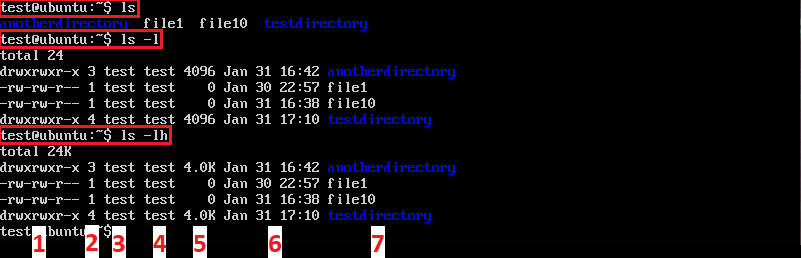
Contents of a Directory
Permissions
As seen in the image below, the owner and group of the contents in a user's home directory is the user. We can see that the owner and group for the test user home directory is test. The first column states what kind of permissions certain users have for that directory or file. The permissions are ordered OWNER-GROUP-OTHERS with three possible letters each. So here the OWNER:test has rwx permissions which are read, write, and execute. The GROUP:test has --- permissions which are none. The OTHERS also have --- permissions which are none. Since the owner of the test user home directory is test and we were logged in as test, creating files and directories did not cause any errors. The limited permissions for GROUP and OTHERS is due to test being the first user created.
If we take a look at the anotheruser user home directory, the OWNER:anotheruser has rwx permissions which are read, write, and execute. The GROUP:anotheruser has r-x permissions which are read and execute only. The OTHERS also have r-x permissions which are read and execute only. The explanations for each permission can be seen below.
- For Files:
- Read allows you to look into the file.
- Write allows you to edit the file.
- Execute allows you to run the file.
- For Directories:
- Read allows you to see the files within the directory.
- Write allows you to create, edit, and delete files within the directory and delete the directory.
- Execute allows you to enter the directory using the change directory command (cd \DIRECTORYNAME).
Input:
ls -lh
Output:

Home Permissions
If the user test tries to create file or directory in anotheruser's home directory an error will occur since the user test does not have write permissions as the user test is not the owner of that directory.
Input:
touch file1
						    mkdir directory1
Output:

Permission Error
Using the superuser do sudo command allows a user to have root permissions and edit anything even if they are not the owner or part of the group. A regular user or a user not using sudo cannot edit those files. Note that using sudo causes the owner and group of the file or directory to be root.
Input:
sudo touch file1
						    sudo mkdir directory1
Output:

Use sudo to Create File and Directory
However, not all users are part of the sudo group and can use the sudo command. The command groups USERNAME allows you to see what groups a certain user belongs to. As seen below, the user test belongs to sudo and a bunch of other groups while the user anotheruser only belongs to their own group: anotheruser.
Input:
groups test
						    groups anotheruser
Output:

Groups
Use the command exit to log out of the current user and enter your second user credentials. Notice the username changed before the @ in the terminal.
Input:
exit
Output:
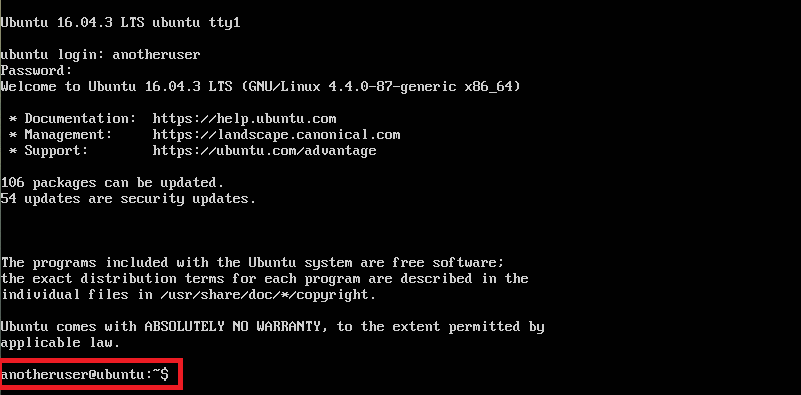
Switch Users
You can change the password of a user using the password passwd command so that it is not the same password that was assigned on the creation of the user.
Input:
passwd
Output:

Change Password
If the user anotheruser tries to change directories into the user test's home directory, they will get denied due to the OTHERS having --- no permissions. If the user anotheruser tries to use sudo and is not the in sudo group, the incident will be reported.
Input:
cd test/
								sudo cd test/
Output:

Reported
User Modification (usermod)
The user modification usermod command allows sudo to modify users. Adding a user to a group is one of those modifications. The command below modifies the user (usermod) and appends (-a) the group (-G) sudo to the user anotheruser's groups.
Input:
sudo usermod -a -G sudo anotheruser
Output:

Add User to Group
A user can also be removed from a group using the deluser command.
Input:
sudo deluser anotheruser sudo
Output:

Delete User from Group
Add Group (addgroup)
A group can be created so that both users (test and anotheruser) can modify files without the sudo command. A group is created using the addgroup command. We then add both users (test and anotheruser) to the group bothusers.
Input:
sudo addgroup bothusers
								sudo usermod -a -G bothusers test
								sudo usermod -a -G bothusers anotheruser
Output:
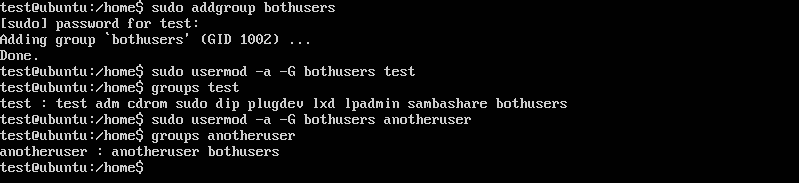
Add Group bothusers
A directory is created titled directoryforbothusers with the sudo command. However, since it was created with the sudo command, the owner and group is root.
Input:
sudo mkdir directoryforbothusers
								ls -lh
Output:

Directory for Both Users
Change Ownership (chown)
The change onwership chown command allows sudo to change the owner or group of a file. In the image below, the owner and the group of the directory directoryforbothusers is changed to test and bothusers respectively. Anything that would have been in the directory directoryforbothusers would have also changed ownership due to the recursive (-R) option.
Note: If you wanted to change the owner of directory only it would be sudo chown -R USERNAME DIRECTORYNAME. If you wanted to change only the group it would be sudo chown -R :GROUPNAME DIRECTORYNAME.
Input:
sudo chown -R test:bothusers /home/directoryforbothusers/
Output:
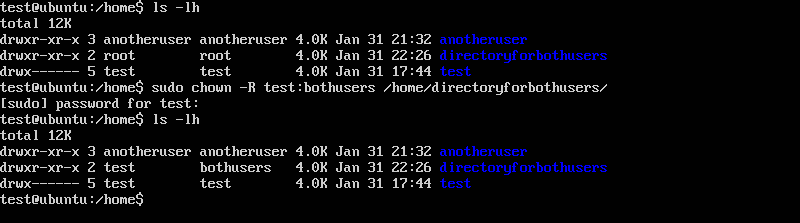
Change Ownership
Change Mode (chmod)
The change mode chmod command allows sudo to change permissions of a file. In the image above, the user test has rwx (read, write, and execute) permissions since the user test is the owner of the directory directoryforbothusers. However, we still need to give write permissions to the group bothusers as it currently only has r-x (read and execute) permissions so the user anotheruser cannot create files in the directory directoryforbothusers.
We will change permissions with the change mode chmod command. The three numbers correlate to OWNER-GROUP-OTHERS. The numbers and their corresponding permissions can be seen below. Here we are giving read, write, and execute permissions to both the OWNER and GROUP while only giving read and execute permissions to OTHERS.
- 7: Read, write, and execute.
- 6: Read and write.
- 5: Read and execute.
- 4: Read.
- 3: Write and execute.
- 2: Write.
- 1: Execute.
- 0: None.
Input:
sudo chmod -R 775 /home/directoryforbothusers/
Output:
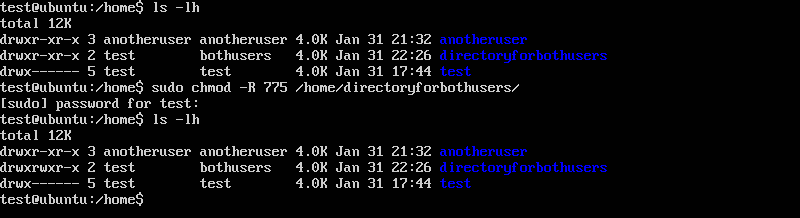
Change Mode
Now both users (test and anotheruser) can add files to the directory directoryforbothusers without the sudo command.
Input:
touch file1
Output:

Create File in directoryforbothusers
The user anotheruser can also create files in the directory directoryforbothusers without the sudo command due to the modified group permissions.
Input:
touch file2
Output:

Create Another File in directoryforbothusers
Now both users can edit each other's files. Below I am deleting file1 which is owned by the user test when I am signed in as the user anotheruser. Since it is owned by the user test, it will ask the user to confirm the deletion.
Input:
rm file1
Output:

Delete Another User's File
Visual Editor (vi)
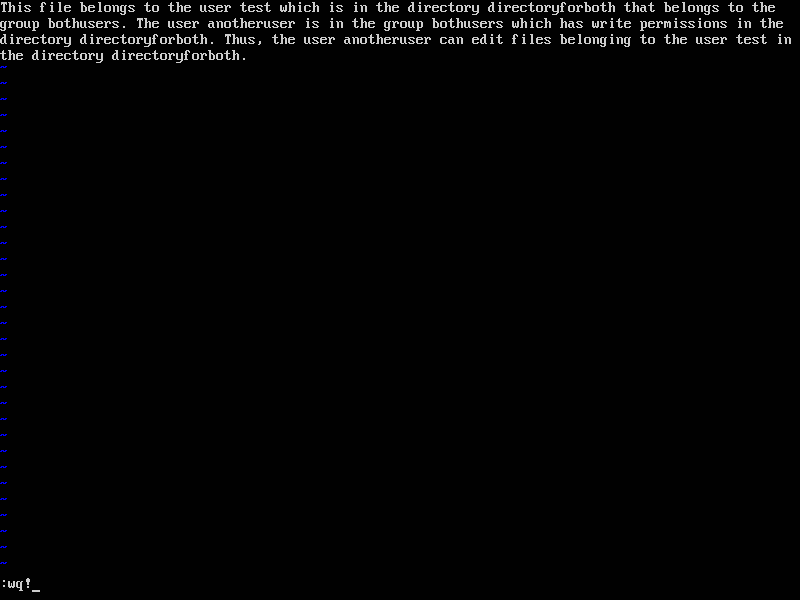
The visual editor vi is the default text editor in Linux. Enter the command vi FILENAME in order to start editing a file. You will now be in the visual editor and be able to edit the specified file. Start by pressing the letter "i" on your keyboard and the text "-- INSERT --" should now appear at the bottom of the terminal signifying you can begin inserting text. Once done, press the "ESC" key to exit the "-- INSERT --" mode. After you have pressed the "ESC" key, you should be able to type :wq which allows you to write/save (w) and quit (q) the file. Since we are editing a different user's file within a group we have write permissions in, we will need to add the override command (!) such that we write wq!. Hit enter and you should have exited the visual editor. If the ls -lh command is entered, one can see that the file ownership for file1 has changed from user test to user anotheruser.
Input:
vi file1
Output:

Edit Another User's File
Edit Another User's File 2
Input:
i
Output:
-- INSERT -- Mode
Input:
This file belongs to the user test which is in the directory directoryforboth that belongs to the group bothusers. The user anotheruser is in the group bothusers which has write permissions in the directory directoryforboth. Thus, the user anotheruser can edit files belonging to the user test in the directory directoryforboth.
Output:
Editing File
Input:
"Press the ESC Key"
Output:
ESC Key
Input:
:wq!
Output:
Write and Quit
Input:
ls -lh
Output:

Change Ownership
The clear command allows you to clear the window in order to prevent cluttering of the terminal.
Input:clear
Clear
Output:
Cleared
The print working directory pwd command states the current directory. By default you start off in your own user directory when you log in.
Input:pwd
Output:
Show Current Directory
Make Directory (mkdir)
You can create directories by using the command mkdir DIRECTORYNAME. You can see the contents of the current directory by using the ls command. The image below shows an empty directory using the ls command before we make the directory. After the new directory testdirectory is created, it is seen using the ls command.
Input:
ls
mkdir testdirectory
ls
Output:
Make Directory
You can remove directories by using the command rmdir DIRECTORYNAME.
Input:
ls
rmdir testdirectory
ls
Output:
Remove Directory
However, you will get an error if the directory is not empty.
Input:
rmdir testdirectory
Output:
Remove Directory Not Empty
You would then need to use the remove command (rm) along with the recursive (-r) option rm -r DIRECTORYNAME to remove the directory if it is not empty.
Input:
rm -r testdirectory
Output:
Remove Directory with rm -r
Change Directory (cd)
The change directory cd DIRECTORYNAME command allows you to navigate through directories. The input below takes me to the directory testdirectory. I have also made multiple test directories within testdirectory to illustrate how one can keep navigating further into other directories.
Note: One can press tab in order to autocomplete a file or directory name.
Input:
cd testdirectory
Output:
Change Directory
Input:
cd testdirectory/testdirectory2/testdirectory3
Output:
Change Directory Multiple
You can go up one directory by using the cd .. command or multiple directories cd ../../.. and so on.
Input:
cd ..
Output:
Go Up One Directory
Input:
cd ../../..
Output:
Go Up Multiple Directories
Typing cd ../../../../../.. can be a hassle so you can also use the cd ~ command to take you to your home directory. This command can be used in whichever directory you are currently in.
Input:
cd ~
Output:
Change to Home Directory
The cd ~ command can also be useful if you are switching to directories within your home directory by changing the command to cd ~/. I have made two directories named testdirectory and anotherdirectory that are within my home directory. In the image below, I navigate to the directory testdirectory/testdirectory2/testdirectory3. I then use cd ~/anotherdirectory/anotherdirectory2 to navigate to the directory anotherdirectory/anotherdirectory2 which is within my home directory.
An error occurs if the change directory command omitted the ~ as this would mean you are looking for the directory anotherdirectory/anotherdirectory2 within the directory testdirectory/testdirectory2/testdirectory3 instead of within the home directory.
Input:
cd ~/anotherdirectory/anotherdirectory2
Output:
Change to Directories Within Home Directory
Change to Directories Within Home Directory Error
The cd / command takes you to the root directory of the server which is the directory that contains all directories. This can also be used in whichever directory you are currently in. In the second image, I switch from the directory testdirectory/testdirectory2/testdirectory3 to my home directory home/test using the cd / command.
Input:
cd /
Output:
Root Directory
Input:
cd /home/test
Output:
Change to Directories Within Root Directory
Touch (touch)
The touch FILENAME command creates an empty file in the current directory. You can also create files in other directories by stating the directory name before the file name as seen in the second image. If you want to create a certain file type, just include the file extension in the name, e.g. file1.html instead of file1.
Note: A directory and file cannot have the same name as seen in the third image.
Input:
touch file1
Output:
Create a File
Input:
touch testdirectory/file2
Output:
Create a File in Another Directory
Input:
mkdir file1
Output:
Same Name
The rm command also works with files. You can also delete files in other directories by stating the directory name before the file name as seen in the second image.
Input:
rm file1
Output:
Remove a File
Input:
rm testdirectory/file2
Output:
Remove a File in Another Directory
Move (mv)
The move mv command allows you to move a file by stating a directory name. The first image shows the file file1 moving from the home directory to the directory anotherdirectory. The second image shows the file file1 moving from the directory anotherdirectory to the home directory using the tilde ~ character.
Input:
mv file1 anotherdirectory
Output:
Move a File
Input:
mv file1 ~
Output:
Move a File to Home Directory
The move mv command also allows you to rename a file by stating a file name. The first image shows the file file1 being renamed to file10. The second image shows the file file1 moving from the home directory to the directory anotherdirectory and being renamed to file10. The third image depicts file file10 moving back to the home directory and being renamed to file1.
Input:
mv file1 file10
Output:
Rename a File
Input:
mv file1 anotherdirectory/file10
Output:
Move and Rename a File
Input:
mv file10 ~/file1
Output:
Move Home and Rename a File
Copy (cp)
The copy cp command allows you to copy files. The first command copies file1 to file10. The second command copies file10 to the directory anotherdirectory. The third command copies file10 to the directory anotherdirectory and renames it file20.
Input:
cp file1 file10
Output:
Copy a File
Input:
cp file10 anotherdirectory/
Output:
Copy a File to Directory
Input:
cp file10 anotherdirectory/file20
Output:
Copy a File to Directory and Rename It
The copy cp command can also be used to copy directories by using the recursive -r option. The first command copies the directory anotherdirectory and all of its contents to the directory testdirectory. If you only want to copy the contents but not the directory itself, you will need to add the dot . to the end of the folder you are copying as seen in the second command. You can also copy the contents to another directory that doesn't exist by using the third command.
Input:
cp -r anotherdirectory/ testdirectory/
Output:
Copy a Directory to Another Directory
Input:
cp -r anotherdirectory/. testdirectory/
Output:
Copy a Directory's Content to Another Directory
Input:
cp -r anotherdirectory/ yetanotherdirectory/
Output:
Copy a Directory's Content to Another Directory That Hasn't Been Created
Add User (adduser)
If you want to enable other people to use your server, you can add users using the adduser command. The command below adds a user with the username anotheruser. You will need to add the superuser do sudo command to the beginning of the adduser command as adding a user requires heightened permissions. You will then be asked for your password to confirm this action then you will be asked to create a password for the new user.
Input:
sudo adduser anotheruser
Output:
Add User
You can find the new user's home directory if you go the /home directory which contains all users' home directories.
Input:
cd /home
Output:
User Home Directory
You can delete a user by using the userdel command. Using userdel USERNAME deletes the user while userdel -r USERNAME deletes the user and their home directory.
Input:
sudo userdel anotheruser
sudo userdel -r anotheruser
Output:
Delete User
Delete User and Their Home Directory
List (ls)
The ls command lists the contents of a directory. We are in the user test's home directory in the image below.
The first command (ls) lists the files, links, and directories.
The second command (ls -l) lists the files, links, and directories in the long format (-l) with more metadata shown.
The third command (ls -lh) lists the files, links, and directories in the long format (-l) with human readable (-h) file sizes.
- The first column contains the permissions with the first character signify if it's a file, link, or directory represented by a -, l, or d respectively.
- The second column is the link count.
- The third column is the owner of that file, link, or directory.
- The fourth column is the group of that file, link, or directory.
- The fifth column is the file size.
- The sixth column is the date of last modification.
- The last column is the name of the file, link, or directory.
Input:
ls
ls -l
ls -lh
Output:
Contents of a Directory
Permissions
As seen in the image below, the owner and group of the contents in a user's home directory is the user. We can see that the owner and group for the test user home directory is test. The first column states what kind of permissions certain users have for that directory or file. The permissions are ordered OWNER-GROUP-OTHERS with three possible letters each. So here the OWNER:test has rwx permissions which are read, write, and execute. The GROUP:test has --- permissions which are none. The OTHERS also have --- permissions which are none. Since the owner of the test user home directory is test and we were logged in as test, creating files and directories did not cause any errors. The limited permissions for GROUP and OTHERS is due to test being the first user created.
If we take a look at the anotheruser user home directory, the OWNER:anotheruser has rwx permissions which are read, write, and execute. The GROUP:anotheruser has r-x permissions which are read and execute only. The OTHERS also have r-x permissions which are read and execute only. The explanations for each permission can be seen below.
- For Files:
- Read allows you to look into the file.
- Write allows you to edit the file.
- Execute allows you to run the file.
- For Directories:
- Read allows you to see the files within the directory.
- Write allows you to create, edit, and delete files within the directory and delete the directory.
- Execute allows you to enter the directory using the change directory command (cd \DIRECTORYNAME).
Input:
ls -lh
Output:
Home Permissions
If the user test tries to create file or directory in anotheruser's home directory an error will occur since the user test does not have write permissions as the user test is not the owner of that directory.
Input:
touch file1
mkdir directory1
Output:
Permission Error
Using the superuser do sudo command allows a user to have root permissions and edit anything even if they are not the owner or part of the group. A regular user or a user not using sudo cannot edit those files. Note that using sudo causes the owner and group of the file or directory to be root.
Input:
sudo touch file1
sudo mkdir directory1
Output:
Use sudo to Create File and Directory
However, not all users are part of the sudo group and can use the sudo command. The command groups USERNAME allows you to see what groups a certain user belongs to. As seen below, the user test belongs to sudo and a bunch of other groups while the user anotheruser only belongs to their own group: anotheruser.
Input:
groups test
groups anotheruser
Output:
Groups
Use the command exit to log out of the current user and enter your second user credentials. Notice the username changed before the @ in the terminal.
Input:
exit
Output:
Switch Users
You can change the password of a user using the password passwd command so that it is not the same password that was assigned on the creation of the user.
Input:
passwd
Output:
Change Password
If the user anotheruser tries to change directories into the user test's home directory, they will get denied due to the OTHERS having --- no permissions. If the user anotheruser tries to use sudo and is not the in sudo group, the incident will be reported.
Input:
cd test/
sudo cd test/
Output:
Reported
User Modification (usermod)
The user modification usermod command allows sudo to modify users. Adding a user to a group is one of those modifications. The command below modifies the user (usermod) and appends (-a) the group (-G) sudo to the user anotheruser's groups.
Input:
sudo usermod -a -G sudo anotheruser
Output:
Add User to Group
A user can also be removed from a group using the deluser command.
Input:
sudo deluser anotheruser sudo
Output:
Delete User from Group
Add Group (addgroup)
A group can be created so that both users (test and anotheruser) can modify files without the sudo command. A group is created using the addgroup command. We then add both users (test and anotheruser) to the group bothusers.
Input:
sudo addgroup bothusers
sudo usermod -a -G bothusers test
sudo usermod -a -G bothusers anotheruser
Output:
Add Group bothusers
A directory is created titled directoryforbothusers with the sudo command. However, since it was created with the sudo command, the owner and group is root.
Input:
sudo mkdir directoryforbothusers
ls -lh
Output:
Directory for Both Users
Change Ownership (chown)
The change onwership chown command allows sudo to change the owner or group of a file. In the image below, the owner and the group of the directory directoryforbothusers is changed to test and bothusers respectively. Anything that would have been in the directory directoryforbothusers would have also changed ownership due to the recursive (-R) option.
Note: If you wanted to change the owner of directory only it would be sudo chown -R USERNAME DIRECTORYNAME. If you wanted to change only the group it would be sudo chown -R :GROUPNAME DIRECTORYNAME.
Input:
sudo chown -R test:bothusers /home/directoryforbothusers/
Output:
Change Ownership
Change Mode (chmod)
The change mode chmod command allows sudo to change permissions of a file. In the image above, the user test has rwx (read, write, and execute) permissions since the user test is the owner of the directory directoryforbothusers. However, we still need to give write permissions to the group bothusers as it currently only has r-x (read and execute) permissions so the user anotheruser cannot create files in the directory directoryforbothusers.
We will change permissions with the change mode chmod command. The three numbers correlate to OWNER-GROUP-OTHERS. The numbers and their corresponding permissions can be seen below. Here we are giving read, write, and execute permissions to both the OWNER and GROUP while only giving read and execute permissions to OTHERS.
- 7: Read, write, and execute.
- 6: Read and write.
- 5: Read and execute.
- 4: Read.
- 3: Write and execute.
- 2: Write.
- 1: Execute.
- 0: None.
Input:
sudo chmod -R 775 /home/directoryforbothusers/
Output:
Change Mode
Now both users (test and anotheruser) can add files to the directory directoryforbothusers without the sudo command.
Input:
touch file1
Output:
Create File in directoryforbothusers
The user anotheruser can also create files in the directory directoryforbothusers without the sudo command due to the modified group permissions.
Input:
touch file2
Output:
Create Another File in directoryforbothusers
Now both users can edit each other's files. Below I am deleting file1 which is owned by the user test when I am signed in as the user anotheruser. Since it is owned by the user test, it will ask the user to confirm the deletion.
Input:
rm file1
Output:
Delete Another User's File
Visual Editor (vi)
The visual editor vi is the default text editor in Linux. Enter the command vi FILENAME in order to start editing a file. You will now be in the visual editor and be able to edit the specified file. Start by pressing the letter "i" on your keyboard and the text "-- INSERT --" should now appear at the bottom of the terminal signifying you can begin inserting text. Once done, press the "ESC" key to exit the "-- INSERT --" mode. After you have pressed the "ESC" key, you should be able to type :wq which allows you to write/save (w) and quit (q) the file. Since we are editing a different user's file within a group we have write permissions in, we will need to add the override command (!) such that we write wq!. Hit enter and you should have exited the visual editor. If the ls -lh command is entered, one can see that the file ownership for file1 has changed from user test to user anotheruser.
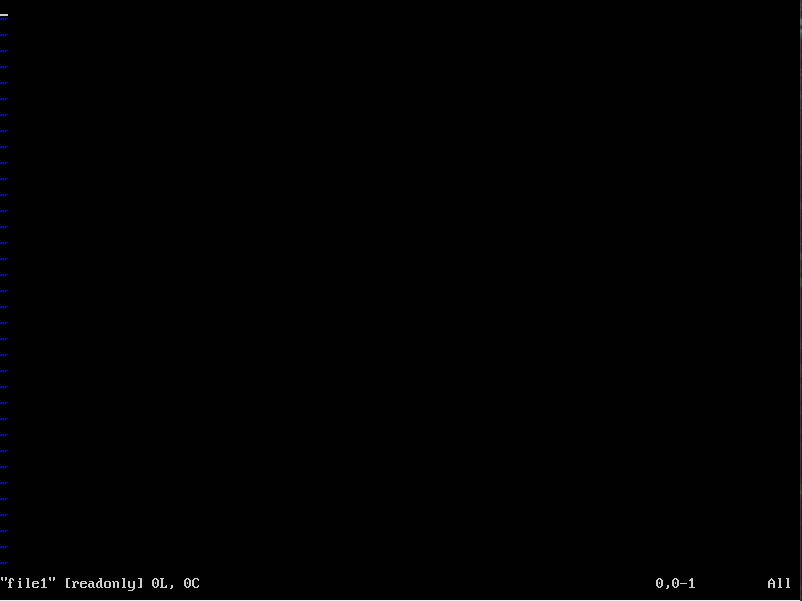
Input:
vi file1
Output:
Edit Another User's File
Edit Another User's File 2
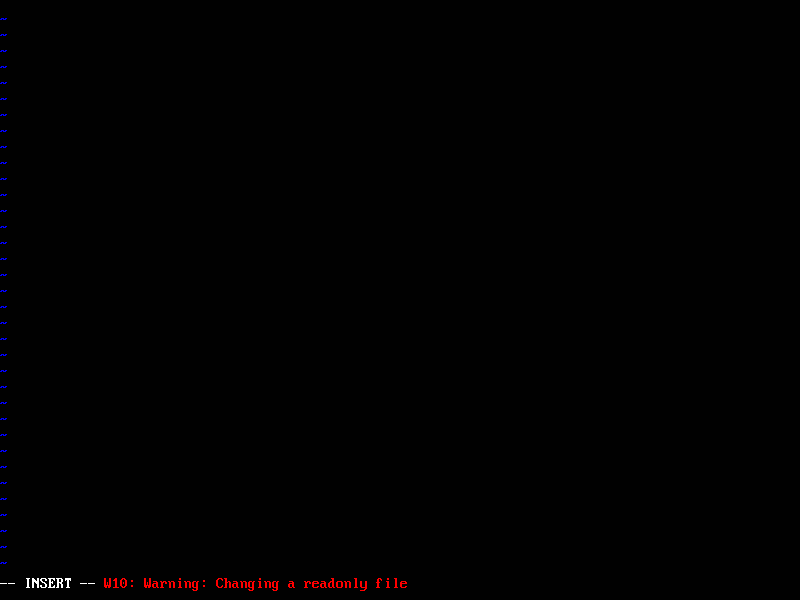
Input:
i
Output:
-- INSERT -- Mode
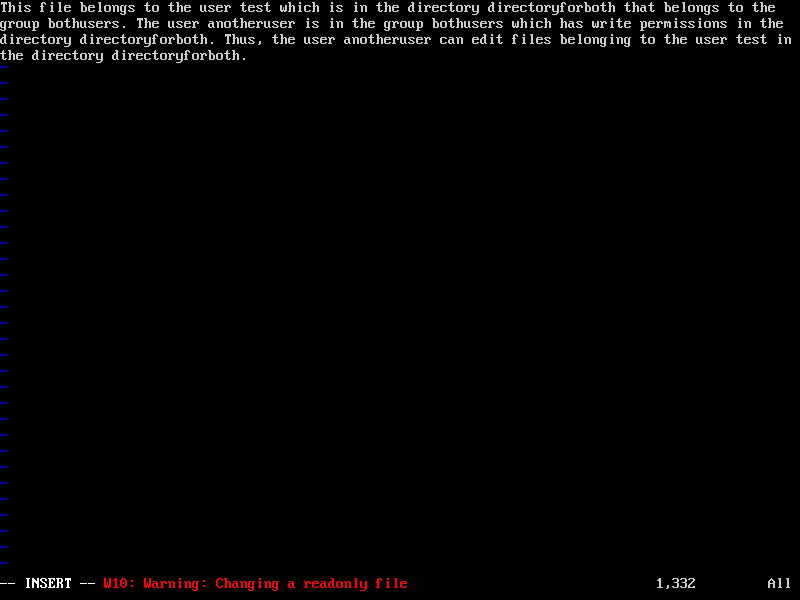
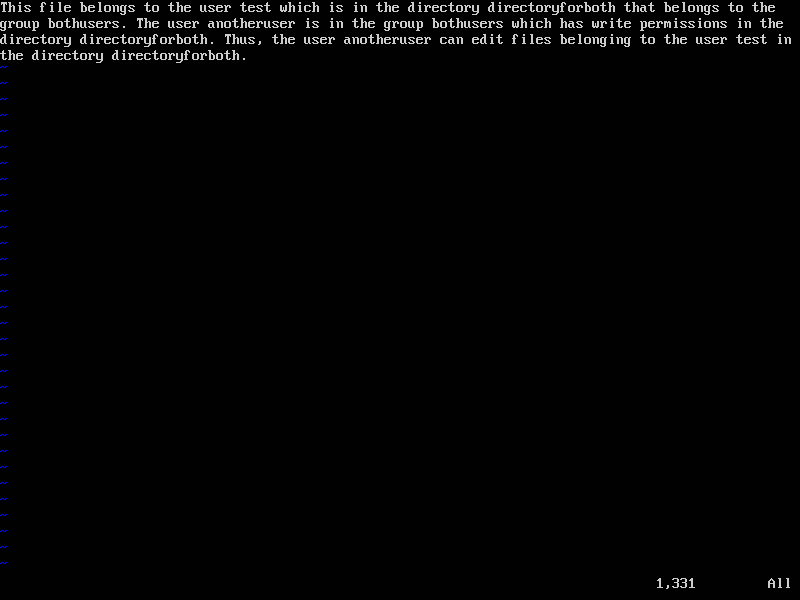
Input:
This file belongs to the user test which is in the directory directoryforboth that belongs to the group bothusers. The user anotheruser is in the group bothusers which has write permissions in the directory directoryforboth. Thus, the user anotheruser can edit files belonging to the user test in the directory directoryforboth.
Output:
Editing File
Input:
"Press the ESC Key"
Output:
ESC Key
Input:
:wq!
Output:
Write and Quit
Input:
ls -lh
Output:
Change Ownership
You can create directories by using the command mkdir DIRECTORYNAME. You can see the contents of the current directory by using the ls command. The image below shows an empty directory using the ls command before we make the directory. After the new directory testdirectory is created, it is seen using the ls command.
Input:ls
mkdir testdirectory
ls
Output:
Make Directory
You can remove directories by using the command rmdir DIRECTORYNAME.
Input:ls
rmdir testdirectory
ls
Output:
Remove Directory
However, you will get an error if the directory is not empty.
Input:rmdir testdirectory
Output:
Remove Directory Not Empty
You would then need to use the remove command (rm) along with the recursive (-r) option rm -r DIRECTORYNAME to remove the directory if it is not empty.
Input:rm -r testdirectory
Output:
Remove Directory with rm -r
The change directory cd DIRECTORYNAME command allows you to navigate through directories. The input below takes me to the directory testdirectory. I have also made multiple test directories within testdirectory to illustrate how one can keep navigating further into other directories.
Note: One can press tab in order to autocomplete a file or directory name.
cd testdirectory
Output:
Change Directory
Input:
cd testdirectory/testdirectory2/testdirectory3
Output:
Change Directory Multiple
You can go up one directory by using the cd .. command or multiple directories cd ../../.. and so on.
Input:cd ..
Output:
Go Up One Directory
Input:
cd ../../..
Output:
Go Up Multiple Directories
Typing cd ../../../../../.. can be a hassle so you can also use the cd ~ command to take you to your home directory. This command can be used in whichever directory you are currently in.
Input:cd ~
Output:
Change to Home Directory
The cd ~ command can also be useful if you are switching to directories within your home directory by changing the command to cd ~/. I have made two directories named testdirectory and anotherdirectory that are within my home directory. In the image below, I navigate to the directory testdirectory/testdirectory2/testdirectory3. I then use cd ~/anotherdirectory/anotherdirectory2 to navigate to the directory anotherdirectory/anotherdirectory2 which is within my home directory.
An error occurs if the change directory command omitted the ~ as this would mean you are looking for the directory anotherdirectory/anotherdirectory2 within the directory testdirectory/testdirectory2/testdirectory3 instead of within the home directory.
Input:cd ~/anotherdirectory/anotherdirectory2
Output:
Change to Directories Within Home Directory
Change to Directories Within Home Directory Error
The cd / command takes you to the root directory of the server which is the directory that contains all directories. This can also be used in whichever directory you are currently in. In the second image, I switch from the directory testdirectory/testdirectory2/testdirectory3 to my home directory home/test using the cd / command.
Input:cd /
Output:
Root Directory
Input:
cd /home/test
Output:
Change to Directories Within Root Directory
Touch (touch)
The touch FILENAME command creates an empty file in the current directory. You can also create files in other directories by stating the directory name before the file name as seen in the second image. If you want to create a certain file type, just include the file extension in the name, e.g. file1.html instead of file1.
Note: A directory and file cannot have the same name as seen in the third image.
Input:
touch file1
Output:
Create a File
Input:
touch testdirectory/file2
Output:
Create a File in Another Directory
Input:
mkdir file1
Output:
Same Name
The rm command also works with files. You can also delete files in other directories by stating the directory name before the file name as seen in the second image.
Input:
rm file1
Output:
Remove a File
Input:
rm testdirectory/file2
Output:
Remove a File in Another Directory
Move (mv)
The move mv command allows you to move a file by stating a directory name. The first image shows the file file1 moving from the home directory to the directory anotherdirectory. The second image shows the file file1 moving from the directory anotherdirectory to the home directory using the tilde ~ character.
Input:
mv file1 anotherdirectory
Output:
Move a File
Input:
mv file1 ~
Output:
Move a File to Home Directory
The move mv command also allows you to rename a file by stating a file name. The first image shows the file file1 being renamed to file10. The second image shows the file file1 moving from the home directory to the directory anotherdirectory and being renamed to file10. The third image depicts file file10 moving back to the home directory and being renamed to file1.
Input:
mv file1 file10
Output:
Rename a File
Input:
mv file1 anotherdirectory/file10
Output:
Move and Rename a File
Input:
mv file10 ~/file1
Output:
Move Home and Rename a File
Copy (cp)
The copy cp command allows you to copy files. The first command copies file1 to file10. The second command copies file10 to the directory anotherdirectory. The third command copies file10 to the directory anotherdirectory and renames it file20.
Input:
cp file1 file10
Output:
Copy a File
Input:
cp file10 anotherdirectory/
Output:
Copy a File to Directory
Input:
cp file10 anotherdirectory/file20
Output:
Copy a File to Directory and Rename It
The copy cp command can also be used to copy directories by using the recursive -r option. The first command copies the directory anotherdirectory and all of its contents to the directory testdirectory. If you only want to copy the contents but not the directory itself, you will need to add the dot . to the end of the folder you are copying as seen in the second command. You can also copy the contents to another directory that doesn't exist by using the third command.
Input:
cp -r anotherdirectory/ testdirectory/
Output:
Copy a Directory to Another Directory
Input:
cp -r anotherdirectory/. testdirectory/
Output:
Copy a Directory's Content to Another Directory
Input:
cp -r anotherdirectory/ yetanotherdirectory/
Output:
Copy a Directory's Content to Another Directory That Hasn't Been Created
Add User (adduser)
If you want to enable other people to use your server, you can add users using the adduser command. The command below adds a user with the username anotheruser. You will need to add the superuser do sudo command to the beginning of the adduser command as adding a user requires heightened permissions. You will then be asked for your password to confirm this action then you will be asked to create a password for the new user.
Input:
sudo adduser anotheruser
Output:
Add User
You can find the new user's home directory if you go the /home directory which contains all users' home directories.
Input:
cd /home
Output:
User Home Directory
You can delete a user by using the userdel command. Using userdel USERNAME deletes the user while userdel -r USERNAME deletes the user and their home directory.
Input:
sudo userdel anotheruser
sudo userdel -r anotheruser
Output:
Delete User
Delete User and Their Home Directory
List (ls)
The ls command lists the contents of a directory. We are in the user test's home directory in the image below.
The first command (ls) lists the files, links, and directories.
The second command (ls -l) lists the files, links, and directories in the long format (-l) with more metadata shown.
The third command (ls -lh) lists the files, links, and directories in the long format (-l) with human readable (-h) file sizes.
- The first column contains the permissions with the first character signify if it's a file, link, or directory represented by a -, l, or d respectively.
- The second column is the link count.
- The third column is the owner of that file, link, or directory.
- The fourth column is the group of that file, link, or directory.
- The fifth column is the file size.
- The sixth column is the date of last modification.
- The last column is the name of the file, link, or directory.
Input:
ls
ls -l
ls -lh
Output:
Contents of a Directory
Permissions
As seen in the image below, the owner and group of the contents in a user's home directory is the user. We can see that the owner and group for the test user home directory is test. The first column states what kind of permissions certain users have for that directory or file. The permissions are ordered OWNER-GROUP-OTHERS with three possible letters each. So here the OWNER:test has rwx permissions which are read, write, and execute. The GROUP:test has --- permissions which are none. The OTHERS also have --- permissions which are none. Since the owner of the test user home directory is test and we were logged in as test, creating files and directories did not cause any errors. The limited permissions for GROUP and OTHERS is due to test being the first user created.
If we take a look at the anotheruser user home directory, the OWNER:anotheruser has rwx permissions which are read, write, and execute. The GROUP:anotheruser has r-x permissions which are read and execute only. The OTHERS also have r-x permissions which are read and execute only. The explanations for each permission can be seen below.
- For Files:
- Read allows you to look into the file.
- Write allows you to edit the file.
- Execute allows you to run the file.
- For Directories:
- Read allows you to see the files within the directory.
- Write allows you to create, edit, and delete files within the directory and delete the directory.
- Execute allows you to enter the directory using the change directory command (cd \DIRECTORYNAME).
Input:
ls -lh
Output:
Home Permissions
If the user test tries to create file or directory in anotheruser's home directory an error will occur since the user test does not have write permissions as the user test is not the owner of that directory.
Input:
touch file1
mkdir directory1
Output:
Permission Error
Using the superuser do sudo command allows a user to have root permissions and edit anything even if they are not the owner or part of the group. A regular user or a user not using sudo cannot edit those files. Note that using sudo causes the owner and group of the file or directory to be root.
Input:
sudo touch file1
sudo mkdir directory1
Output:
Use sudo to Create File and Directory
However, not all users are part of the sudo group and can use the sudo command. The command groups USERNAME allows you to see what groups a certain user belongs to. As seen below, the user test belongs to sudo and a bunch of other groups while the user anotheruser only belongs to their own group: anotheruser.
Input:
groups test
groups anotheruser
Output:
Groups
Use the command exit to log out of the current user and enter your second user credentials. Notice the username changed before the @ in the terminal.
Input:
exit
Output:
Switch Users
You can change the password of a user using the password passwd command so that it is not the same password that was assigned on the creation of the user.
Input:
passwd
Output:
Change Password
If the user anotheruser tries to change directories into the user test's home directory, they will get denied due to the OTHERS having --- no permissions. If the user anotheruser tries to use sudo and is not the in sudo group, the incident will be reported.
Input:
cd test/
sudo cd test/
Output:
Reported
User Modification (usermod)
The user modification usermod command allows sudo to modify users. Adding a user to a group is one of those modifications. The command below modifies the user (usermod) and appends (-a) the group (-G) sudo to the user anotheruser's groups.
Input:
sudo usermod -a -G sudo anotheruser
Output:
Add User to Group
A user can also be removed from a group using the deluser command.
Input:
sudo deluser anotheruser sudo
Output:
Delete User from Group
Add Group (addgroup)
A group can be created so that both users (test and anotheruser) can modify files without the sudo command. A group is created using the addgroup command. We then add both users (test and anotheruser) to the group bothusers.
Input:
sudo addgroup bothusers
sudo usermod -a -G bothusers test
sudo usermod -a -G bothusers anotheruser
Output:
Add Group bothusers
A directory is created titled directoryforbothusers with the sudo command. However, since it was created with the sudo command, the owner and group is root.
Input:
sudo mkdir directoryforbothusers
ls -lh
Output:
Directory for Both Users
Change Ownership (chown)
The change onwership chown command allows sudo to change the owner or group of a file. In the image below, the owner and the group of the directory directoryforbothusers is changed to test and bothusers respectively. Anything that would have been in the directory directoryforbothusers would have also changed ownership due to the recursive (-R) option.
Note: If you wanted to change the owner of directory only it would be sudo chown -R USERNAME DIRECTORYNAME. If you wanted to change only the group it would be sudo chown -R :GROUPNAME DIRECTORYNAME.
Input:
sudo chown -R test:bothusers /home/directoryforbothusers/
Output:
Change Ownership
Change Mode (chmod)
The change mode chmod command allows sudo to change permissions of a file. In the image above, the user test has rwx (read, write, and execute) permissions since the user test is the owner of the directory directoryforbothusers. However, we still need to give write permissions to the group bothusers as it currently only has r-x (read and execute) permissions so the user anotheruser cannot create files in the directory directoryforbothusers.
We will change permissions with the change mode chmod command. The three numbers correlate to OWNER-GROUP-OTHERS. The numbers and their corresponding permissions can be seen below. Here we are giving read, write, and execute permissions to both the OWNER and GROUP while only giving read and execute permissions to OTHERS.
- 7: Read, write, and execute.
- 6: Read and write.
- 5: Read and execute.
- 4: Read.
- 3: Write and execute.
- 2: Write.
- 1: Execute.
- 0: None.
Input:
sudo chmod -R 775 /home/directoryforbothusers/
Output:
Change Mode
Now both users (test and anotheruser) can add files to the directory directoryforbothusers without the sudo command.
Input:
touch file1
Output:
Create File in directoryforbothusers
The user anotheruser can also create files in the directory directoryforbothusers without the sudo command due to the modified group permissions.
Input:
touch file2
Output:
Create Another File in directoryforbothusers
Now both users can edit each other's files. Below I am deleting file1 which is owned by the user test when I am signed in as the user anotheruser. Since it is owned by the user test, it will ask the user to confirm the deletion.
Input:
rm file1
Output:
Delete Another User's File
Visual Editor (vi)
The visual editor vi is the default text editor in Linux. Enter the command vi FILENAME in order to start editing a file. You will now be in the visual editor and be able to edit the specified file. Start by pressing the letter "i" on your keyboard and the text "-- INSERT --" should now appear at the bottom of the terminal signifying you can begin inserting text. Once done, press the "ESC" key to exit the "-- INSERT --" mode. After you have pressed the "ESC" key, you should be able to type :wq which allows you to write/save (w) and quit (q) the file. Since we are editing a different user's file within a group we have write permissions in, we will need to add the override command (!) such that we write wq!. Hit enter and you should have exited the visual editor. If the ls -lh command is entered, one can see that the file ownership for file1 has changed from user test to user anotheruser.
Input:
vi file1
Output:
Edit Another User's File
Edit Another User's File 2
Input:
i
Output:
-- INSERT -- Mode
Input:
This file belongs to the user test which is in the directory directoryforboth that belongs to the group bothusers. The user anotheruser is in the group bothusers which has write permissions in the directory directoryforboth. Thus, the user anotheruser can edit files belonging to the user test in the directory directoryforboth.
Output:
Editing File
Input:
"Press the ESC Key"
Output:
ESC Key
Input:
:wq!
Output:
Write and Quit
Input:
ls -lh
Output:
Change Ownership
The touch FILENAME command creates an empty file in the current directory. You can also create files in other directories by stating the directory name before the file name as seen in the second image. If you want to create a certain file type, just include the file extension in the name, e.g. file1.html instead of file1.
Note: A directory and file cannot have the same name as seen in the third image.
touch file1
Output:
Create a File
Input:
touch testdirectory/file2
Output:
Create a File in Another Directory
Input:
mkdir file1
Output:
Same Name
The rm command also works with files. You can also delete files in other directories by stating the directory name before the file name as seen in the second image.
Input:rm file1
Output:
Remove a File
Input:
rm testdirectory/file2
Output:
Remove a File in Another Directory
The move mv command allows you to move a file by stating a directory name. The first image shows the file file1 moving from the home directory to the directory anotherdirectory. The second image shows the file file1 moving from the directory anotherdirectory to the home directory using the tilde ~ character.
Input:mv file1 anotherdirectory
Output:
Move a File
Input:
mv file1 ~
Output:
Move a File to Home Directory
The move mv command also allows you to rename a file by stating a file name. The first image shows the file file1 being renamed to file10. The second image shows the file file1 moving from the home directory to the directory anotherdirectory and being renamed to file10. The third image depicts file file10 moving back to the home directory and being renamed to file1.
Input:mv file1 file10
Output:
Rename a File
Input:
mv file1 anotherdirectory/file10
Output:
Move and Rename a File
Input:
mv file10 ~/file1
Output:
Move Home and Rename a File
Copy (cp)
The copy cp command allows you to copy files. The first command copies file1 to file10. The second command copies file10 to the directory anotherdirectory. The third command copies file10 to the directory anotherdirectory and renames it file20.
Input:
cp file1 file10
Output:
Copy a File
Input:
cp file10 anotherdirectory/
Output:
Copy a File to Directory
Input:
cp file10 anotherdirectory/file20
Output:
Copy a File to Directory and Rename It
The copy cp command can also be used to copy directories by using the recursive -r option. The first command copies the directory anotherdirectory and all of its contents to the directory testdirectory. If you only want to copy the contents but not the directory itself, you will need to add the dot . to the end of the folder you are copying as seen in the second command. You can also copy the contents to another directory that doesn't exist by using the third command.
Input:
cp -r anotherdirectory/ testdirectory/
Output:
Copy a Directory to Another Directory
Input:
cp -r anotherdirectory/. testdirectory/
Output:
Copy a Directory's Content to Another Directory
Input:
cp -r anotherdirectory/ yetanotherdirectory/
Output:
Copy a Directory's Content to Another Directory That Hasn't Been Created
Add User (adduser)
If you want to enable other people to use your server, you can add users using the adduser command. The command below adds a user with the username anotheruser. You will need to add the superuser do sudo command to the beginning of the adduser command as adding a user requires heightened permissions. You will then be asked for your password to confirm this action then you will be asked to create a password for the new user.
Input:
sudo adduser anotheruser
Output:
Add User
You can find the new user's home directory if you go the /home directory which contains all users' home directories.
Input:
cd /home
Output:
User Home Directory
You can delete a user by using the userdel command. Using userdel USERNAME deletes the user while userdel -r USERNAME deletes the user and their home directory.
Input:
sudo userdel anotheruser
sudo userdel -r anotheruser
Output:
Delete User
Delete User and Their Home Directory
List (ls)
The ls command lists the contents of a directory. We are in the user test's home directory in the image below.
The first command (ls) lists the files, links, and directories.
The second command (ls -l) lists the files, links, and directories in the long format (-l) with more metadata shown.
The third command (ls -lh) lists the files, links, and directories in the long format (-l) with human readable (-h) file sizes.
- The first column contains the permissions with the first character signify if it's a file, link, or directory represented by a -, l, or d respectively.
- The second column is the link count.
- The third column is the owner of that file, link, or directory.
- The fourth column is the group of that file, link, or directory.
- The fifth column is the file size.
- The sixth column is the date of last modification.
- The last column is the name of the file, link, or directory.
Input:
ls
ls -l
ls -lh
Output:
Contents of a Directory
Permissions
As seen in the image below, the owner and group of the contents in a user's home directory is the user. We can see that the owner and group for the test user home directory is test. The first column states what kind of permissions certain users have for that directory or file. The permissions are ordered OWNER-GROUP-OTHERS with three possible letters each. So here the OWNER:test has rwx permissions which are read, write, and execute. The GROUP:test has --- permissions which are none. The OTHERS also have --- permissions which are none. Since the owner of the test user home directory is test and we were logged in as test, creating files and directories did not cause any errors. The limited permissions for GROUP and OTHERS is due to test being the first user created.
If we take a look at the anotheruser user home directory, the OWNER:anotheruser has rwx permissions which are read, write, and execute. The GROUP:anotheruser has r-x permissions which are read and execute only. The OTHERS also have r-x permissions which are read and execute only. The explanations for each permission can be seen below.
- For Files:
- Read allows you to look into the file.
- Write allows you to edit the file.
- Execute allows you to run the file.
- For Directories:
- Read allows you to see the files within the directory.
- Write allows you to create, edit, and delete files within the directory and delete the directory.
- Execute allows you to enter the directory using the change directory command (cd \DIRECTORYNAME).
Input:
ls -lh
Output:
Home Permissions
If the user test tries to create file or directory in anotheruser's home directory an error will occur since the user test does not have write permissions as the user test is not the owner of that directory.
Input:
touch file1
mkdir directory1
Output:
Permission Error
Using the superuser do sudo command allows a user to have root permissions and edit anything even if they are not the owner or part of the group. A regular user or a user not using sudo cannot edit those files. Note that using sudo causes the owner and group of the file or directory to be root.
Input:
sudo touch file1
sudo mkdir directory1
Output:
Use sudo to Create File and Directory
However, not all users are part of the sudo group and can use the sudo command. The command groups USERNAME allows you to see what groups a certain user belongs to. As seen below, the user test belongs to sudo and a bunch of other groups while the user anotheruser only belongs to their own group: anotheruser.
Input:
groups test
groups anotheruser
Output:
Groups
Use the command exit to log out of the current user and enter your second user credentials. Notice the username changed before the @ in the terminal.
Input:
exit
Output:
Switch Users
You can change the password of a user using the password passwd command so that it is not the same password that was assigned on the creation of the user.
Input:
passwd
Output:
Change Password
If the user anotheruser tries to change directories into the user test's home directory, they will get denied due to the OTHERS having --- no permissions. If the user anotheruser tries to use sudo and is not the in sudo group, the incident will be reported.
Input:
cd test/
sudo cd test/
Output:
Reported
User Modification (usermod)
The user modification usermod command allows sudo to modify users. Adding a user to a group is one of those modifications. The command below modifies the user (usermod) and appends (-a) the group (-G) sudo to the user anotheruser's groups.
Input:
sudo usermod -a -G sudo anotheruser
Output:
Add User to Group
A user can also be removed from a group using the deluser command.
Input:
sudo deluser anotheruser sudo
Output:
Delete User from Group
Add Group (addgroup)
A group can be created so that both users (test and anotheruser) can modify files without the sudo command. A group is created using the addgroup command. We then add both users (test and anotheruser) to the group bothusers.
Input:
sudo addgroup bothusers
sudo usermod -a -G bothusers test
sudo usermod -a -G bothusers anotheruser
Output:
Add Group bothusers
A directory is created titled directoryforbothusers with the sudo command. However, since it was created with the sudo command, the owner and group is root.
Input:
sudo mkdir directoryforbothusers
ls -lh
Output:
Directory for Both Users
Change Ownership (chown)
The change onwership chown command allows sudo to change the owner or group of a file. In the image below, the owner and the group of the directory directoryforbothusers is changed to test and bothusers respectively. Anything that would have been in the directory directoryforbothusers would have also changed ownership due to the recursive (-R) option.
Note: If you wanted to change the owner of directory only it would be sudo chown -R USERNAME DIRECTORYNAME. If you wanted to change only the group it would be sudo chown -R :GROUPNAME DIRECTORYNAME.
Input:
sudo chown -R test:bothusers /home/directoryforbothusers/
Output:
Change Ownership
Change Mode (chmod)
The change mode chmod command allows sudo to change permissions of a file. In the image above, the user test has rwx (read, write, and execute) permissions since the user test is the owner of the directory directoryforbothusers. However, we still need to give write permissions to the group bothusers as it currently only has r-x (read and execute) permissions so the user anotheruser cannot create files in the directory directoryforbothusers.
We will change permissions with the change mode chmod command. The three numbers correlate to OWNER-GROUP-OTHERS. The numbers and their corresponding permissions can be seen below. Here we are giving read, write, and execute permissions to both the OWNER and GROUP while only giving read and execute permissions to OTHERS.
- 7: Read, write, and execute.
- 6: Read and write.
- 5: Read and execute.
- 4: Read.
- 3: Write and execute.
- 2: Write.
- 1: Execute.
- 0: None.
Input:
sudo chmod -R 775 /home/directoryforbothusers/
Output:
Change Mode
Now both users (test and anotheruser) can add files to the directory directoryforbothusers without the sudo command.
Input:
touch file1
Output:
Create File in directoryforbothusers
The user anotheruser can also create files in the directory directoryforbothusers without the sudo command due to the modified group permissions.
Input:
touch file2
Output:
Create Another File in directoryforbothusers
Now both users can edit each other's files. Below I am deleting file1 which is owned by the user test when I am signed in as the user anotheruser. Since it is owned by the user test, it will ask the user to confirm the deletion.
Input:
rm file1
Output:
Delete Another User's File
Visual Editor (vi)
The visual editor vi is the default text editor in Linux. Enter the command vi FILENAME in order to start editing a file. You will now be in the visual editor and be able to edit the specified file. Start by pressing the letter "i" on your keyboard and the text "-- INSERT --" should now appear at the bottom of the terminal signifying you can begin inserting text. Once done, press the "ESC" key to exit the "-- INSERT --" mode. After you have pressed the "ESC" key, you should be able to type :wq which allows you to write/save (w) and quit (q) the file. Since we are editing a different user's file within a group we have write permissions in, we will need to add the override command (!) such that we write wq!. Hit enter and you should have exited the visual editor. If the ls -lh command is entered, one can see that the file ownership for file1 has changed from user test to user anotheruser.
Input:
vi file1
Output:
Edit Another User's File
Edit Another User's File 2
Input:
i
Output:
-- INSERT -- Mode
Input:
This file belongs to the user test which is in the directory directoryforboth that belongs to the group bothusers. The user anotheruser is in the group bothusers which has write permissions in the directory directoryforboth. Thus, the user anotheruser can edit files belonging to the user test in the directory directoryforboth.
Output:
Editing File
Input:
"Press the ESC Key"
Output:
ESC Key
Input:
:wq!
Output:
Write and Quit
Input:
ls -lh
Output:
Change Ownership
The copy cp command allows you to copy files. The first command copies file1 to file10. The second command copies file10 to the directory anotherdirectory. The third command copies file10 to the directory anotherdirectory and renames it file20.
Input:cp file1 file10
Output:
Copy a File
Input:
cp file10 anotherdirectory/
Output:
Copy a File to Directory
Input:
cp file10 anotherdirectory/file20
Output:
Copy a File to Directory and Rename It
The copy cp command can also be used to copy directories by using the recursive -r option. The first command copies the directory anotherdirectory and all of its contents to the directory testdirectory. If you only want to copy the contents but not the directory itself, you will need to add the dot . to the end of the folder you are copying as seen in the second command. You can also copy the contents to another directory that doesn't exist by using the third command.
Input:cp -r anotherdirectory/ testdirectory/
Output:
Copy a Directory to Another Directory
Input:
cp -r anotherdirectory/. testdirectory/
Output:
Copy a Directory's Content to Another Directory
Input:
cp -r anotherdirectory/ yetanotherdirectory/
Output:
Copy a Directory's Content to Another Directory That Hasn't Been Created
If you want to enable other people to use your server, you can add users using the adduser command. The command below adds a user with the username anotheruser. You will need to add the superuser do sudo command to the beginning of the adduser command as adding a user requires heightened permissions. You will then be asked for your password to confirm this action then you will be asked to create a password for the new user.
Input:sudo adduser anotheruser
Output:
Add User
You can find the new user's home directory if you go the /home directory which contains all users' home directories.
Input:cd /home
Output:
User Home Directory
You can delete a user by using the userdel command. Using userdel USERNAME deletes the user while userdel -r USERNAME deletes the user and their home directory.
Input:sudo userdel anotheruser
sudo userdel -r anotheruser
Output:
Delete User
Delete User and Their Home Directory
List (ls)
The ls command lists the contents of a directory. We are in the user test's home directory in the image below.
The first command (ls) lists the files, links, and directories.
The second command (ls -l) lists the files, links, and directories in the long format (-l) with more metadata shown.
The third command (ls -lh) lists the files, links, and directories in the long format (-l) with human readable (-h) file sizes.
- The first column contains the permissions with the first character signify if it's a file, link, or directory represented by a -, l, or d respectively.
- The second column is the link count.
- The third column is the owner of that file, link, or directory.
- The fourth column is the group of that file, link, or directory.
- The fifth column is the file size.
- The sixth column is the date of last modification.
- The last column is the name of the file, link, or directory.
Input:
ls
ls -l
ls -lh
Output:
Contents of a Directory
Permissions
As seen in the image below, the owner and group of the contents in a user's home directory is the user. We can see that the owner and group for the test user home directory is test. The first column states what kind of permissions certain users have for that directory or file. The permissions are ordered OWNER-GROUP-OTHERS with three possible letters each. So here the OWNER:test has rwx permissions which are read, write, and execute. The GROUP:test has --- permissions which are none. The OTHERS also have --- permissions which are none. Since the owner of the test user home directory is test and we were logged in as test, creating files and directories did not cause any errors. The limited permissions for GROUP and OTHERS is due to test being the first user created.
If we take a look at the anotheruser user home directory, the OWNER:anotheruser has rwx permissions which are read, write, and execute. The GROUP:anotheruser has r-x permissions which are read and execute only. The OTHERS also have r-x permissions which are read and execute only. The explanations for each permission can be seen below.
- For Files:
- Read allows you to look into the file.
- Write allows you to edit the file.
- Execute allows you to run the file.
- For Directories:
- Read allows you to see the files within the directory.
- Write allows you to create, edit, and delete files within the directory and delete the directory.
- Execute allows you to enter the directory using the change directory command (cd \DIRECTORYNAME).
Input:
ls -lh
Output:
Home Permissions
If the user test tries to create file or directory in anotheruser's home directory an error will occur since the user test does not have write permissions as the user test is not the owner of that directory.
Input:
touch file1
mkdir directory1
Output:
Permission Error
Using the superuser do sudo command allows a user to have root permissions and edit anything even if they are not the owner or part of the group. A regular user or a user not using sudo cannot edit those files. Note that using sudo causes the owner and group of the file or directory to be root.
Input:
sudo touch file1
sudo mkdir directory1
Output:
Use sudo to Create File and Directory
However, not all users are part of the sudo group and can use the sudo command. The command groups USERNAME allows you to see what groups a certain user belongs to. As seen below, the user test belongs to sudo and a bunch of other groups while the user anotheruser only belongs to their own group: anotheruser.
Input:
groups test
groups anotheruser
Output:
Groups
Use the command exit to log out of the current user and enter your second user credentials. Notice the username changed before the @ in the terminal.
Input:
exit
Output:
Switch Users
You can change the password of a user using the password passwd command so that it is not the same password that was assigned on the creation of the user.
Input:
passwd
Output:
Change Password
If the user anotheruser tries to change directories into the user test's home directory, they will get denied due to the OTHERS having --- no permissions. If the user anotheruser tries to use sudo and is not the in sudo group, the incident will be reported.
Input:
cd test/
sudo cd test/
Output:
Reported
User Modification (usermod)
The user modification usermod command allows sudo to modify users. Adding a user to a group is one of those modifications. The command below modifies the user (usermod) and appends (-a) the group (-G) sudo to the user anotheruser's groups.
Input:
sudo usermod -a -G sudo anotheruser
Output:
Add User to Group
A user can also be removed from a group using the deluser command.
Input:
sudo deluser anotheruser sudo
Output:
Delete User from Group
Add Group (addgroup)
A group can be created so that both users (test and anotheruser) can modify files without the sudo command. A group is created using the addgroup command. We then add both users (test and anotheruser) to the group bothusers.
Input:
sudo addgroup bothusers
sudo usermod -a -G bothusers test
sudo usermod -a -G bothusers anotheruser
Output:
Add Group bothusers
A directory is created titled directoryforbothusers with the sudo command. However, since it was created with the sudo command, the owner and group is root.
Input:
sudo mkdir directoryforbothusers
ls -lh
Output:
Directory for Both Users
Change Ownership (chown)
The change onwership chown command allows sudo to change the owner or group of a file. In the image below, the owner and the group of the directory directoryforbothusers is changed to test and bothusers respectively. Anything that would have been in the directory directoryforbothusers would have also changed ownership due to the recursive (-R) option.
Note: If you wanted to change the owner of directory only it would be sudo chown -R USERNAME DIRECTORYNAME. If you wanted to change only the group it would be sudo chown -R :GROUPNAME DIRECTORYNAME.
Input:
sudo chown -R test:bothusers /home/directoryforbothusers/
Output:
Change Ownership
Change Mode (chmod)
The change mode chmod command allows sudo to change permissions of a file. In the image above, the user test has rwx (read, write, and execute) permissions since the user test is the owner of the directory directoryforbothusers. However, we still need to give write permissions to the group bothusers as it currently only has r-x (read and execute) permissions so the user anotheruser cannot create files in the directory directoryforbothusers.
We will change permissions with the change mode chmod command. The three numbers correlate to OWNER-GROUP-OTHERS. The numbers and their corresponding permissions can be seen below. Here we are giving read, write, and execute permissions to both the OWNER and GROUP while only giving read and execute permissions to OTHERS.
- 7: Read, write, and execute.
- 6: Read and write.
- 5: Read and execute.
- 4: Read.
- 3: Write and execute.
- 2: Write.
- 1: Execute.
- 0: None.
Input:
sudo chmod -R 775 /home/directoryforbothusers/
Output:
Change Mode
Now both users (test and anotheruser) can add files to the directory directoryforbothusers without the sudo command.
Input:
touch file1
Output:
Create File in directoryforbothusers
The user anotheruser can also create files in the directory directoryforbothusers without the sudo command due to the modified group permissions.
Input:
touch file2
Output:
Create Another File in directoryforbothusers
Now both users can edit each other's files. Below I am deleting file1 which is owned by the user test when I am signed in as the user anotheruser. Since it is owned by the user test, it will ask the user to confirm the deletion.
Input:
rm file1
Output:
Delete Another User's File
Visual Editor (vi)
The visual editor vi is the default text editor in Linux. Enter the command vi FILENAME in order to start editing a file. You will now be in the visual editor and be able to edit the specified file. Start by pressing the letter "i" on your keyboard and the text "-- INSERT --" should now appear at the bottom of the terminal signifying you can begin inserting text. Once done, press the "ESC" key to exit the "-- INSERT --" mode. After you have pressed the "ESC" key, you should be able to type :wq which allows you to write/save (w) and quit (q) the file. Since we are editing a different user's file within a group we have write permissions in, we will need to add the override command (!) such that we write wq!. Hit enter and you should have exited the visual editor. If the ls -lh command is entered, one can see that the file ownership for file1 has changed from user test to user anotheruser.
Input:
vi file1
Output:
Edit Another User's File
Edit Another User's File 2
Input:
i
Output:
-- INSERT -- Mode
Input:
This file belongs to the user test which is in the directory directoryforboth that belongs to the group bothusers. The user anotheruser is in the group bothusers which has write permissions in the directory directoryforboth. Thus, the user anotheruser can edit files belonging to the user test in the directory directoryforboth.
Output:
Editing File
Input:
"Press the ESC Key"
Output:
ESC Key
Input:
:wq!
Output:
Write and Quit
Input:
ls -lh
Output:
Change Ownership
The ls command lists the contents of a directory. We are in the user test's home directory in the image below.
The first command (ls) lists the files, links, and directories.
The second command (ls -l) lists the files, links, and directories in the long format (-l) with more metadata shown.
The third command (ls -lh) lists the files, links, and directories in the long format (-l) with human readable (-h) file sizes.
- The first column contains the permissions with the first character signify if it's a file, link, or directory represented by a -, l, or d respectively.
- The second column is the link count.
- The third column is the owner of that file, link, or directory.
- The fourth column is the group of that file, link, or directory.
- The fifth column is the file size.
- The sixth column is the date of last modification.
- The last column is the name of the file, link, or directory.
ls
ls -l
ls -lh
Output:
Contents of a Directory
As seen in the image below, the owner and group of the contents in a user's home directory is the user. We can see that the owner and group for the test user home directory is test. The first column states what kind of permissions certain users have for that directory or file. The permissions are ordered OWNER-GROUP-OTHERS with three possible letters each. So here the OWNER:test has rwx permissions which are read, write, and execute. The GROUP:test has --- permissions which are none. The OTHERS also have --- permissions which are none. Since the owner of the test user home directory is test and we were logged in as test, creating files and directories did not cause any errors. The limited permissions for GROUP and OTHERS is due to test being the first user created.
If we take a look at the anotheruser user home directory, the OWNER:anotheruser has rwx permissions which are read, write, and execute. The GROUP:anotheruser has r-x permissions which are read and execute only. The OTHERS also have r-x permissions which are read and execute only. The explanations for each permission can be seen below.
- For Files:
- Read allows you to look into the file.
- Write allows you to edit the file.
- Execute allows you to run the file.
- For Directories:
- Read allows you to see the files within the directory.
- Write allows you to create, edit, and delete files within the directory and delete the directory.
- Execute allows you to enter the directory using the change directory command (cd \DIRECTORYNAME).
ls -lh
Output:
Home Permissions
If the user test tries to create file or directory in anotheruser's home directory an error will occur since the user test does not have write permissions as the user test is not the owner of that directory.
Input:touch file1
mkdir directory1
Output:
Permission Error
Using the superuser do sudo command allows a user to have root permissions and edit anything even if they are not the owner or part of the group. A regular user or a user not using sudo cannot edit those files. Note that using sudo causes the owner and group of the file or directory to be root.
Input:sudo touch file1
sudo mkdir directory1
Output:
Use sudo to Create File and Directory
However, not all users are part of the sudo group and can use the sudo command. The command groups USERNAME allows you to see what groups a certain user belongs to. As seen below, the user test belongs to sudo and a bunch of other groups while the user anotheruser only belongs to their own group: anotheruser.
Input:groups test
groups anotheruser
Output:
Groups
Use the command exit to log out of the current user and enter your second user credentials. Notice the username changed before the @ in the terminal.
Input:exit
Output:
Switch Users
You can change the password of a user using the password passwd command so that it is not the same password that was assigned on the creation of the user.
Input:passwd
Output:
Change Password
If the user anotheruser tries to change directories into the user test's home directory, they will get denied due to the OTHERS having --- no permissions. If the user anotheruser tries to use sudo and is not the in sudo group, the incident will be reported.
Input:cd test/
sudo cd test/
Output:
Reported
User Modification (usermod)
The user modification usermod command allows sudo to modify users. Adding a user to a group is one of those modifications. The command below modifies the user (usermod) and appends (-a) the group (-G) sudo to the user anotheruser's groups.
Input:
sudo usermod -a -G sudo anotheruser
Output:
Add User to Group
A user can also be removed from a group using the deluser command.
Input:
sudo deluser anotheruser sudo
Output:
Delete User from Group
Add Group (addgroup)
A group can be created so that both users (test and anotheruser) can modify files without the sudo command. A group is created using the addgroup command. We then add both users (test and anotheruser) to the group bothusers.
Input:
sudo addgroup bothusers
sudo usermod -a -G bothusers test
sudo usermod -a -G bothusers anotheruser
Output:
Add Group bothusers
A directory is created titled directoryforbothusers with the sudo command. However, since it was created with the sudo command, the owner and group is root.
Input:
sudo mkdir directoryforbothusers
ls -lh
Output:
Directory for Both Users
Change Ownership (chown)
The change onwership chown command allows sudo to change the owner or group of a file. In the image below, the owner and the group of the directory directoryforbothusers is changed to test and bothusers respectively. Anything that would have been in the directory directoryforbothusers would have also changed ownership due to the recursive (-R) option.
Note: If you wanted to change the owner of directory only it would be sudo chown -R USERNAME DIRECTORYNAME. If you wanted to change only the group it would be sudo chown -R :GROUPNAME DIRECTORYNAME.
Input:
sudo chown -R test:bothusers /home/directoryforbothusers/
Output:
Change Ownership
Change Mode (chmod)
The change mode chmod command allows sudo to change permissions of a file. In the image above, the user test has rwx (read, write, and execute) permissions since the user test is the owner of the directory directoryforbothusers. However, we still need to give write permissions to the group bothusers as it currently only has r-x (read and execute) permissions so the user anotheruser cannot create files in the directory directoryforbothusers.
We will change permissions with the change mode chmod command. The three numbers correlate to OWNER-GROUP-OTHERS. The numbers and their corresponding permissions can be seen below. Here we are giving read, write, and execute permissions to both the OWNER and GROUP while only giving read and execute permissions to OTHERS.
- 7: Read, write, and execute.
- 6: Read and write.
- 5: Read and execute.
- 4: Read.
- 3: Write and execute.
- 2: Write.
- 1: Execute.
- 0: None.
Input:
sudo chmod -R 775 /home/directoryforbothusers/
Output:
Change Mode
Now both users (test and anotheruser) can add files to the directory directoryforbothusers without the sudo command.
Input:
touch file1
Output:
Create File in directoryforbothusers
The user anotheruser can also create files in the directory directoryforbothusers without the sudo command due to the modified group permissions.
Input:
touch file2
Output:
Create Another File in directoryforbothusers
Now both users can edit each other's files. Below I am deleting file1 which is owned by the user test when I am signed in as the user anotheruser. Since it is owned by the user test, it will ask the user to confirm the deletion.
Input:
rm file1
Output:
Delete Another User's File
Visual Editor (vi)
The visual editor vi is the default text editor in Linux. Enter the command vi FILENAME in order to start editing a file. You will now be in the visual editor and be able to edit the specified file. Start by pressing the letter "i" on your keyboard and the text "-- INSERT --" should now appear at the bottom of the terminal signifying you can begin inserting text. Once done, press the "ESC" key to exit the "-- INSERT --" mode. After you have pressed the "ESC" key, you should be able to type :wq which allows you to write/save (w) and quit (q) the file. Since we are editing a different user's file within a group we have write permissions in, we will need to add the override command (!) such that we write wq!. Hit enter and you should have exited the visual editor. If the ls -lh command is entered, one can see that the file ownership for file1 has changed from user test to user anotheruser.
Input:
vi file1
Output:
Edit Another User's File
Edit Another User's File 2
Input:
i
Output:
-- INSERT -- Mode
Input:
This file belongs to the user test which is in the directory directoryforboth that belongs to the group bothusers. The user anotheruser is in the group bothusers which has write permissions in the directory directoryforboth. Thus, the user anotheruser can edit files belonging to the user test in the directory directoryforboth.
Output:
Editing File
Input:
"Press the ESC Key"
Output:
ESC Key
Input:
:wq!
Output:
Write and Quit
Input:
ls -lh
Output:
Change Ownership
The user modification usermod command allows sudo to modify users. Adding a user to a group is one of those modifications. The command below modifies the user (usermod) and appends (-a) the group (-G) sudo to the user anotheruser's groups.
Input:sudo usermod -a -G sudo anotheruser
Output:
Add User to Group
A user can also be removed from a group using the deluser command.
Input:sudo deluser anotheruser sudo
Output:
Delete User from Group
A group can be created so that both users (test and anotheruser) can modify files without the sudo command. A group is created using the addgroup command. We then add both users (test and anotheruser) to the group bothusers.
Input:sudo addgroup bothusers
sudo usermod -a -G bothusers test
sudo usermod -a -G bothusers anotheruser
Output:
Add Group bothusers
A directory is created titled directoryforbothusers with the sudo command. However, since it was created with the sudo command, the owner and group is root.
Input:sudo mkdir directoryforbothusers
ls -lh
Output:
Directory for Both Users
Change Ownership (chown)
The change onwership chown command allows sudo to change the owner or group of a file. In the image below, the owner and the group of the directory directoryforbothusers is changed to test and bothusers respectively. Anything that would have been in the directory directoryforbothusers would have also changed ownership due to the recursive (-R) option.
Note: If you wanted to change the owner of directory only it would be sudo chown -R USERNAME DIRECTORYNAME. If you wanted to change only the group it would be sudo chown -R :GROUPNAME DIRECTORYNAME.
Input:
sudo chown -R test:bothusers /home/directoryforbothusers/
Output:
Change Ownership
Change Mode (chmod)
The change mode chmod command allows sudo to change permissions of a file. In the image above, the user test has rwx (read, write, and execute) permissions since the user test is the owner of the directory directoryforbothusers. However, we still need to give write permissions to the group bothusers as it currently only has r-x (read and execute) permissions so the user anotheruser cannot create files in the directory directoryforbothusers.
We will change permissions with the change mode chmod command. The three numbers correlate to OWNER-GROUP-OTHERS. The numbers and their corresponding permissions can be seen below. Here we are giving read, write, and execute permissions to both the OWNER and GROUP while only giving read and execute permissions to OTHERS.
- 7: Read, write, and execute.
- 6: Read and write.
- 5: Read and execute.
- 4: Read.
- 3: Write and execute.
- 2: Write.
- 1: Execute.
- 0: None.
Input:
sudo chmod -R 775 /home/directoryforbothusers/
Output:
Change Mode
Now both users (test and anotheruser) can add files to the directory directoryforbothusers without the sudo command.
Input:
touch file1
Output:
Create File in directoryforbothusers
The user anotheruser can also create files in the directory directoryforbothusers without the sudo command due to the modified group permissions.
Input:
touch file2
Output:
Create Another File in directoryforbothusers
Now both users can edit each other's files. Below I am deleting file1 which is owned by the user test when I am signed in as the user anotheruser. Since it is owned by the user test, it will ask the user to confirm the deletion.
Input:
rm file1
Output:
Delete Another User's File
Visual Editor (vi)
The visual editor vi is the default text editor in Linux. Enter the command vi FILENAME in order to start editing a file. You will now be in the visual editor and be able to edit the specified file. Start by pressing the letter "i" on your keyboard and the text "-- INSERT --" should now appear at the bottom of the terminal signifying you can begin inserting text. Once done, press the "ESC" key to exit the "-- INSERT --" mode. After you have pressed the "ESC" key, you should be able to type :wq which allows you to write/save (w) and quit (q) the file. Since we are editing a different user's file within a group we have write permissions in, we will need to add the override command (!) such that we write wq!. Hit enter and you should have exited the visual editor. If the ls -lh command is entered, one can see that the file ownership for file1 has changed from user test to user anotheruser.
Input:
vi file1
Output:
Edit Another User's File
Edit Another User's File 2
Input:
i
Output:
-- INSERT -- Mode
Input:
This file belongs to the user test which is in the directory directoryforboth that belongs to the group bothusers. The user anotheruser is in the group bothusers which has write permissions in the directory directoryforboth. Thus, the user anotheruser can edit files belonging to the user test in the directory directoryforboth.
Output:
Editing File
Input:
"Press the ESC Key"
Output:
ESC Key
Input:
:wq!
Output:
Write and Quit
Input:
ls -lh
Output:
Change Ownership
The change onwership chown command allows sudo to change the owner or group of a file. In the image below, the owner and the group of the directory directoryforbothusers is changed to test and bothusers respectively. Anything that would have been in the directory directoryforbothusers would have also changed ownership due to the recursive (-R) option.
Note: If you wanted to change the owner of directory only it would be sudo chown -R USERNAME DIRECTORYNAME. If you wanted to change only the group it would be sudo chown -R :GROUPNAME DIRECTORYNAME.
sudo chown -R test:bothusers /home/directoryforbothusers/
Output:
Change Ownership
The change mode chmod command allows sudo to change permissions of a file. In the image above, the user test has rwx (read, write, and execute) permissions since the user test is the owner of the directory directoryforbothusers. However, we still need to give write permissions to the group bothusers as it currently only has r-x (read and execute) permissions so the user anotheruser cannot create files in the directory directoryforbothusers.
We will change permissions with the change mode chmod command. The three numbers correlate to OWNER-GROUP-OTHERS. The numbers and their corresponding permissions can be seen below. Here we are giving read, write, and execute permissions to both the OWNER and GROUP while only giving read and execute permissions to OTHERS.
- 7: Read, write, and execute.
- 6: Read and write.
- 5: Read and execute.
- 4: Read.
- 3: Write and execute.
- 2: Write.
- 1: Execute.
- 0: None.
sudo chmod -R 775 /home/directoryforbothusers/
Output:
Change Mode
Now both users (test and anotheruser) can add files to the directory directoryforbothusers without the sudo command.
Input:touch file1
Output:
Create File in directoryforbothusers
The user anotheruser can also create files in the directory directoryforbothusers without the sudo command due to the modified group permissions.
Input:touch file2
Output:
Create Another File in directoryforbothusers
Now both users can edit each other's files. Below I am deleting file1 which is owned by the user test when I am signed in as the user anotheruser. Since it is owned by the user test, it will ask the user to confirm the deletion.
Input:rm file1
Output:
Delete Another User's File
Visual Editor (vi)
The visual editor vi is the default text editor in Linux. Enter the command vi FILENAME in order to start editing a file. You will now be in the visual editor and be able to edit the specified file. Start by pressing the letter "i" on your keyboard and the text "-- INSERT --" should now appear at the bottom of the terminal signifying you can begin inserting text. Once done, press the "ESC" key to exit the "-- INSERT --" mode. After you have pressed the "ESC" key, you should be able to type :wq which allows you to write/save (w) and quit (q) the file. Since we are editing a different user's file within a group we have write permissions in, we will need to add the override command (!) such that we write wq!. Hit enter and you should have exited the visual editor. If the ls -lh command is entered, one can see that the file ownership for file1 has changed from user test to user anotheruser.
Input:
vi file1
Output:
Edit Another User's File
Edit Another User's File 2
Input:
i
Output:
-- INSERT -- Mode
Input:
This file belongs to the user test which is in the directory directoryforboth that belongs to the group bothusers. The user anotheruser is in the group bothusers which has write permissions in the directory directoryforboth. Thus, the user anotheruser can edit files belonging to the user test in the directory directoryforboth.
Output:
Editing File
Input:
"Press the ESC Key"
Output:
ESC Key
Input:
:wq!
Output:
Write and Quit
Input:
ls -lh
Output:
Change Ownership
The visual editor vi is the default text editor in Linux. Enter the command vi FILENAME in order to start editing a file. You will now be in the visual editor and be able to edit the specified file. Start by pressing the letter "i" on your keyboard and the text "-- INSERT --" should now appear at the bottom of the terminal signifying you can begin inserting text. Once done, press the "ESC" key to exit the "-- INSERT --" mode. After you have pressed the "ESC" key, you should be able to type :wq which allows you to write/save (w) and quit (q) the file. Since we are editing a different user's file within a group we have write permissions in, we will need to add the override command (!) such that we write wq!. Hit enter and you should have exited the visual editor. If the ls -lh command is entered, one can see that the file ownership for file1 has changed from user test to user anotheruser.
Input:vi file1
Output:
Edit Another User's File
Edit Another User's File 2
Input:
i
Output:
-- INSERT -- Mode
Input:
This file belongs to the user test which is in the directory directoryforboth that belongs to the group bothusers. The user anotheruser is in the group bothusers which has write permissions in the directory directoryforboth. Thus, the user anotheruser can edit files belonging to the user test in the directory directoryforboth.
Output:
Editing File
Input:
"Press the ESC Key"
Output:
ESC Key
Input:
:wq!
Output:
Write and Quit
Input:
ls -lh
Output:
Change Ownership