MySQL Tutorial
Introduction
MySQL is one of the many database management systems (DBMS) available online for free. It uses structured query language (SQL) as its programming language like many other DBMS. DBMS are useful if one has a lot of data that is needed to be stored and kept track of.
Installing MySQL
This section is a reiteration of the MySQL installation on the Website Setup page. If you have already installed MySQL for your Ubuntu Server, please head on over to the Basic Commands section.
In order to install MySQL for your Ubuntu Server, type the command below into your terminal. Type in y for yes when asked if you want to proceed with the installation.
sudo apt-get install mysql-server
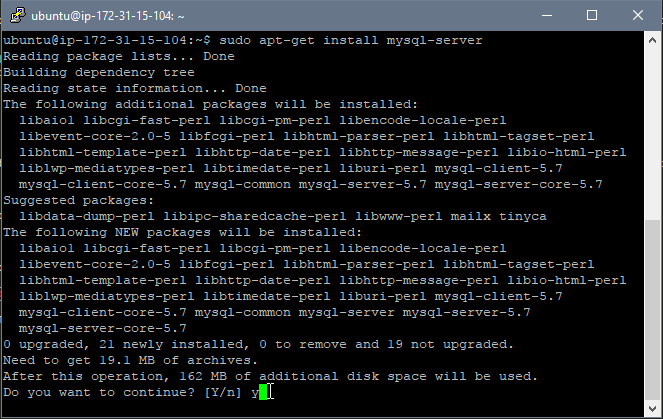
MySQL Server
A prompt will ask you to create a password for your MySQL root user and confirm it.
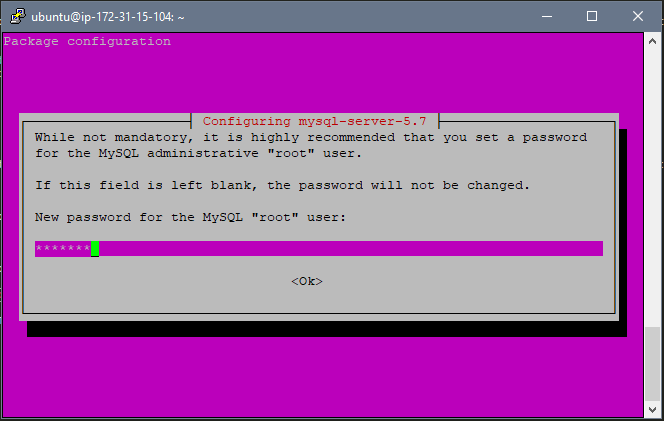
MySQL Server Password
Now we will edit some of the settings in MySQL in order to make it more secure. The first setting will ask you if you want to validate passwords by making them meet a certain criteria. Select yes and then select the password validation criteria of LOW, MEDIUM, or STRONG by selecting 0, 1, or 2 respectively. For this example I chose LOW by typing 0. It will then ask you if you want to change your MySQL password for the root user. The next four questions deal with the security of MySQL, select yes for all of them. The first question removes anonymous users, the second question removes the possibility of the root user logging in remotely, the third question removes the test database, and fourth question makes sure the changes are applied immediately.
sudo mysql_secure_installation
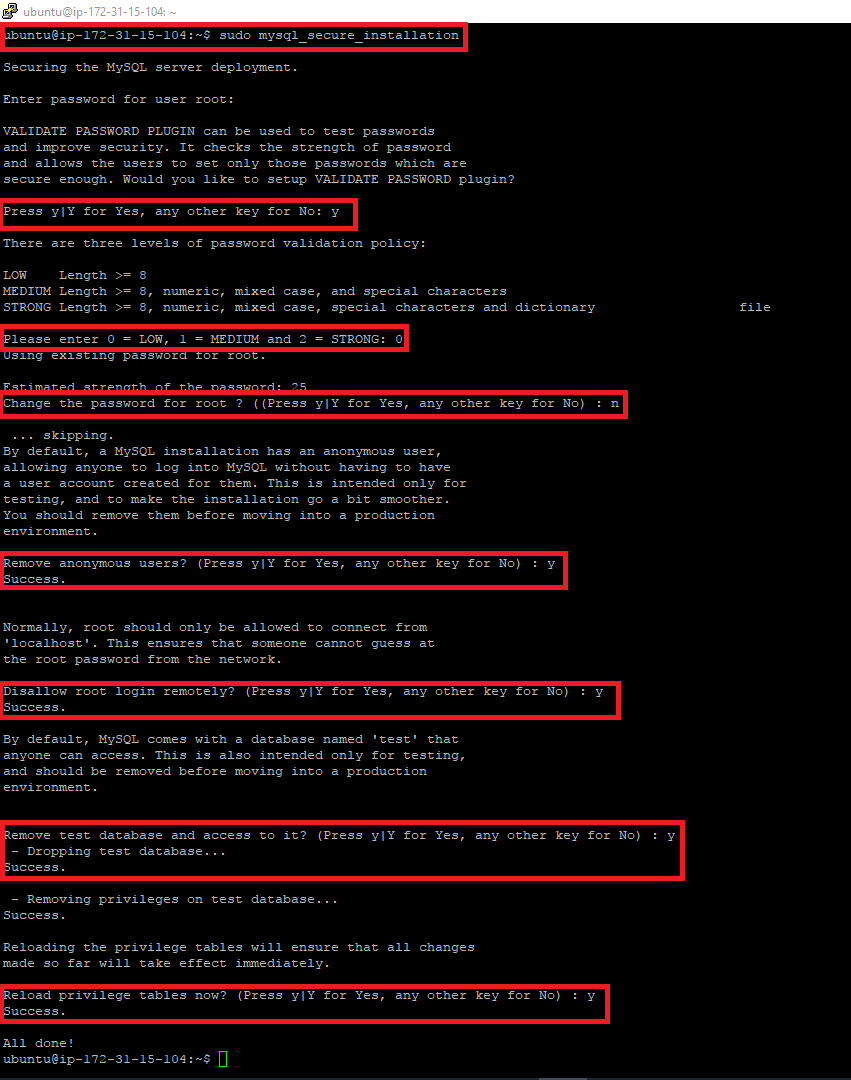
MySQL Server Secure Installation
Basic Commands
This section will go over some useful commands for MySQL that can also be used on other SQL based DBMS.
- Getting Started
- Database Commands
- Table Commands
- Insert Data
- Select
- Where
- And Or
- Order By
- As
- Math Functions
- Group By
- Join
- Views
- New Users
Getting Started
The command below allows the user to log in to MySQL as the root user. The desired username is stated after -u and the password can be typed in once the user presses enter after -p. Once logged in, the command prompt username@servername:~$ will be replaced with mysql> signifying that the user is now in MySQL.
Input:mysql -u root -p
Output:

MySQL Login
You can exit MySQL by typing exit.
Input:exit
Output:
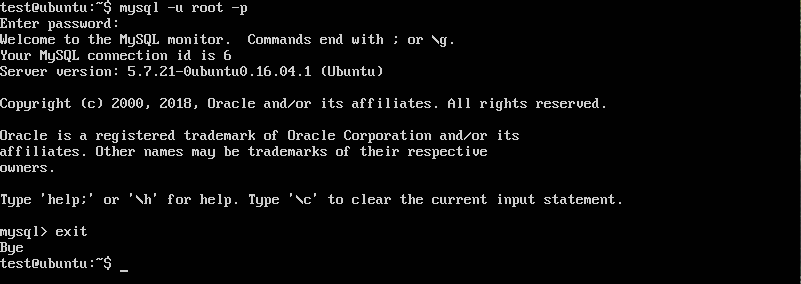
MySQL Exit
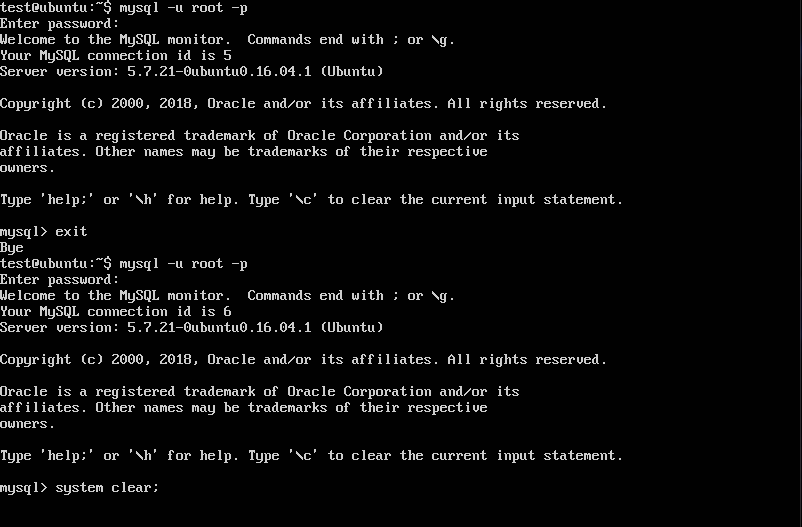
The system clear; command clears the terminal window in MySQL but you can also use Ctrl + L.
Input:system clear;
System Clear
Output:

System Cleared
Database Commands
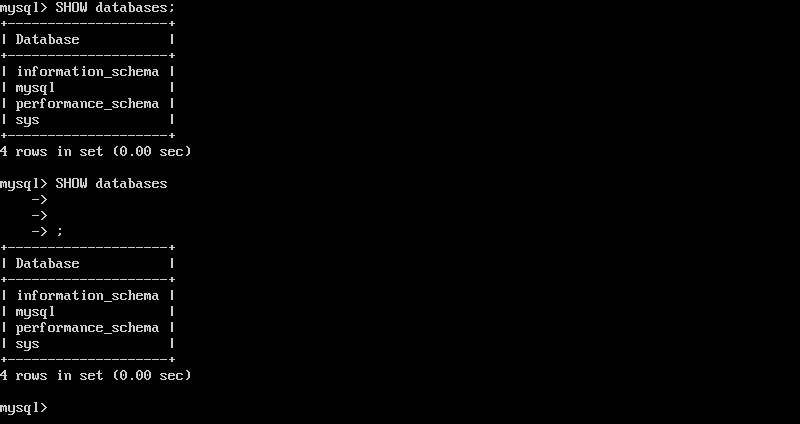
Now that we are in MySQL, we can start creating databases in order to store data. The command SHOW databases; allows the user to see the databases in MySQL. Note the inclusion of the semicolon ; as this informs MySQL that the command is to be executed. Pressing enter does not execute the command and the command still needs the semicolon ; in order to be executed. Below is the list of the default databases that come with MySQL which deal with MySQL settings and information. We will leave these alone.
Input:SHOW databases;
Output:
Show Databases
The command CREATE DATABASE databasename; creates a database with the name databasename. I have created a database with the name testdatabase as seen below.
Input:CREATE DATABASE testdatabase;
Output:

Create Databases
You can delete a database with DROP DATABASE databasename;.
Input:DROP DATABASE testdatabase;
Output:

Drop Databases
Now we will select the database testdatabase with USE databasename; in order to create a table in the testdatabase database. You can see which database is currently selected with the SELECT DATABASE(); command.
Input:USE testdatabase;
SELECT DATABASE();
Output:

Use and Select Database
Table Commands
A table is the object that holds data in a database and can be created by using CREATE TABLE tablename();. I have created a table named testtable in order to start inputting data. The command SHOW tables; lists the tables in the current database.
The data columns of the table are created within the parentheses of CREATE TABLE tablename();. You can input all the SQL code on one line but it is easier to differentiate each new column by entering them on a new line. You must specify the column name and the data type of that column in order to create the column. Each new column is separated by a comma , before going to the next line.
The left most input in each new line is the column name (i.e. id, first_name, and last_name). The data type of the column and any other information for that column is stated after the column name. Below is a list of the columns I have created for the table testtable and their description.
id:
I have made the column id an integer INT that must be zero or positive UNSIGNED and cannot be empty NOT NULL. The option PRIMARY KEY makes id the unique identifier for each row. No other row can have the same id and it cannot be empty.
first_name and last_name:
The column first_name and last_name have the data type VARCHAR(#) which is a variable length string with the number # being the maximum number of characters.
date_of_birth:
The date_of_birth column is a DATE data type with the format YYYY-MM-DD.
state:
The column state uses the CHAR(#) data type with the # being the number of characters allowed. The number used is 2 since we know the abbreviations for states are 2 characters such as CA, NM, and NY.
username and email :
The username and email must be UNIQUE but can be NULL unlike the PRIMARY KEY. I have made these two columns NOT NULL even though they can be NULL.
has_pet:
The has_pet column is a BIT data type which can be 1 for true or 0 for false.
pet_type:
The column pet_type uses the enumerated ENUM('list','of','choices') data type which requires the data entered to be from the list of choices given.
pet_food_cost:
The column pet_food_cost uses the DECIMAL(A,B) data type where A is the number of digits to the left of the decimal and B is the number of digits to the right of the decimal. The code below uses DECUMAL(4,2) which indicates a number value of AAAA.BB for the column pet_food_cost.
pet_favorite_food:
The pet_favorite_food column does not have the NOT NULL statement and by default can be empty NULL.
Note that the last column of the table does not have a comma before ending the command with ); on the next line.
USE testdatabase;

					    CREATE TABLE testtable (

						id INT UNSIGNED PRIMARY KEY NOT NULL,
						first_name VARCHAR(50) NOT NULL,
						last_name VARCHAR(50) NOT NULL,
						date_of_birth DATE NOT NULL,
						address VARCHAR(50) NOT NULL,
						city VARCHAR (50) NOT NULL,
						state CHAR(2) NOT NULL,
						zip_code INT UNSIGNED NOT NULL,
						username VARCHAR(50) UNIQUE NOT NULL,
						email VARCHAR(50) UNIQUE NOT NULL,
						has_pet BIT NOT NULL,
						pet_type ENUM('dog','cat','fish','bird','multiple','other') NOT NULL,
						pet_food_cost DECIMAL(4,2) NOT NULL,
						pet_favorite_food VARCHAR(50)
						);

						SHOW tables;
Output:

Create Table
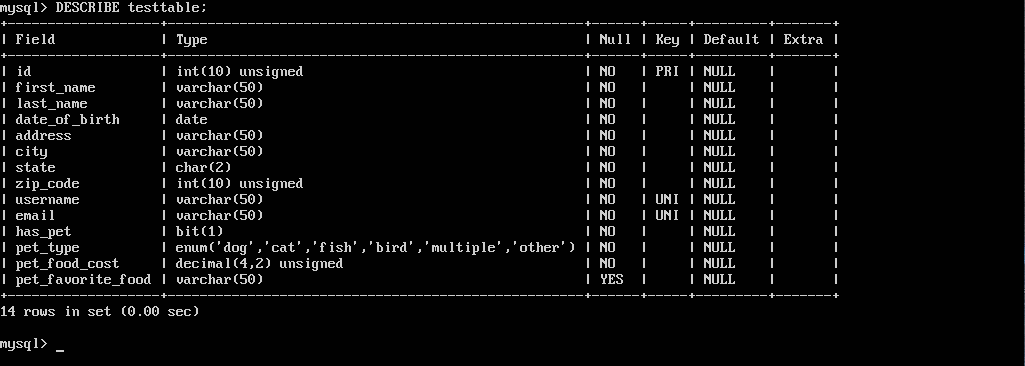
You can see table information with the DESCRIBE tablename; command. This lists the columns of a table and what their respective data types are along with any other pertinent information.
Input:DESCRIBE testtable;
Output:
Describe Table
A table can be deleted with the DROP TABLE tablename; command. I have created another table named table1 in order to illustrate this command.
Input:DROP TABLE table1;
Output:

Drop Table
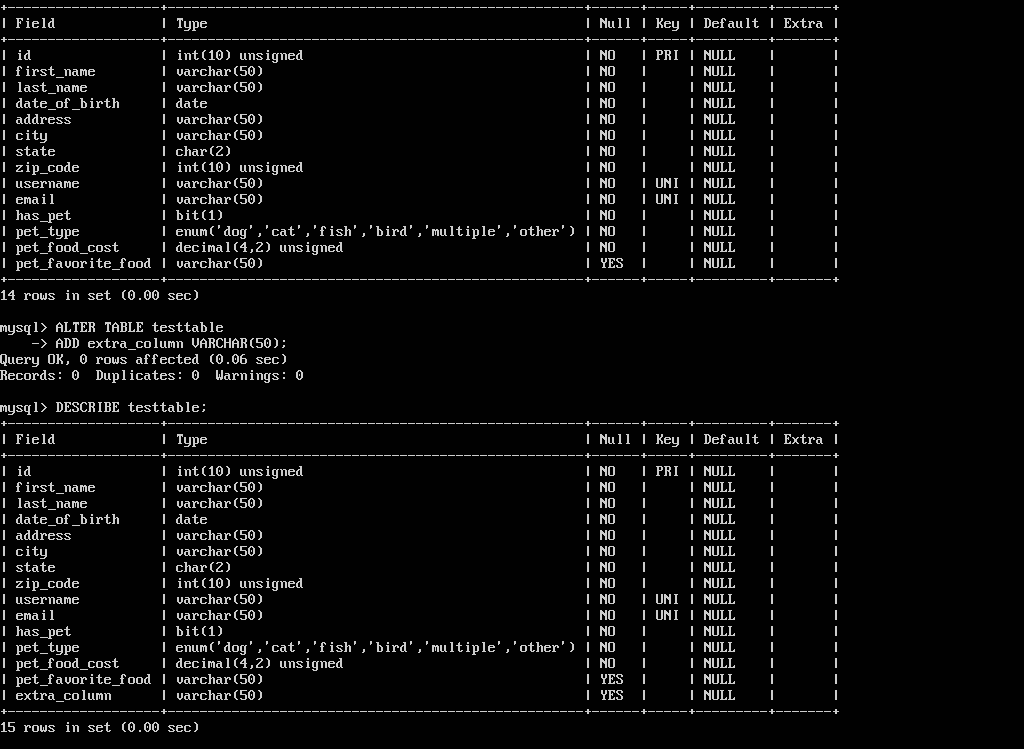
You can add a column to a table using ALTER TABLE tablename ADD columnname datatype;.
Input:ALTER TABLE testtable
ADD extra_column VARCHAR(50);
Output:
Extra Column
A column can be deleted from a table using ALTER TABLE tablename DROP COLUMN columnname;
Input:ALTER TABLE testtable
DROP COLUMN extra_column;
Output:
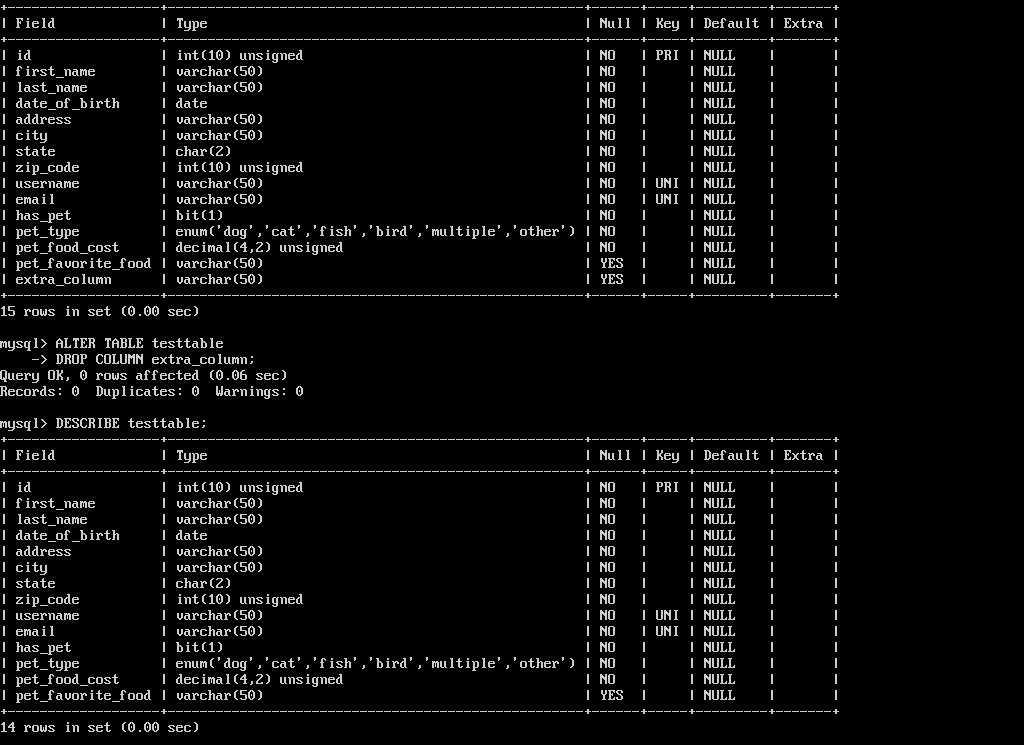
Drop Column
You can change a column's name and data type using ALTER TABLE tablename CHANGE oldcolumnname newcolumnname newdatatype;
Input:ALTER TABLE tablename
CHANGE extra_column column_extra DATE;
Output:
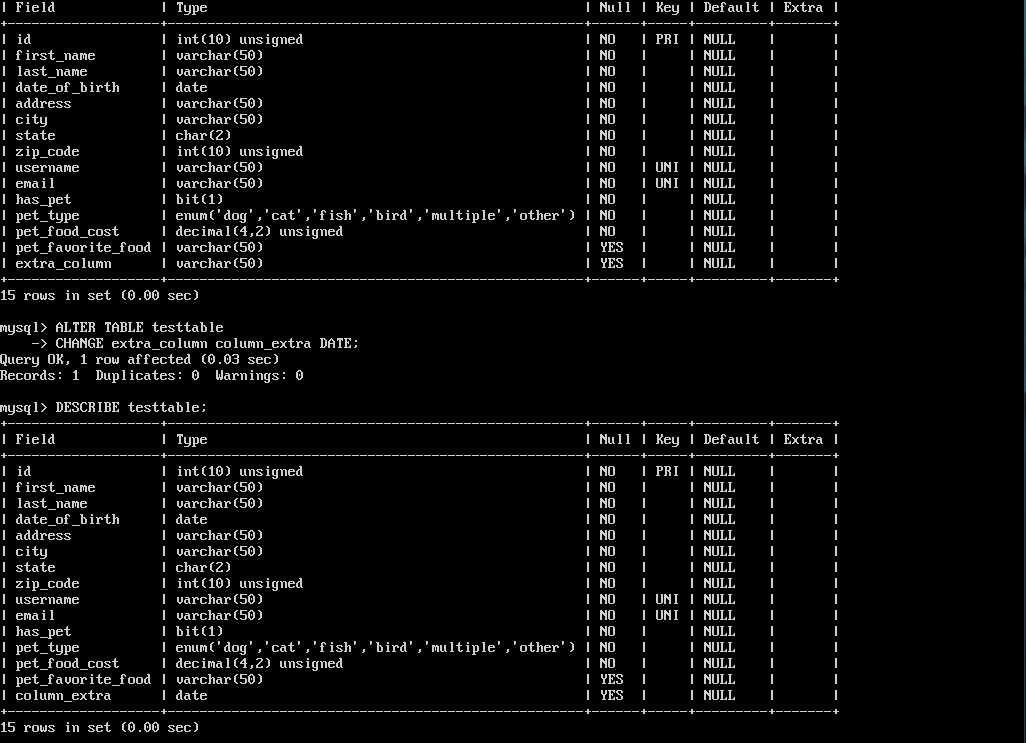
Change Column
A column's data type can be modified using ALTER TABLE tablename MODIFY columnname newdatatype;
Input:ALTER TABLE tablename
MODIFY column_extra VARCHAR(50);
Output:
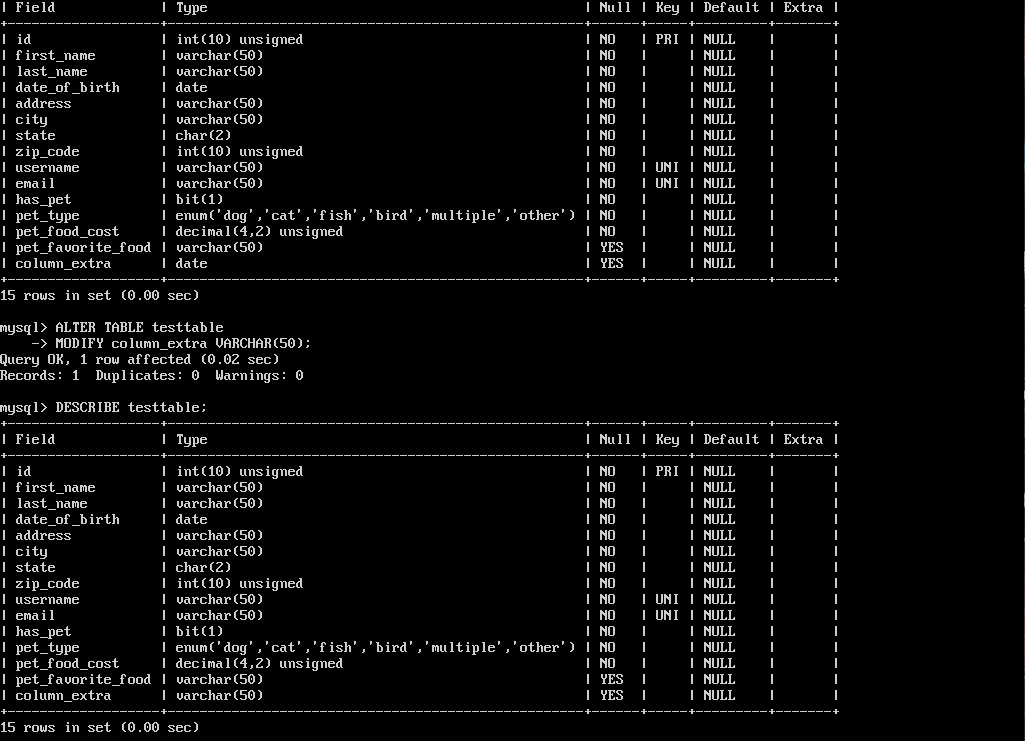
Modify Column
Insert Data
Data can be entered into a table by using the INSERT INTO tablename VALUE(); command. The data values must be inserted in the order of the columns and must match the number of columns. Strings and dates are surrounded with apostrophes (' '). If a column does not require a value, one can enter NULL.
Input:INSERT INTO testtable VALUE (
0,
'John',
'Doe',
'1900-01-31',
'123 First Street',
'San Francisco',
'CA',
94016,
'johndoe',
'johndoe@aol.com',
1,
'dog',
19.99,
NULL
);
Output:

Insert Into Table
An error will occur if a duplicate value is entered for a UNIQUE column such as the PRIMARY KEY as this value must be unique.
Input:INSERT INTO testtable VALUE (
0,
'Jane',
'Doe',
'1905-02-15',
'321 Second Street',
'Los Angeles',
'CA',
90001,
'janedoe',
'janedoe@aol.com',
0,
'other',
0.00,
NULL
);
INSERT INTO testtable VALUE (
1,
'Jane',
'Doe',
'1905-02-15',
'321 Second Street',
'Los Angeles',
'CA',
90001,
'janedoe',
'janedoe@aol.com',
0,
'other',
0.00,
NULL
);
Output:

Insert Into Table
You can insert specific data into specific columns and omit any NULL values with INSERT INTO tablename() VALUES();. The columns need to be specified in the parentheses after the specified table tablename(). I have created another table with fewer columns to better illustrate inserting data into specific columns that are NOT NULL. The NULL columns will appear as NULL if not specified. The SELECT * FROM tablename command is used to show all the columns from a table which will be explained later on in the tutorial.
Input:INSERT INTO test1 (
column0,
column1,
column2
)
VALUES (
0,
'testing1',
'testing2'
);
Output:
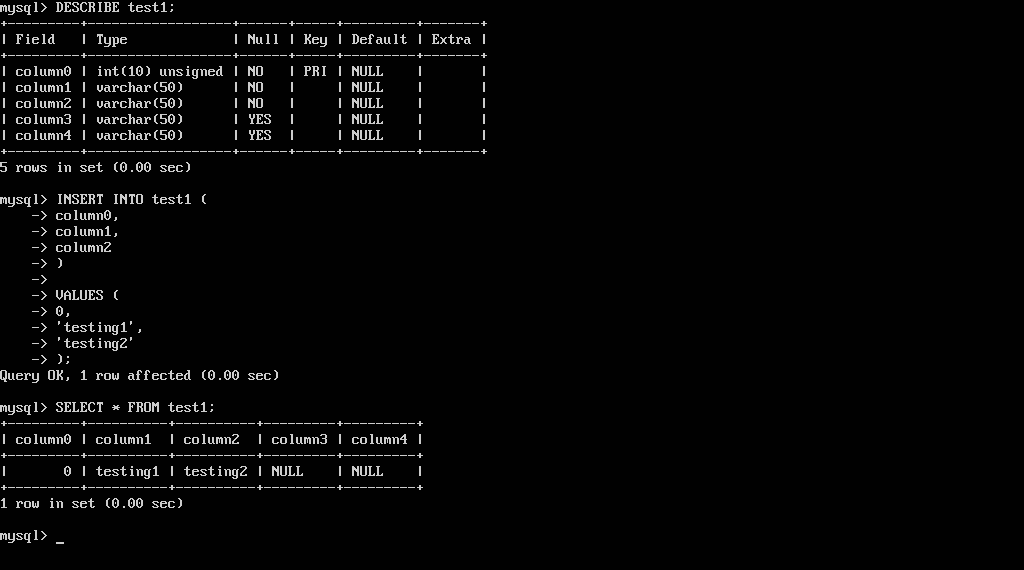
Insert NOT NULL
Updating specific rows of a table can be done with UPDATE tablename SET columnname = newvalue WHERE primarykeycolumn = desiredrow. This is where the PRIMARY KEY comes in handy as this uniquely defines a specific row. The WHERE columnname = desiredvalue command specifies a row(s) with a certain value (desiredvalue) in a certain column (columnname) which will be explained later on in the tutorial.
IMPORTANT: You need to specify the WHERE or else ALL the rows will be updated and not just the desired rows. This can be seen in the second command executed below.
UPDATE test1

					    SET
					    column3 = 'testtest1'
					    column4 = 'testtest2'

					    WHERE
					    column0 = 1
					    ;


						UPDATE test1

					    SET
					    column3 = 'testtest1'
					    column4 = 'testtest2'
					    ;
Output:
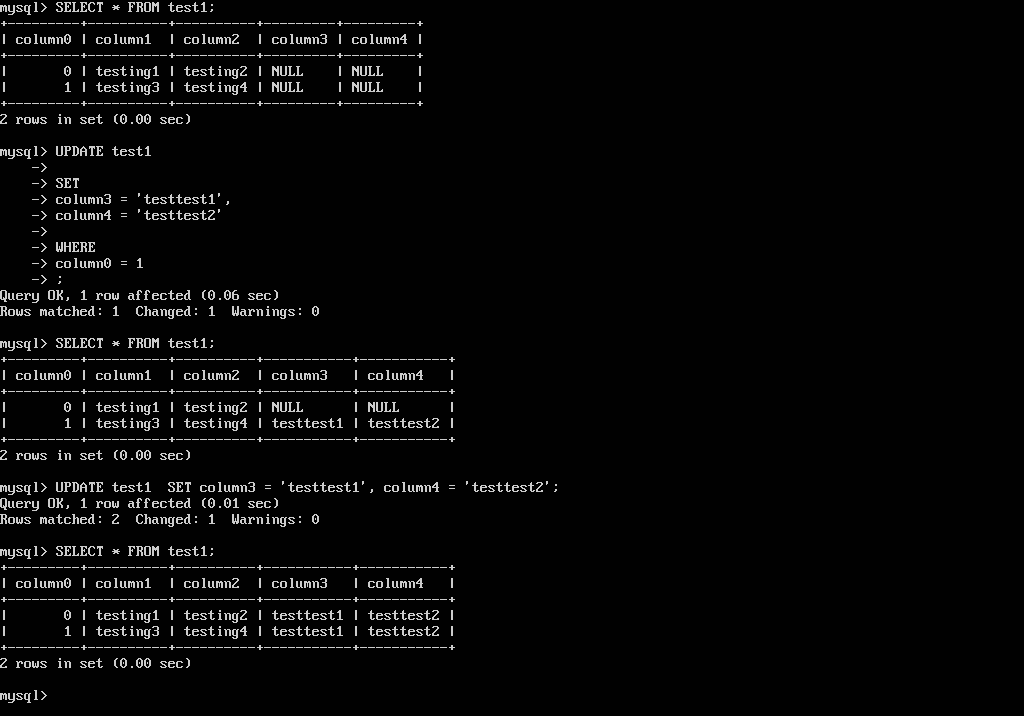
Update Row
Deleting specific rows from a table can be done with DELETE FROM tablename WHERE primarykeycolumn = desiredrow.
IMPORTANT: You need to specify the WHERE or else ALL the rows will be deleted as seen in the second command executed below.
DELETE FROM test1

					    WHERE
						column0 = 0
						;
Output:

Delete Row
Input:
DELETE FROM test1;
Output:

Delete All
Select
Once data has been entered into a table, one can see all the data columns of a table by using SELECT * FROM tablename;. The * shows all columns but the terminal window can be cluttered if there are a lot of columns in a table as seen below.
Input:SELECT * FROM testtable;
Output:

Select All
Therefore, it is useful to select one column or multiple columns by stating the column names separated by commas.
Input:SELECT first_name FROM testtable;
SELECT first_name, last_name, username FROM testtable;
Output:

Select Specific Columns
Where
You can also display a specific row by using SELECT columnnames FROM tablename WHERE primarykeycolumn = desiredrow;. This command uses the PRIMARY KEY to uniquely identify the desired row.
Input:SELECT first_name, last_name, username FROM testtable WHERE id = 0;
Output:

Select Specific Row
The command SELECT columnnames FROM tablename WHERE columnname = desiredvalue; filters out rows by specifying a certain value (desiredvalue) in a certain column (columnname) and using inequalities.
Input:SELECT first_name, pet_food_cost FROM testtable;
SELECT first_name, pet_food_cost FROM testtable WHERE pet_food_cost > 5.00;
SELECT first_name, pet_food_cost FROM testtable WHERE pet_food_cost >= 1.99;
SELECT first_name, pet_food_cost FROM testtable WHERE pet_food_cost = 9.99;
Output:
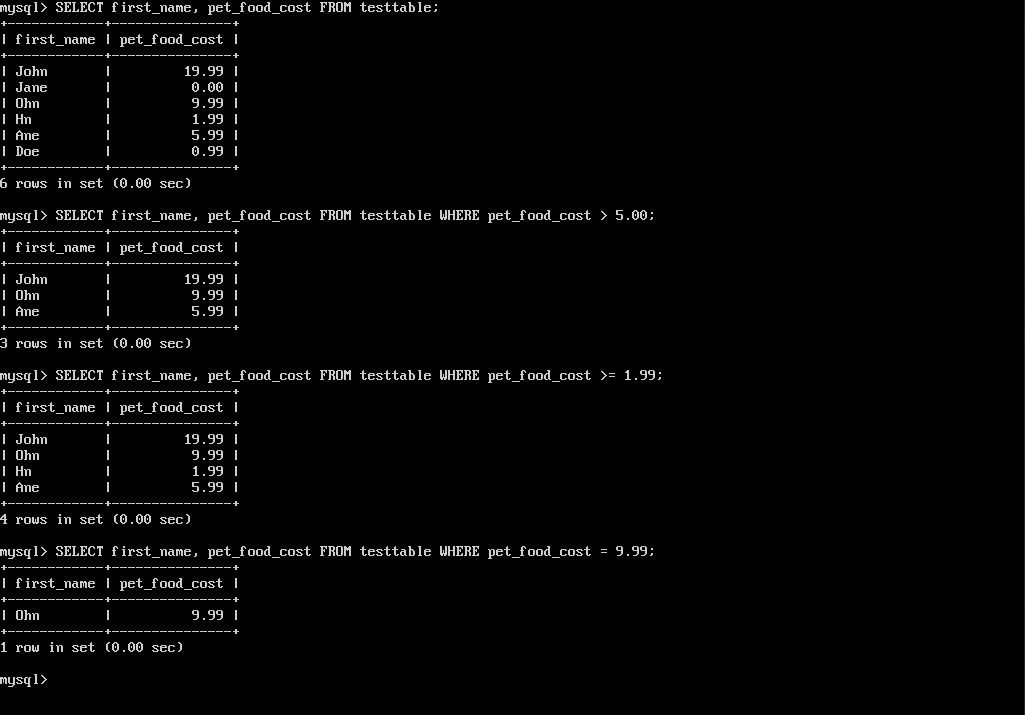
Filter Rows
You can also display specific rows with columns that have string data types.
Input:SELECT first_name, city FROM testtable;
SELECT first_name, city FROM testtable WHERE city = 'San Francisco';
SELECT first_name, city FROM testtable WHERE city = 'Los Angeles';
Output:
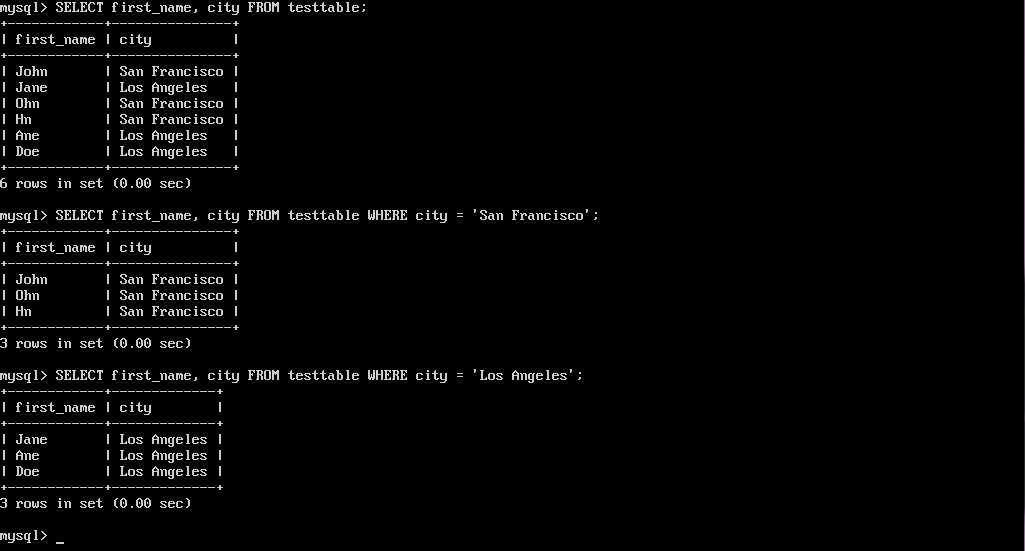
Filter Rows With Strings
And Or
Multiple WHERE statements can be combined with AND or OR. Parentheses are used if there are multiple AND or OR statements within the multiple WHERE statements.
Input:SELECT first_name, last_name, pet_food_cost, city FROM testtable;
SELECT first_name, last_name, pet_food_cost, city FROM testtable WHERE pet_food_cost >= 1.99 AND city = 'Los Angeles';
SELECT first_name, last_name, pet_food_cost, city FROM testtable WHERE (pet_food_cost >= 1.99 AND city = 'Los Angeles')
OR (last_name = 'Doey' AND first_name = 'Doe')
OR (last_name = 'Doe' AND pet_food_cost = 19.99);
Output:
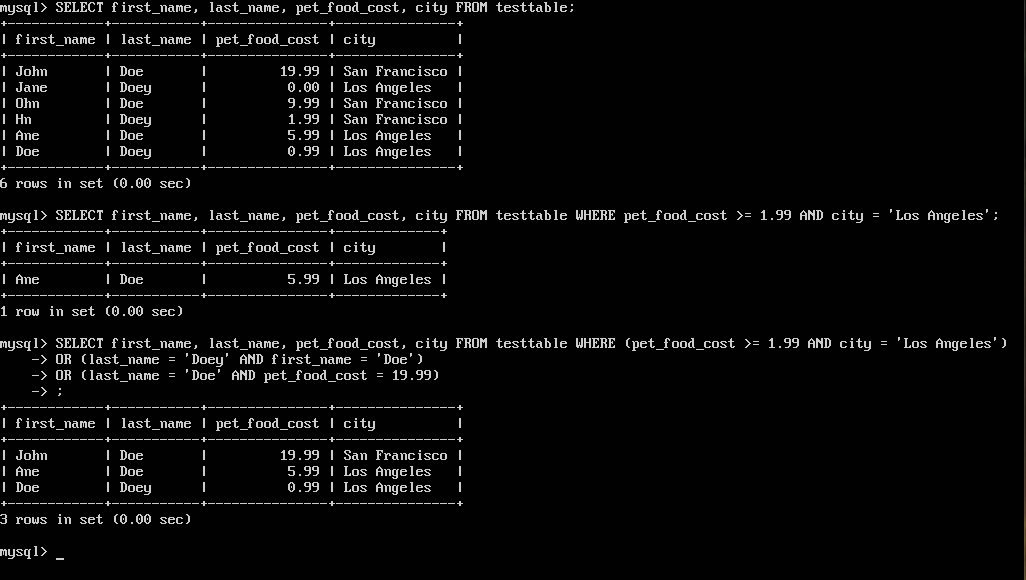
And Or
Order By
You can order the results of a query by a specific column with the SELECT columnnames FROM tablename WHERE columnname = desiredvalue ORDERY BY desiredcolumn; command where WHERE is optional as always. The default order method is ascending but you can state descending DESC.
Input:SELECT first_name, last_name, pet_food_cost FROM testtable;
SELECT first_name, last_name, pet_food_cost FROM testtable ORDER BY pet_food_cost;
SELECT first_name, last_name, pet_food_cost FROM testtable ORDER BY pet_food_cost DESC;
SELECT first_name, last_name, pet_food_cost FROM testtable WHERE pet_food_cost > 6.00 ORDER BY pet_food_cost DESC;
Output:
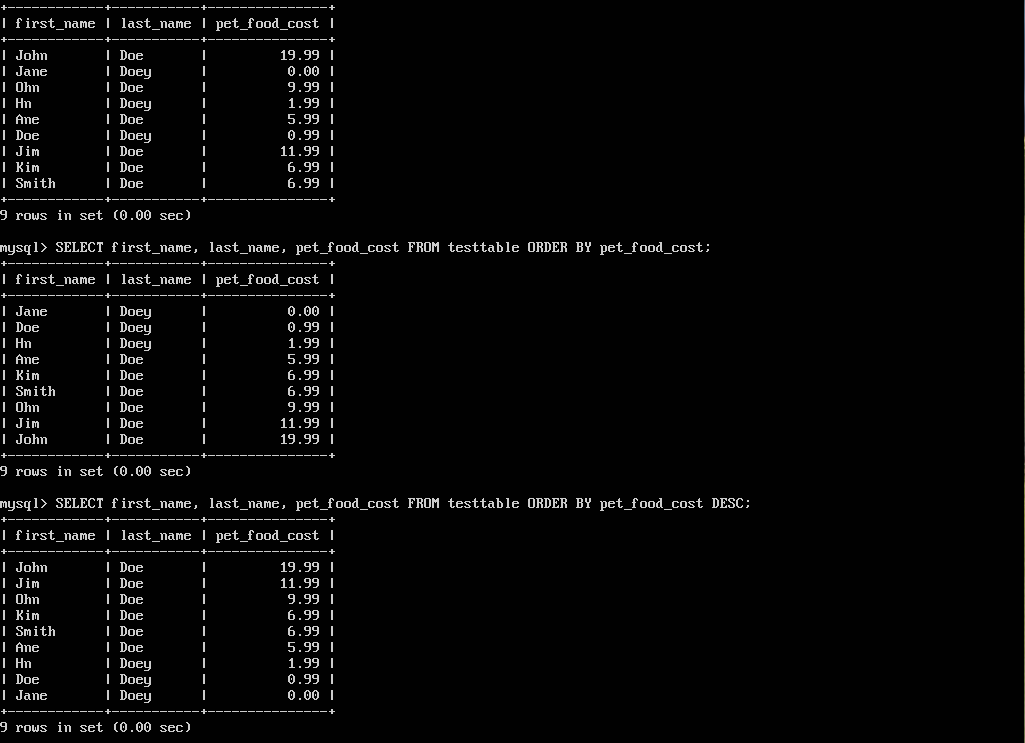
Order By

Order By With Where
As
The As statement is very useful when one is trying to create columns from a combination of other columns or trying to abbreviate column names. I have added another column named pet_food_bags that states the number of pet food bags that were bought by the customer. The As statement below will create a temporary column named total_cost that calculates the total cost of the pet food. You can use other mathematical operations such as addition (+), subtraction (-), multiplication (*), and division (/). The command is SELECT columnnames, desiredcolumn1+desiredcolumn2 AS tempcolumn FROM tablename WHERE columnname = desiredvalue; where WHERE is optional as always. Note that the column created with As does not get added to the table.
Input:SELECT id, first_name, last_name, pet_food_cost, pet_food_bags FROM testtable WHERE id >= 2;
SELECT id, first_name, last_name, pet_food_cost, pet_food_bags, pet_food_cost*pet_food_bags AS total_cost FROM testtable WHERE id >= 2;
SELECT id AS i, first_name AS fn, last_name AS ln, pet_food_cost AS pfc, pet_food_bags AS pfb FROM testtable;
Output:
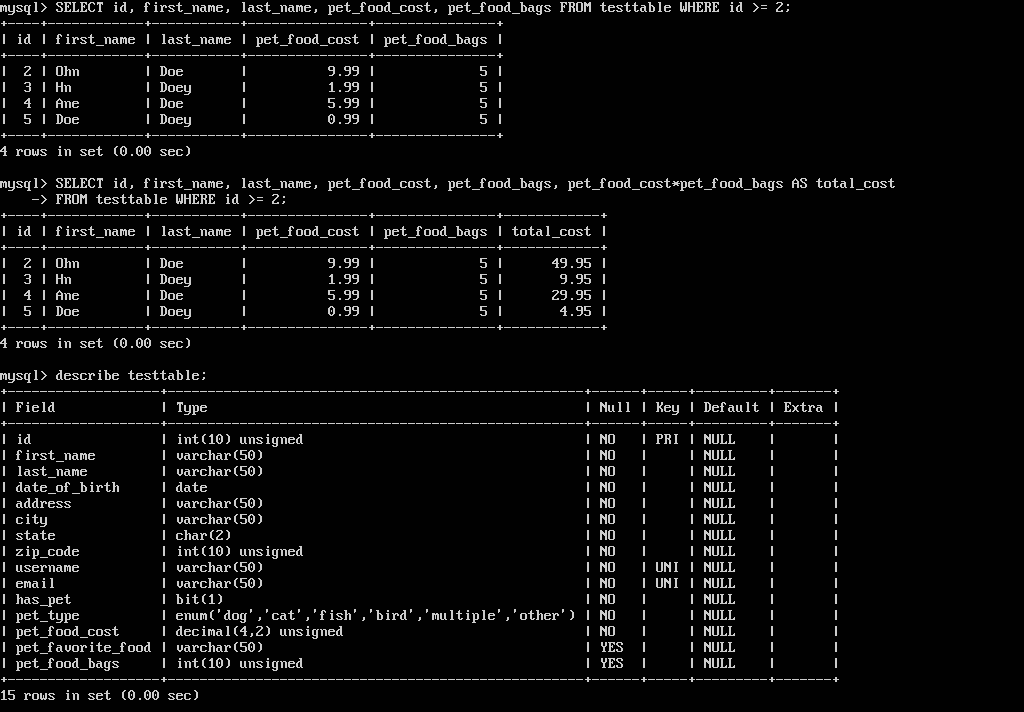
As Statement

As Abbreviation
If a calculated field is to be permanently added to the table, you will need to add the column and update the column with SET. However, you can add values to the calculated column and override it with values that do not match the calculations. The column would need to be updated continuously after each new value is entered with SET.
Input:ALTER TABLE testtable ADD total_cost DECIMAL(4,2) unsigned;
UPDATE testtable SET total_cost = pet_food_cost*pet_food_bags;
Output:
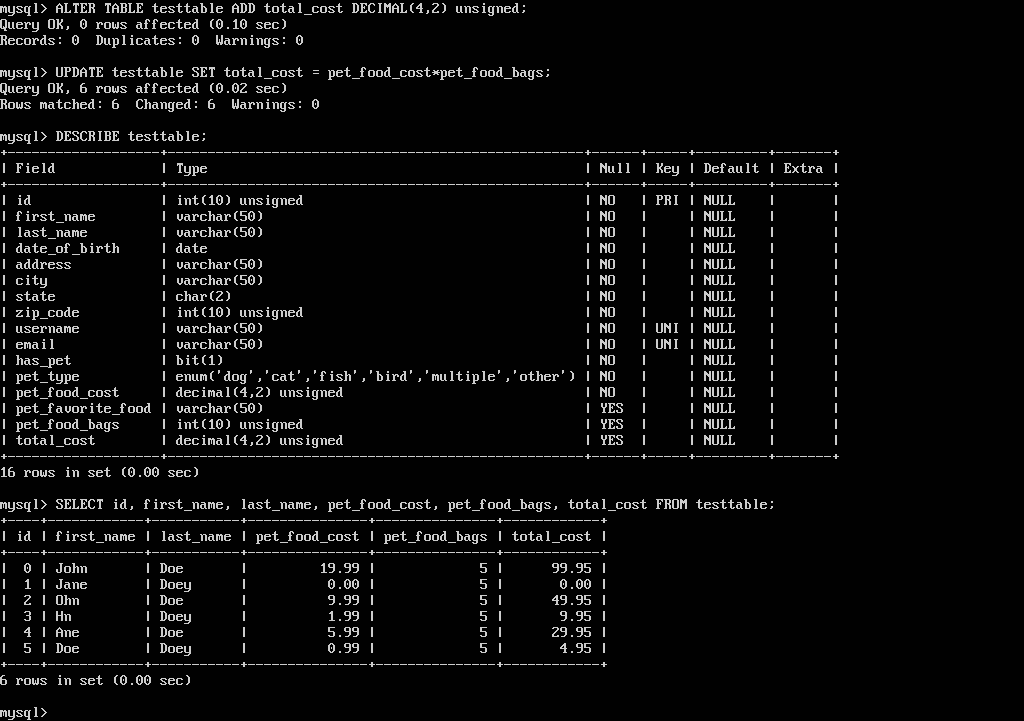
Add Calculated Column
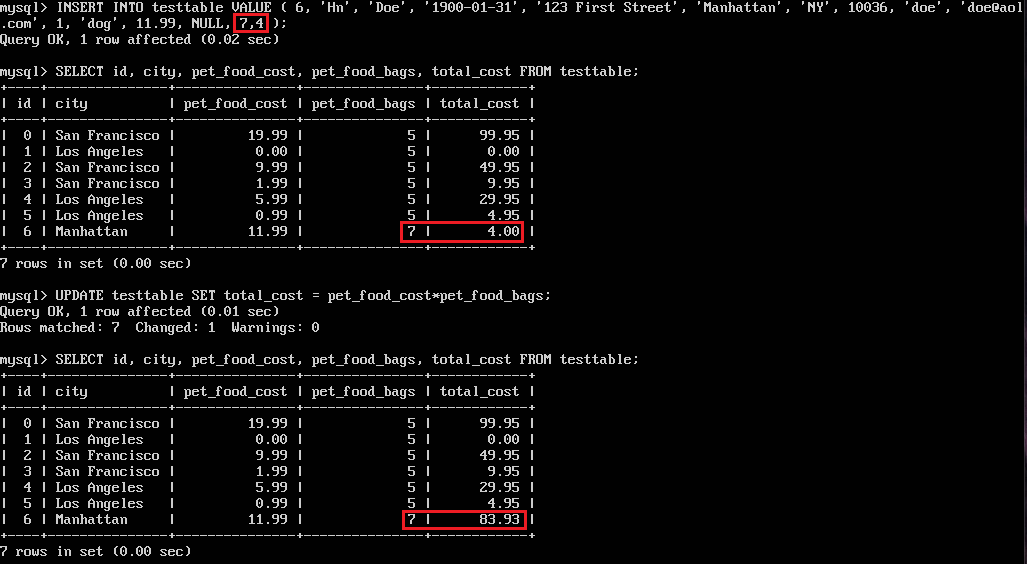
Add Calculated Column Error
Concatenating fields with the As statement can be seen below. The columns to be concatenated are separated by commas in the CONCATE function and the spaces between each column is included using ' '.
Input:SELECT first_name, last_name, address, city, state, zip_code, CONCATE(address, ' ', city, ', ', state, ' ', zip_code) AS mailing_address FROM testtable;
Output:
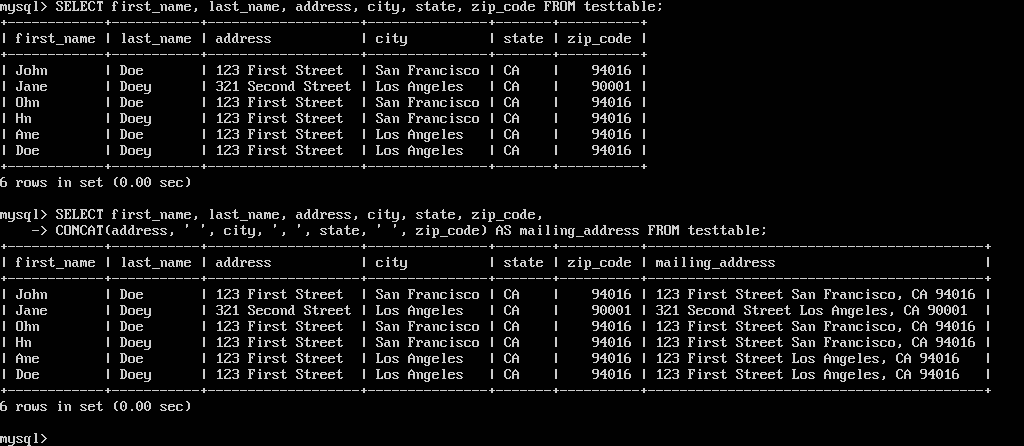
Concatenate
Math Functions
One can count the total number of rows in the whole table or of a specific column with the command below. The value NULL does not add to the count.
Input:SELECT id, pet_favorite_food FROM testtable;
SELECT COUNT(*) FROM testtable;
SELECT COUNT(pet_favorite_food) FROM testtable;
SELECT COUNT(pet_favorite_food) FROM testtable WHERE id >= 2;
Output:
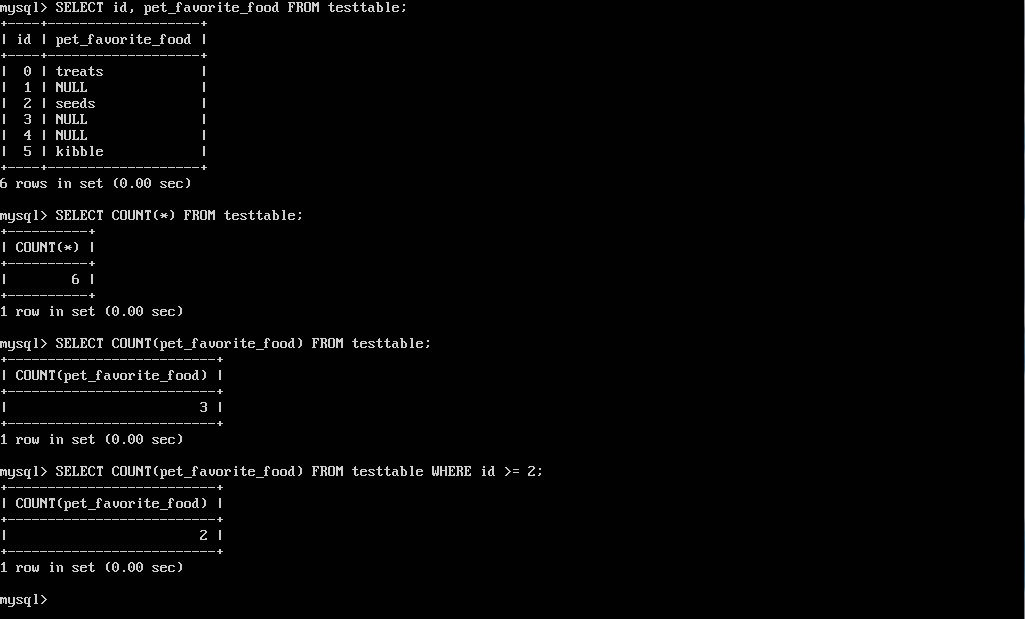
Count
Other useful math functions such as sum (SUM), average (AVG), maximum (MAX), and minimum (MIN) can be seen below. Other mathematical functions supported by MySQL can be seen here.
Input:SELECT SUM(total_cost) AS total_cost_all FROM testtable;
SELECT AVG(total_cost) AS avg_cost_greater_than_599 FROM testtable WHERE pet_food_cost > 5.99;
SELECT MAX(total_cost) AS max_cost_less_than_4995 FROM testtable WHERE total_cost < 49.95;
SELECT MIN(total_cost) AS min_cost_greater_than_000 FROM testtable WHERE total_cost > 0.00;
Output:
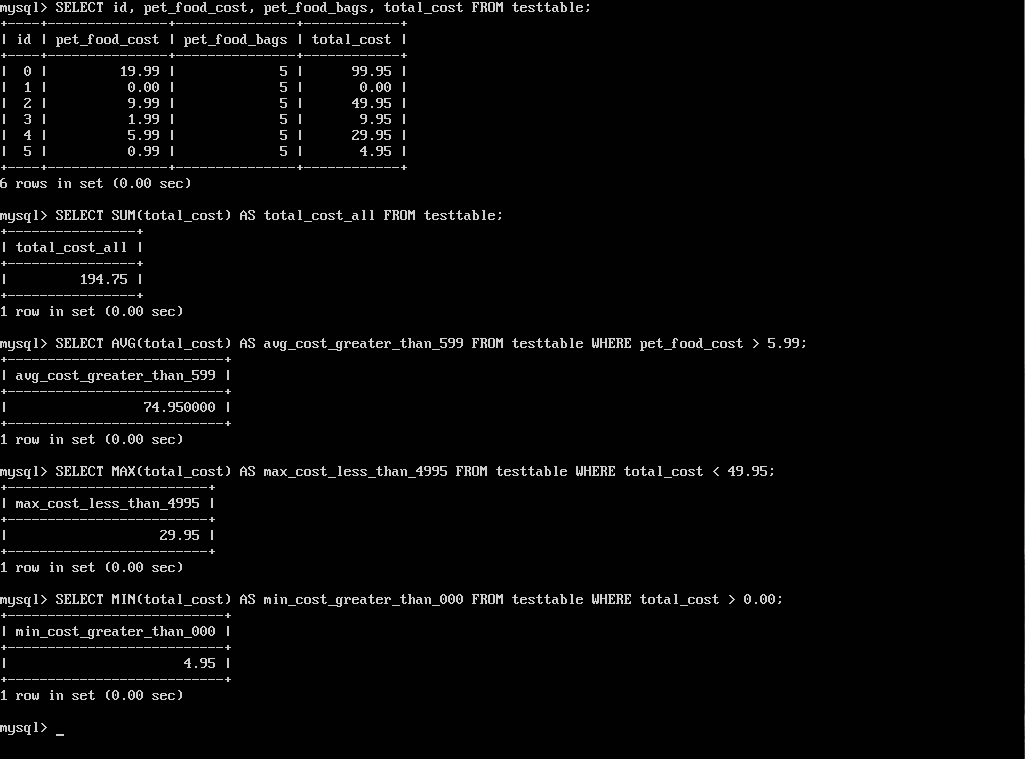
Sum, Average, Maximum, and Minimum
Group By
In the previous example, we calculated mathematical functions based on certain restrictions for rows. However, it is also useful to calculate mathematical functions based on certain row values if those values are repeated. Below is an example of using Group By to calculate the average of the total_cost based on the different cities. The counterpart of WHERE used for rows is the group command HAVING. You can also combine WHERE and HAVING.
Input:SELECT id, city, state, pet_food_cost, pet_food_bags, total_cost FROM testtable;
SELECT city, AVG(total_cost) AS avg_cost FROM testtable GROUP BY city;
SELECT city, AVG(total_cost) AS avg_cost FROM testtable GROUP BY city HAVING avg_cost > 15.00;
SELECT city, AVG(total_cost) AS avg_cost FROM testtable WHERE state = 'CA' GROUP BY city HAVING avg_cost > 15.00;
SELECT city, AVG(total_cost) AS avg_cost FROM testtable WHERE state = 'CA' GROUP BY city HAVING avg_cost > 15.00 ORDER BY avg_cost;
Output:
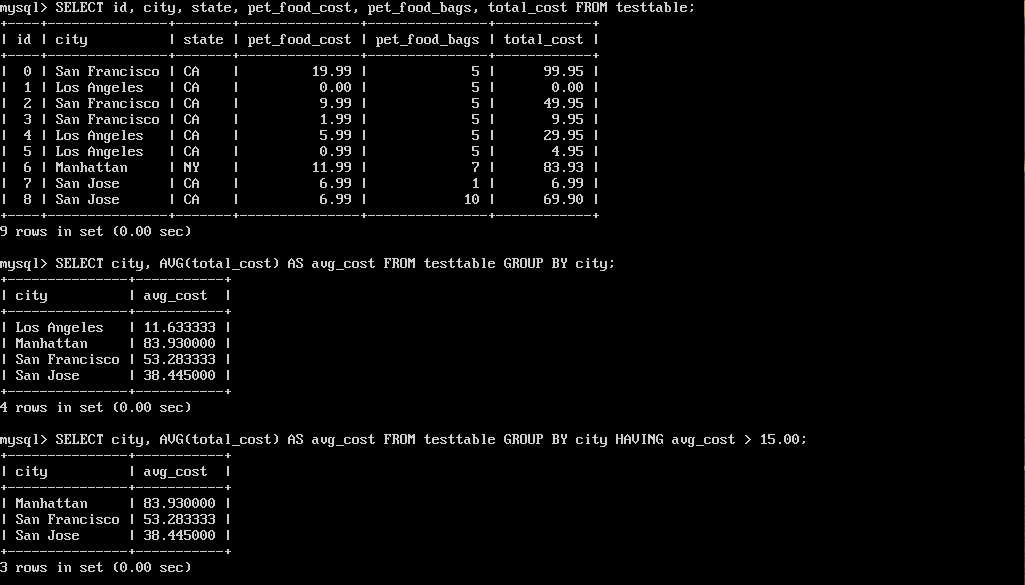
Group By

Group By Having and Where Order By
Join
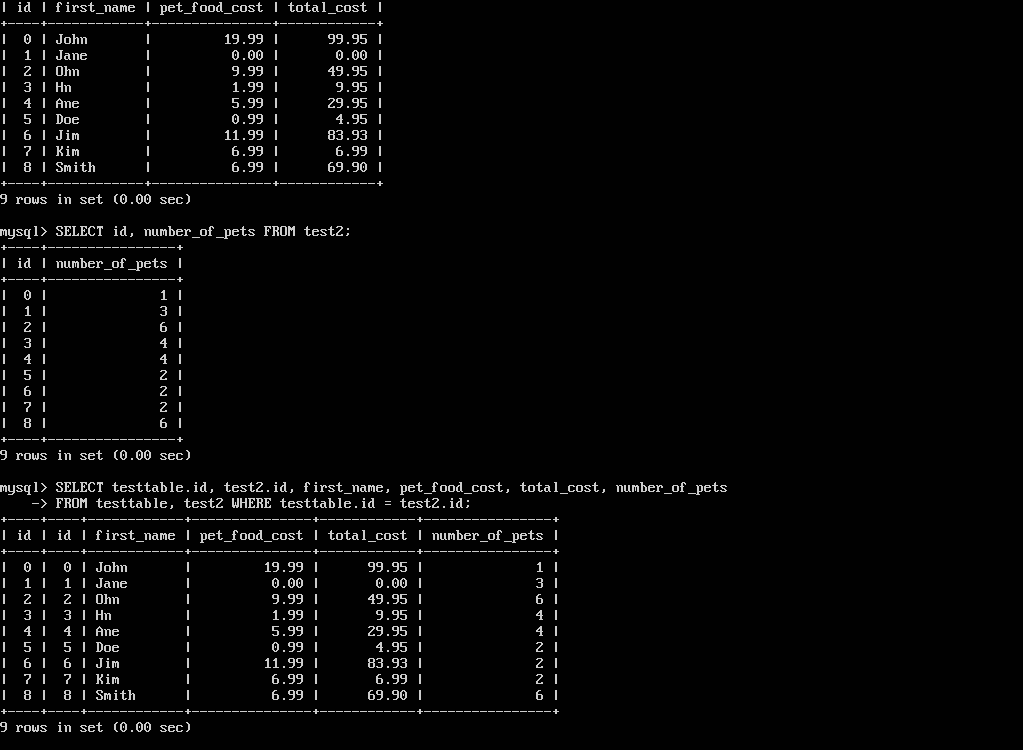
Tables can be linked or "joined" if they have the same value for certain rows across tables. This allows for data from different tables to be extracted together. Below we joined the table testtable and test2 with the column id to extract data matching both tables. Notice the TABLENAME.COLUMNAME callout as both tables can have the same columname and thus the table needs to be specified for the desired column.
Input:SELECT id, first_name, pet_food_cost, total_cost FROM testtable;
SELECT id, number_of_pets FROM test2;
SELECT testtable.id, test2.id, first_name, pet_food_cost, total_cost, number_of_pets
FROM testtable, test2 WHERE testtable.id = test2.id;
Output:
Join
Views
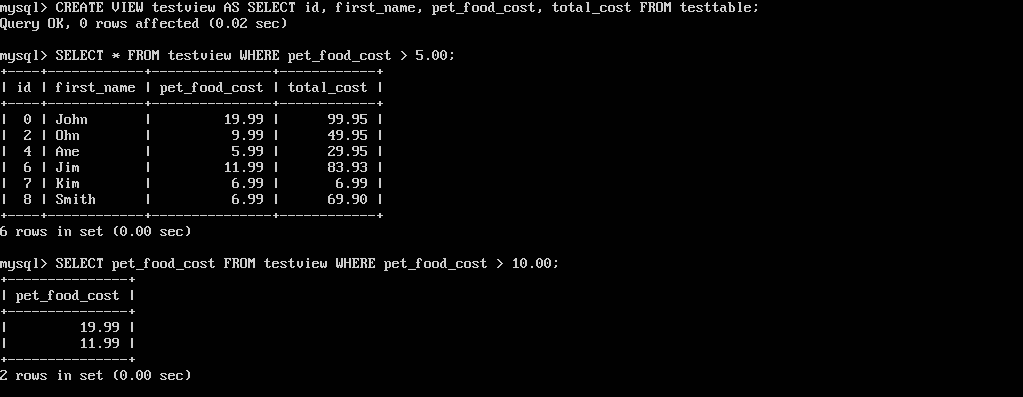
It can be very tedious if one needs to keep entering the same query over and over into the terminal. Views allow the user to save queries in order to use them with a simple statement. This is useful if a certain query is used multiple times and is very long. A view is created with CREATE VIEW viewname AS followed by the query commands that we have learned throughout the tutorial. A view is then called as if one is calling a table with FROM viewname. The query options such as SELECT and WHERE are applied to the view as if it were a table.
Input:CREATE VIEW testview AS SELECT id, firstname, pest_food_cost, total_cost FROM testtable;
SELECT * FROM testview WHERE pet_food_cost > 5.00
SELECT pet_food_cost FROM testview WHERE pet_food_cost > 10.00
Output:
Create View
The WHERE commands after calling a view are applied to the query as if AND was included after the WHERE in the view.
Input:CREATE VIEW testview2 AS SELECT first_name, pet_food_cost, total_cost, number_of_pets FROM testtable, test2 WHERE testtable.id = test2.id;
SELECT * FROM testview2 WHERE pet_food_cost > 2 AND number_of_pets > 3;
Output:

View Where
A view can be deleted with DROP VIEW viewname;.
Input:DROP VIEW testview2;
Output:

Drop View
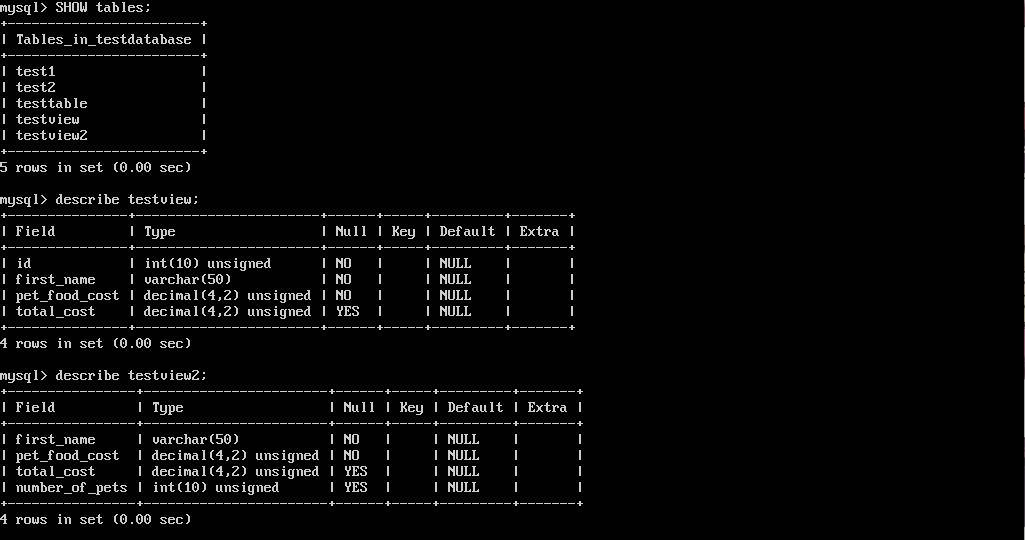
Views are displayed as tables in a database. You can see the views in a database with the same command used to see tables: SHOW tables;. You can also use DESCRIBE viewname; to see the view information.
Input:SELECT * FROM testtable;
Output:
Show Views
New Users
A new user can be created with CREATE USER 'newuser'@'localhost' IDENTIFIED BY 'newuserpassword';. Permissions are then granted to the user with GRANT permissions ON databasename.tablename TO 'newuser'@'localhost';. The types of permissions available and their definitions can be seen on the MySQL Permissions page. The asterisks in place of the databasename or tablename signifies all databases or tables, respectively.
Input:CREATE USER 'newuser'@'localhost' IDENTIFIED BY 'Newuserpassword123!';
GRANT ALL PRIVILEGES ON *.* TO 'newuser'@'localhost';
CREATE USER 'newuser2'@'localhost' IDENTIFIED BY 'Newuserpassword123!2';
GRANT ALL PRIVILEGES ON testdatabase.* TO 'newuser2'@'localhost';
CREATE USER 'newuser3'@'localhost' IDENTIFIED BY 'Newuserpassword123!3';
GRANT ALL PRIVILEGES ON testdatabase.testtable TO 'newuser2'@'localhost';
CREATE USER 'newuser4'@'localhost' IDENTIFIED BY 'Newuserpassword123!4';
GRANT SELECT ON *.* TO 'newuser4'@'localhost';
CREATE USER 'newuser5'@'localhost' IDENTIFIED BY 'Newuserpassword123!5';
GRANT SELECT, CREATE ON testdatabase.* TO 'newuser5'@'localhost';
CREATE USER 'newuser6'@'localhost' IDENTIFIED BY 'Newuserpassword123!6';
GRANT SELECT, CREATE, DELETE ON testdatabase.testtable TO 'newuser6'@'localhost';
Output:

Create New User
Users from MySQL can be seen using SELECT USER, HOST FROM mysql.user;. Users can be deleted using DROP USER 'user'@'localhost';.
Input:SELECT USER, HOST FROM mysql.user;
DROP USER 'newuser6'@'localhost';
Output:

Show and Delete Users
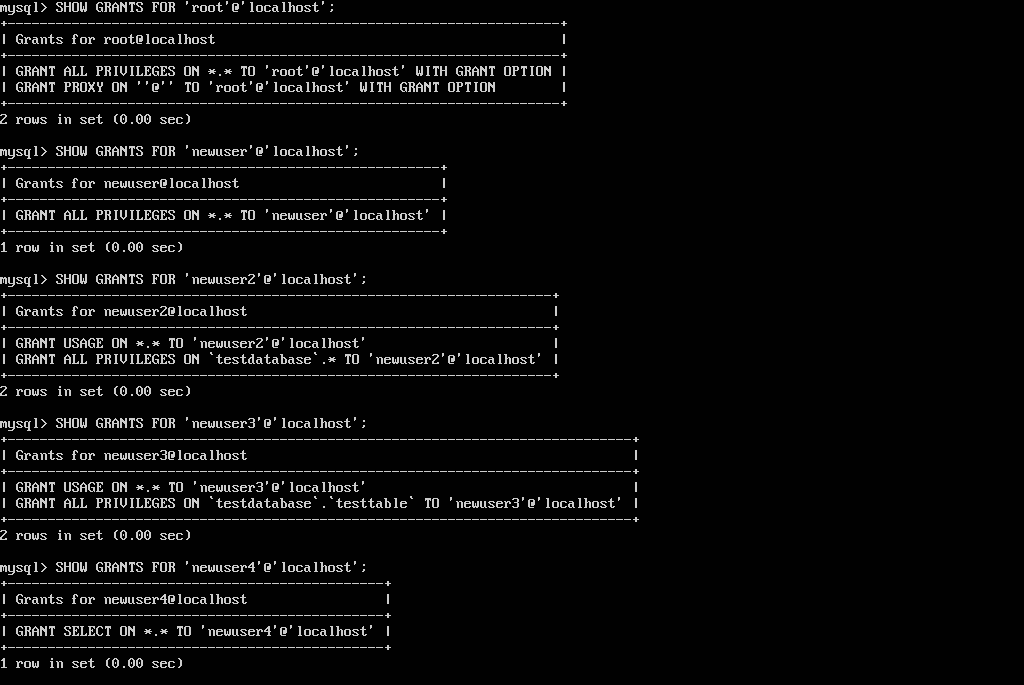
Privileges for a user can be seen with SHOW GRANTS FOR 'user'@'localhost';.
Input:SHOW GRANTS FOR 'root'@'localhost';
SHOW GRANTS FOR 'newuser'@'localhost';
SHOW GRANTS FOR 'newuser2'@'localhost';
SHOW GRANTS FOR 'newuser3'@'localhost';
SHOW GRANTS FOR 'newuser4'@'localhost';
Output:
Show Privileges
The password of a user can be changed from the default created password to a new one with ALTER USER 'user'@'localhost' IDENTIFIED BY 'newpassword';. The current user can be seen with SELECT USER();.
Input:ALTER USER 'newuser'@'localhost' IDENTIFIED BY 'NewPassword321!';
SELECT USER();
Output:
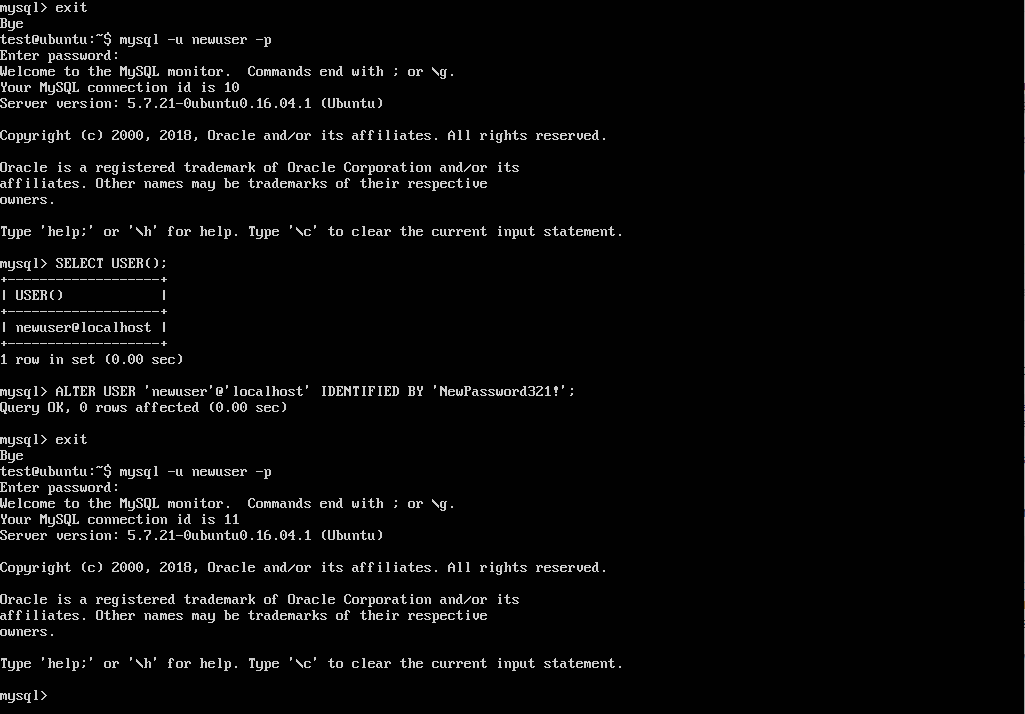
Change Password